Project details
Edit the store's name, country, currency, time zone, contact, website, MCC, slug, default success page and address, and learn what gets locked after card network enrollment.
The project is your store in Vipter. Its details appear in the checkout, in e-mails to buyers and in the customer portal, and some of them go to your payments account. Everything is on a single page, with a save button in the footer.
Before you start
- The Admin or Owner role in the project. People with the Sales role don't see the settings menu.
- A project that is not suspended.
Open the settings
Open GeneralSettings. The first tab, General, holds the cards on this page. The other tabs are Customer portal, Custom domain, E-mails and Team.
The General page has, in this order: General, Checkout, Brand & checkout, Social sharing, Selling and shipping locations and Store address. Branding, share preview and sales locations have their own pages:
- Checkout branding: logo, favicon, titles, colors and the preview of shared links.
- Sales and delivery locations: accepted countries and how the checkout asks for the address.
General
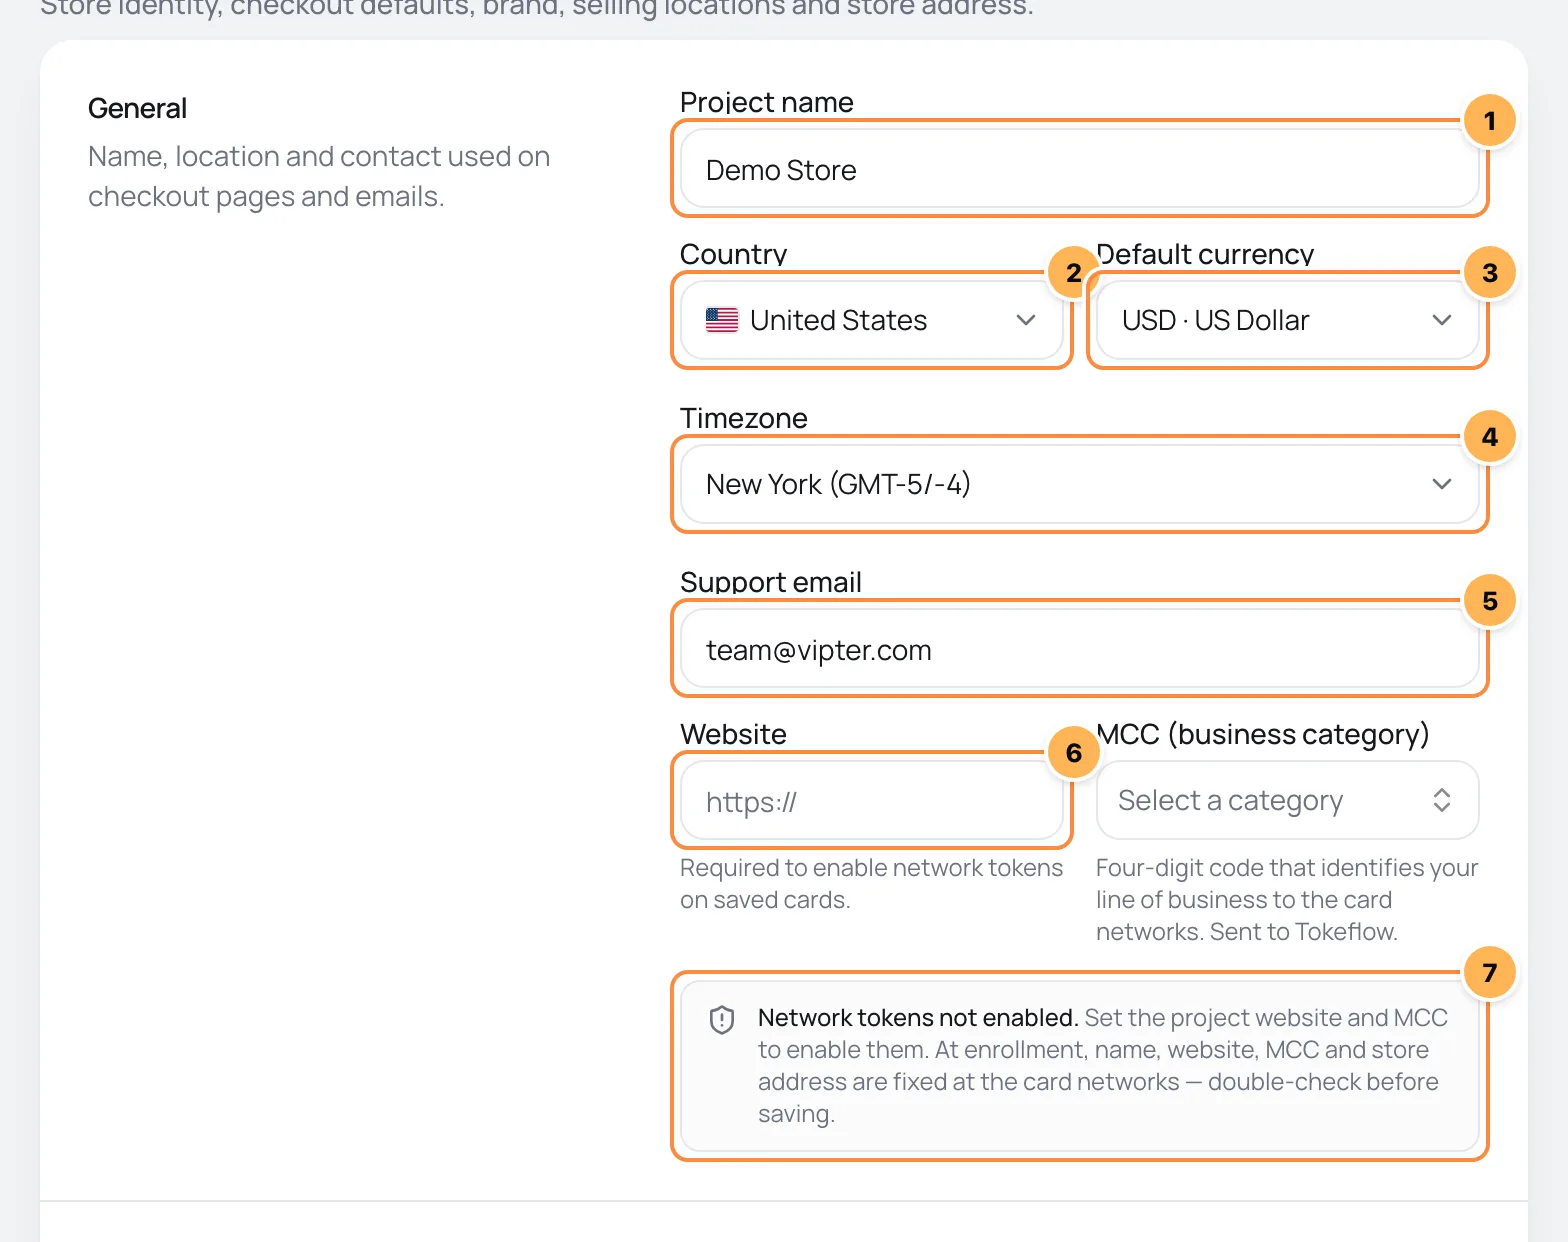
| # | Field | What it does |
|---|---|---|
| 1 | Project name | Required, 2 to 80 characters. It appears in the checkout, in e-mails to buyers, in the customer portal and in the dashboard's project list. |
| 2 | Country | The store's country. It decides which language the e-mail editor's language list starts with, the language of e-mails to the team and the Store country option in sales locations. |
| 3 | Default currency | The currency the dashboard uses to show the store's numbers and to calculate commissions. The checkout opens in it when the offer has a price in that currency. |
| 4 | Timezone | The time zone for dates and times in e-mails to buyers, such as a PIX (Brazil's instant payment) expiry. |
| 5 | Support email | The contact buyers see on the thank-you page, in the portal and in the footer of e-mails. It is also the default Reply-to and the recipient of team e-mails that have no recipients of their own. |
| 6 | Website and MCC (business category) | The store's website, starting with https://, and the 4-digit code for the line of business. Both go together to your payments account: once the website is filled in, the MCC becomes required. |
| 7 | Network tokens notice | Shows whether the store is already enrolled with the card networks to use network tokens on saved cards: Network tokens enabled. or Network tokens not enabled. |
After enrollment, website and MCC are locked
With the website and MCC filled in, the store can be enrolled with the card networks. From then on, the name, website, MCC and store address are registered with the networks. In Vipter, the website and MCC fields become read-only, with the hint Fixed at the card networks after network token enrollment., and the store address is no longer sent to the payments account. Check all four before saving.
Checkout

- Project slug: the store's public identifier. It builds the customer portal address, such as
portal.vipter.com/my-store. Use 2 to 41 lowercase letters, numbers and hyphens, starting with a letter or number. If empty, the store has no shared portal address. The slug does not change the address of payment links: each offer has its own. See Create an offer. - Default success URL: where the buyer goes after paying, when the offer has no success URL of its own.
Changing the slug changes the portal address
The old portal address stops working right away, including in e-mails already sent. If you shared the portal on your website or in e-mails, update the links after the change.
Store address
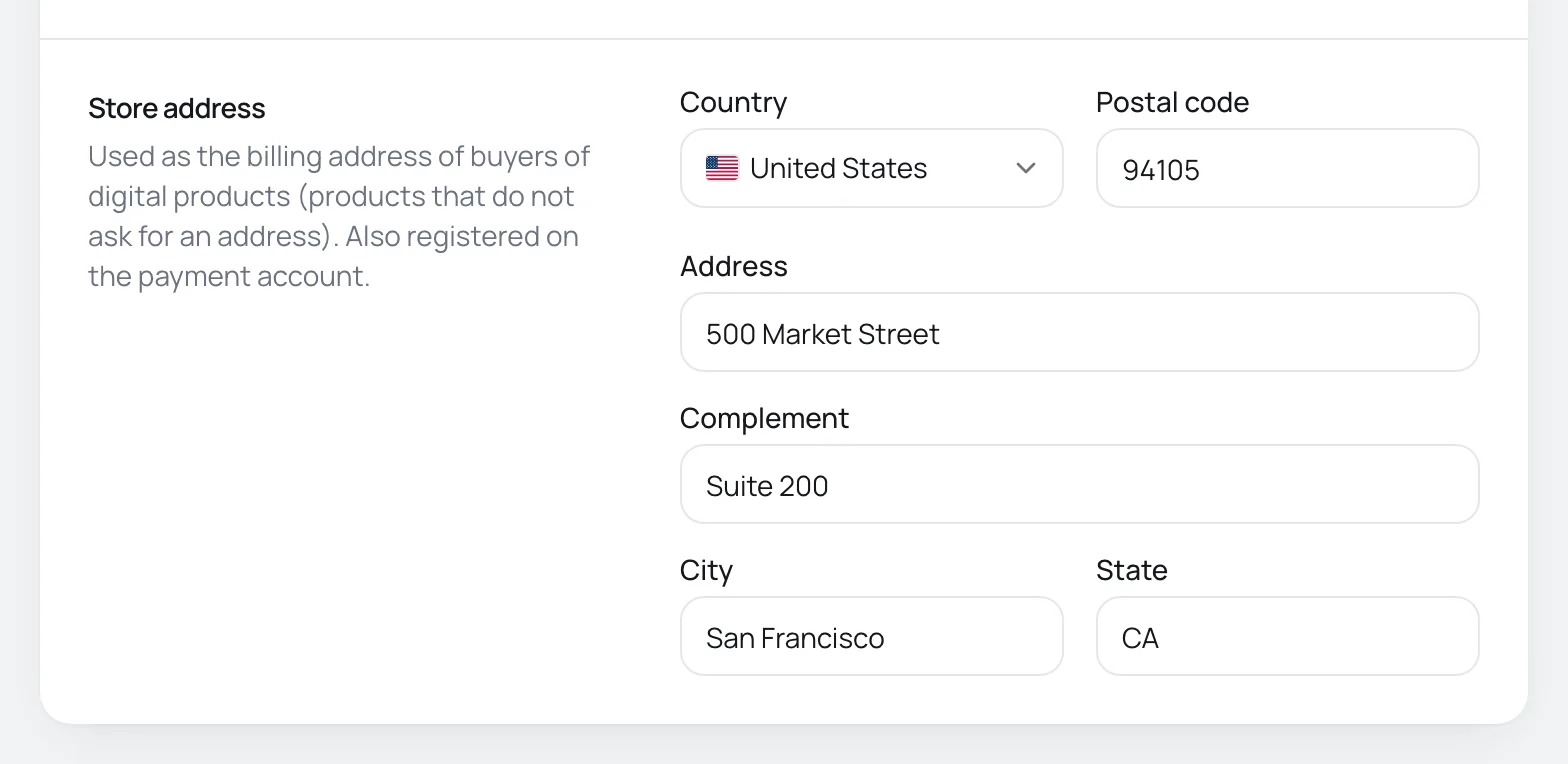
The store address is used as the billing address for buyers of digital products, the products that don't ask for an address in the checkout. It is also registered in your payments account. While it is empty and there is an active product without an address, the product list shows the notice Fill in the store address in Settings so digital-product charges carry a billing address.
The address is optional, but it is all or nothing: once you fill in one field, Country, Postal code, Address, City and State become required. Only Complement stays optional. The address also appears in the footer of e-mails to buyers.
Save
The footer bar shows Unsaved changes when something changed. Click Save changes. To go back to the saved values, click Discard.
When you save, Vipter first sends the website and MCC to your payments account. If that fails, nothing is saved and the page shows the error.
It worked if
You see the message Saved. and the footer bar goes back to normal.
What you can't change here
- Website and MCC after card network enrollment. They are read-only. To correct them, contact Vipter support.
- The project owner. It only changes through an ownership transfer.
- The plan. It belongs to the owner's account, not to the project. See Plans and limits.
- The checkout's custom domain. It is in the Custom domain tab. See Custom domain.
Common problems
-
This slug is already in use.
Another Vipter store already uses this slug. Pick another one, for example with an extra word.
-
Set the MCC together with the website: both are sent together at card-network enrollment.
You filled in the website without the MCC. Choose the business category or clear the website.
-
The project is already enrolled with the card networks; this can no longer be changed.
The store is already enrolled with the card networks. The website and MCC can no longer change.
-
Could not send the website and MCC to Tokeflow right now. Try again in a moment.
The payments account did not respond. Nothing was saved. Try again in a few moments.
-
Invalid value in the address fields
You filled in part of the address. Complete country, postal code, address, city and state, or clear them all.
-
The image is too large (max 5 MB).
A brand image is larger than 5 MB. Make the image smaller and upload it again.
What to do next
- Put your brand on the checkout in Checkout branding.
- Adjust the customer portal.
- Invite your team in Team and invitations.
Receive events in your system (webhooks)
Get a signed notice on your server for every sale, refund, subscription or new customer, with automatic retries and a delivery history.
Customer portal
Turn on the self-service portal, set its title and choose whether buyers can cancel, change plans and change their card, with a cancellation survey and message.