Connect eNotas (Nota Gateway)
Issue NFS-e and NF-e through eNotas for every paid order, test in homologation when your city hall allows it and cancel on refund.
With eNotas (now Nota Gateway) connected, Vipter sends every paid order to eNotas, which issues the invoice (nota fiscal, the Brazilian tax document) on behalf of your company. When the order is fully refunded or charged back, Vipter requests the cancellation. To understand the issuing rules, see Invoices: how they work.
Before you start
- An eNotas account with your company registered, with a digital certificate and complete fiscal data.
- The Admin or Owner role in the Vipter project.
- The tax codes agreed on with your accountant: for services (NFS-e, the electronic service invoice), the LC 116 item (the federal list of taxable services), the municipal code and the ISS (municipal service tax) rate; for goods (NF-e, the electronic goods invoice), the NCM (Mercosur goods classification) and the CFOP (fiscal operation code).
Step 1: copy the API Key and the company ID in eNotas
- In the eNotas dashboard, copy your account's API Key.
- Under Empresas (Companies), find the company that will issue the invoices and copy its ID.
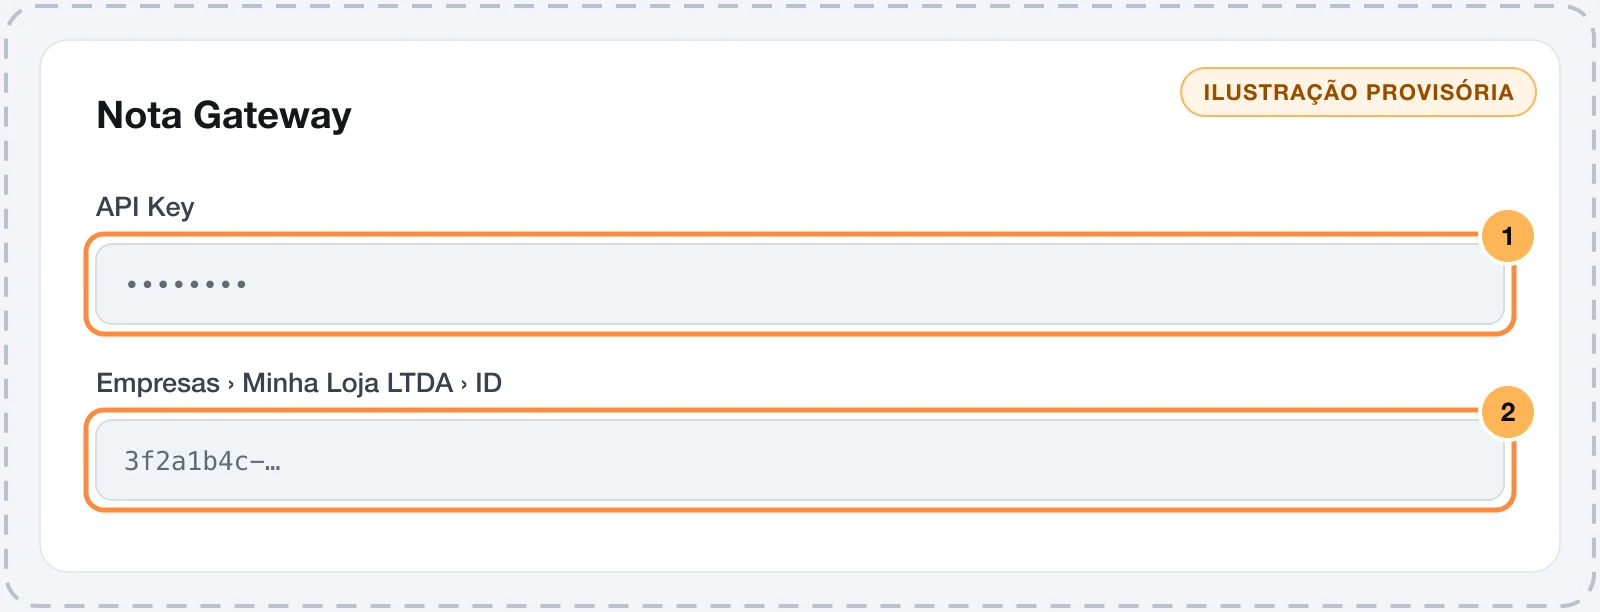
Keep the key safe
The API Key can issue and cancel invoices for the companies in your account. Paste it only into Vipter. Once saved, it is not shown again: the field only shows its last characters.
Step 2: paste the data into Vipter
- In the Vipter dashboard, open GeneralIntegrationsInvoiceseNotas (Nota Gateway).
- Under Connection, fill in the numbered fields.
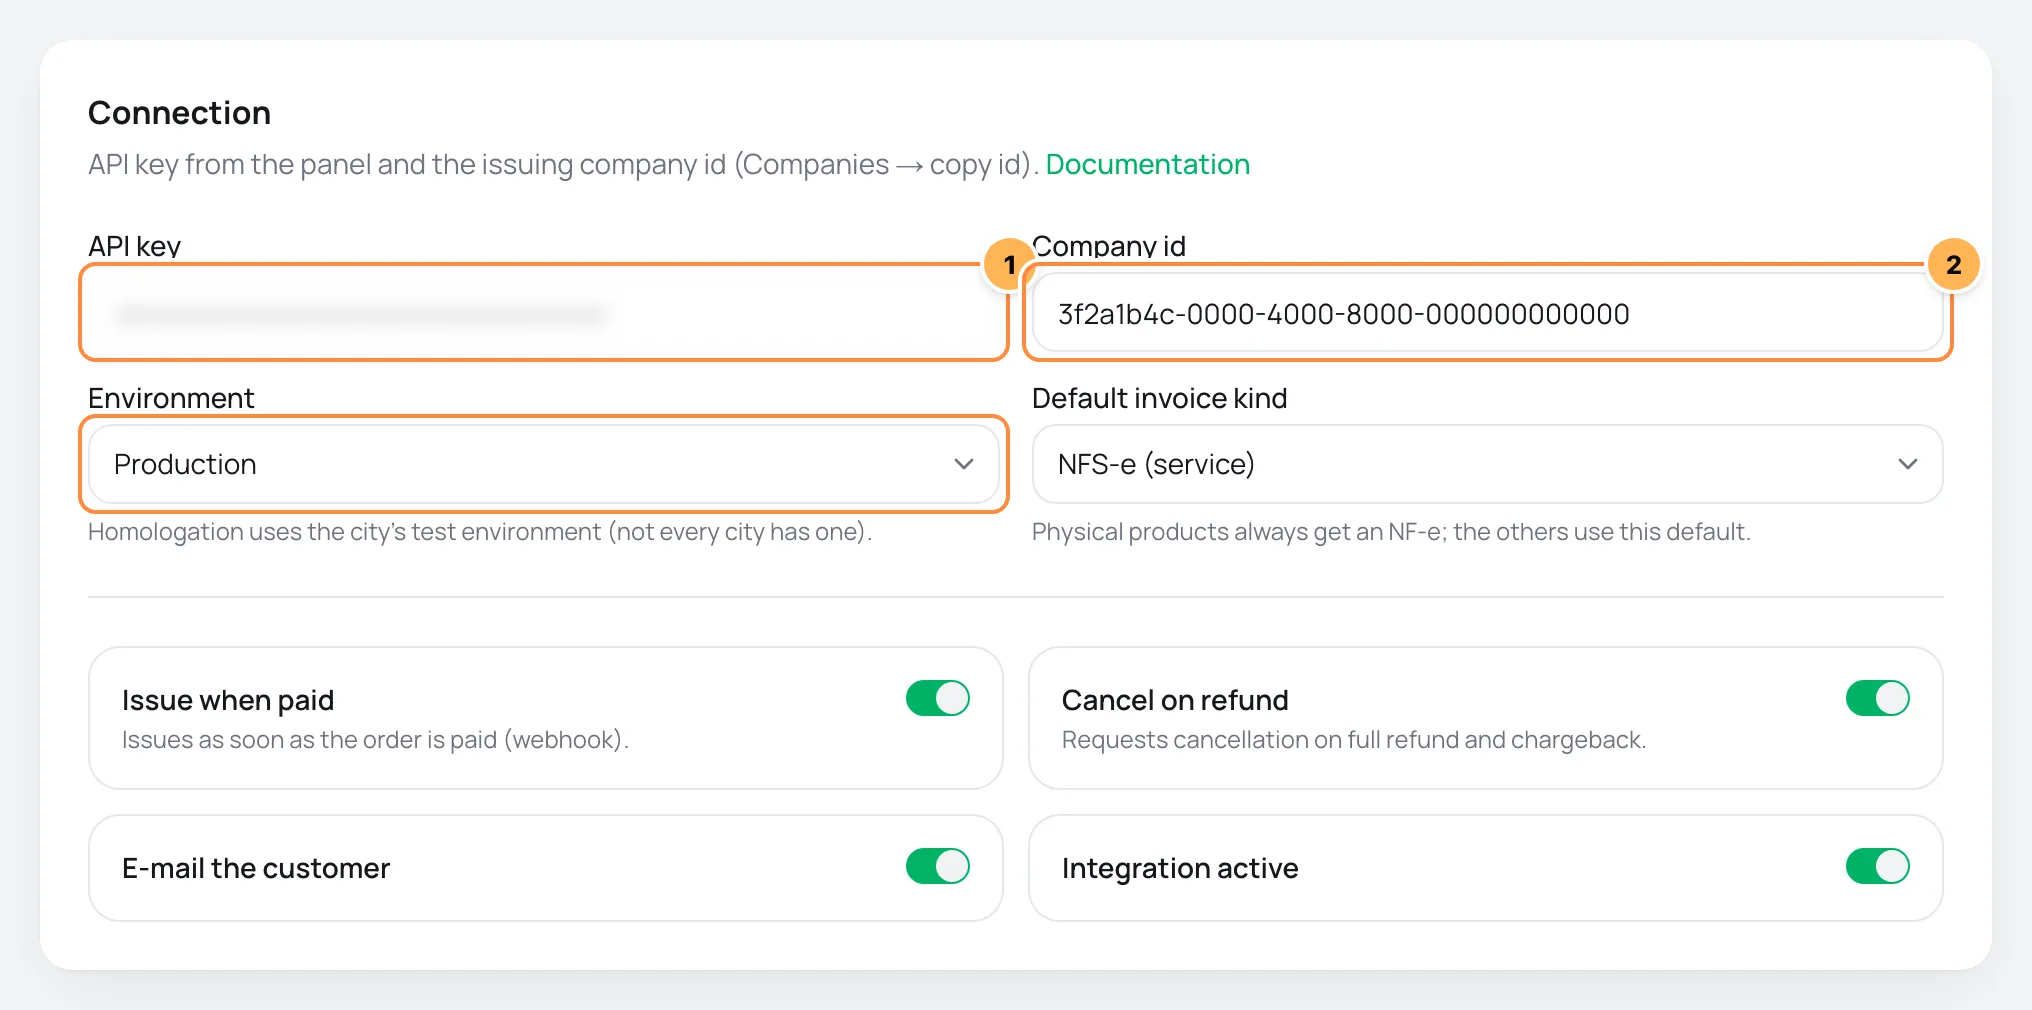
| # | Field | What to paste |
|---|---|---|
| 1 | API key | The API Key you copied in step 1. |
| 2 | Company id | The ID of the issuing company, from Empresas (Companies) in eNotas. It is a long code with dashes. |
- Under Environment, choose Sandbox / homologation for the first tests. Homologation uses the city's test environment (not every city has one).
- Choose the Default invoice kind. It applies to products without delivery. Products with delivery always generate an NF-e.
- Check the switches:
- Issue when paid: issues as soon as the order is paid.
- Cancel on refund: requests the cancellation on a full refund and on a chargeback.
- E-mail the customer: eNotas sends the invoice to the buyer's e-mail.
Step 3: fill in the fiscal defaults
In the NFS-e defaults and NF-e defaults cards, right below, fill in the codes that apply to every product. What each field asks for is in Integration fiscal defaults. The codes filled in on the product are used instead of these.
Then click Save, below the two cards.
Step 4: test
- Click Test credentials. Vipter looks up the company in eNotas with the saved key and ID. This query does not issue an invoice.
- With the environment on Sandbox / homologation, make a test purchase and follow the invoice on the order's Invoices card. See Test your store.
It worked if
The test shows Credentials are valid with your company's legal name, and the test purchase's invoice reaches Issued.
If the success message comes with "(cadastro incompleto)" (incomplete registration), the key and the ID are right, but required company data is missing in eNotas. Complete the registration there before issuing.
When the test invoice is right, go back to the integration, change the Environment to Production and save. From then on, every paid order generates a real invoice.
No homologation in your city
If your city hall has no test environment, the NFS-e in homologation fails. In that case, the first NFS-e test is a real invoice: turn off Issue when paid, issue an invoice for a real sale with the order's Issue invoice button and check it with your accountant.
How it works afterwards
- Order paid: the order ID goes as the invoice's external identifier in eNotas.
- NFS-e: the customer with address, the description, the LC 116 item, the municipal code, the CNAE (Brazilian economic activity code), the ISS rate, whether the ISS is withheld, the discount and the amount. The order number goes in the notes.
- NF-e: the nature of operation, one item per product (main product and order bumps) with CFOP, NCM, unit, origin, shipping and discount, the freight mode and the payment method. The buyer goes as a final consumer, not an ICMS (state sales tax) taxpayer, in an online sale.
- NF-e taxes: Vipter sends the ICMS with tax status 102 and PIS and COFINS with status 07. These are the codes used by Simples Nacional companies (Brazil's simplified tax regime for small businesses). If your company is under another regime, talk to your accountant before issuing an NF-e.
- Full refund or chargeback: Vipter requests the cancellation. The deadline to cancel is set by the city hall (NFS-e) or by SEFAZ, the state tax authority (NF-e).
Common problems
-
Test failed
The API Key or the company ID is wrong. The ID must be the issuing company's, not your account's. Copy it again, save and test once more.
-
The invoice shows as Failed with "the customer has no complete address"
The street, CEP (Brazilian postal code), city or state is missing. Open the customer under SalesCustomers, click Edit, complete the address and issue again from the order. If the order itself already has an incomplete address, Vipter uses the order's: issue this invoice directly in eNotas.
-
The invoice shows as Failed with "the customer has no tax id"
The NF-e requires the buyer's CPF or CNPJ (Brazilian individual or company taxpayer ID). Open the customer under SalesCustomers, click Edit, fill in the CPF or CNPJ and issue again from the order.
-
The invoice shows as Failed or Rejected with a message from eNotas
The reason shows below the status. Most of the time it is a tax code or a piece of company data. Fix it in the defaults, on the product or in the eNotas registration and issue again from the order.
What to do next
- See Invoices: how they work for what goes on each invoice and the fiscal defaults.
- Fill in the fiscal data of each product when the codes change from one product to another.