Connect Asaas
Get paid in reais with credit card and PIX through your Asaas account, with subscriptions, order bumps and one-click upsells.
Asaas processes credit cards and PIX (Brazil's instant payment) in reais, for accounts opened in Brazil. Connected to Vipter, it handles one-time sales, card installments, subscriptions, order bumps and one-click upsells. The Asaas boleto (Brazilian bank payment slip) is not available through Vipter.
Before you start
- An Asaas account with an administrator user: only that user sees the integrations menu. To try things first, create an account in the Asaas Sandbox. Sandbox and production are separate accounts, each with its own keys and webhooks.
- The Admin or Owner role in the Vipter project.
- Room in your plan for one more active connection. The providers screen shows how many you already use.
Saved cards in production depend on Asaas
Subscriptions and one-click upsells charge the buyer's saved card. In production, this only works after your Asaas account manager enables card tokenization on your account. Ask for it before you sell subscriptions.
Step 1: create the API key in Asaas
- Sign in to Asaas in the environment you are going to use: the Sandbox to test or the production account to sell.
- Open IntegraçõesChave de API (Integrations › API key) and create a new key.
- Copy the key right away: Asaas only shows the full value once. The Sandbox key starts with
$aact_hmlg_and the production key with$aact_prod_. Copy the leading$too.
Keep the key safe
The API key gives access to your Asaas account. Paste it only into Vipter. If it leaks, create a new one in Asaas and replace it in Vipter with the Replace keys button.
Step 2: create the connection in Vipter
- In the Vipter dashboard, open PaymentsProvidersAsaas.
- Click New connection. If the store has no Asaas account yet, the form is already open.
- Fill in the numbered fields:
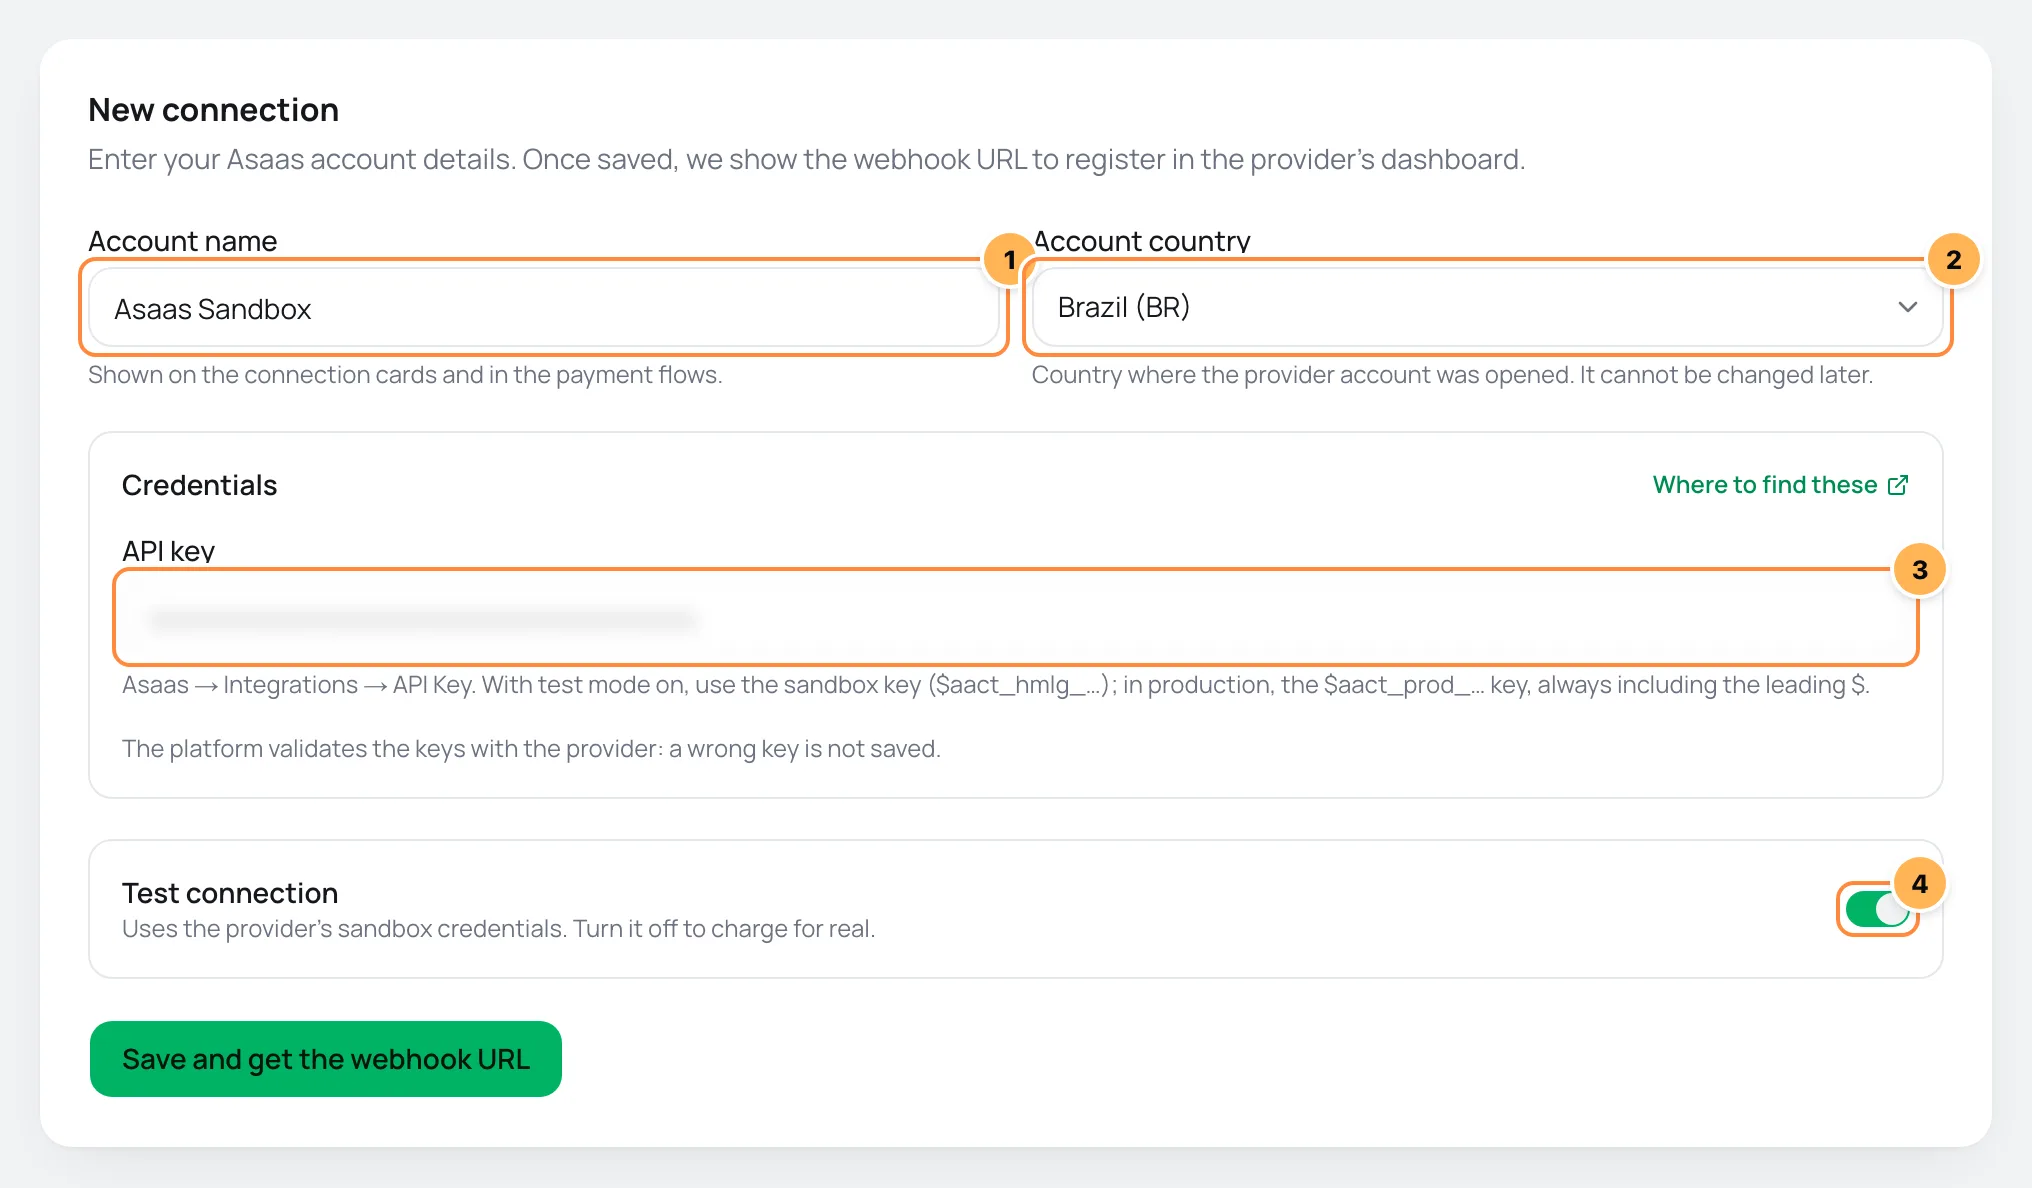
| # | Field | What to paste |
|---|---|---|
| 1 | Account name | A name to recognize the account, such as "Asaas Store". It shows up in the payment flows. |
| 2 | Account country | Brazil, already selected. Asaas only serves accounts opened in Brazil. |
| 3 | API key | The key you copied in step 1, with the leading $. |
| 4 | Test connection | On for the Sandbox key ($aact_hmlg_). Off for the production key ($aact_prod_). A key from one environment with the switch set to the other is rejected. |
- Click Save and get the webhook URL. Vipter checks the key with Asaas before saving. If it is wrong, nothing is saved and the error shows on the form.
Test mode starts on
The Test connection switch starts on so a first connection never charges anyone by mistake. To sell, create the connection with it off and the $aact_prod_ key.
If the store has no flow yet for credit card or PIX, Vipter creates those flows pointing to the new account. The store can charge right after step 4.
Step 3: create the webhook in Asaas
Through the webhook, Asaas tells Vipter what happens to each charge: PIX paid, card approved, refunds and chargebacks. Asaas does not sign its notices. Instead, every notice carries an authentication token that you set when you create the webhook. Without that token saved in Vipter, no notice is accepted, and the store never learns when a PIX is paid.
- After saving, the connection card shows the Webhook URL. Copy it.
- In Asaas, in the same environment as the key, open IntegraçõesWebhooks (Integrations › Webhooks) and click Criar Webhook (Create webhook).
- Give it a name, paste the URL you copied in item 1 and enter an e-mail address to receive the webhook's alerts.
- In the authentication token field, click Gerar token (Generate token) or type a value of 32 to 255 characters, with no spaces. Do not use the API key. Copy the token.
- Choose sequencial (sequential) delivery, so the notices arrive in the order they happened.
- Check the charge events and save the webhook.
- Back in Vipter, paste the same token on the connection card and click Save secret.
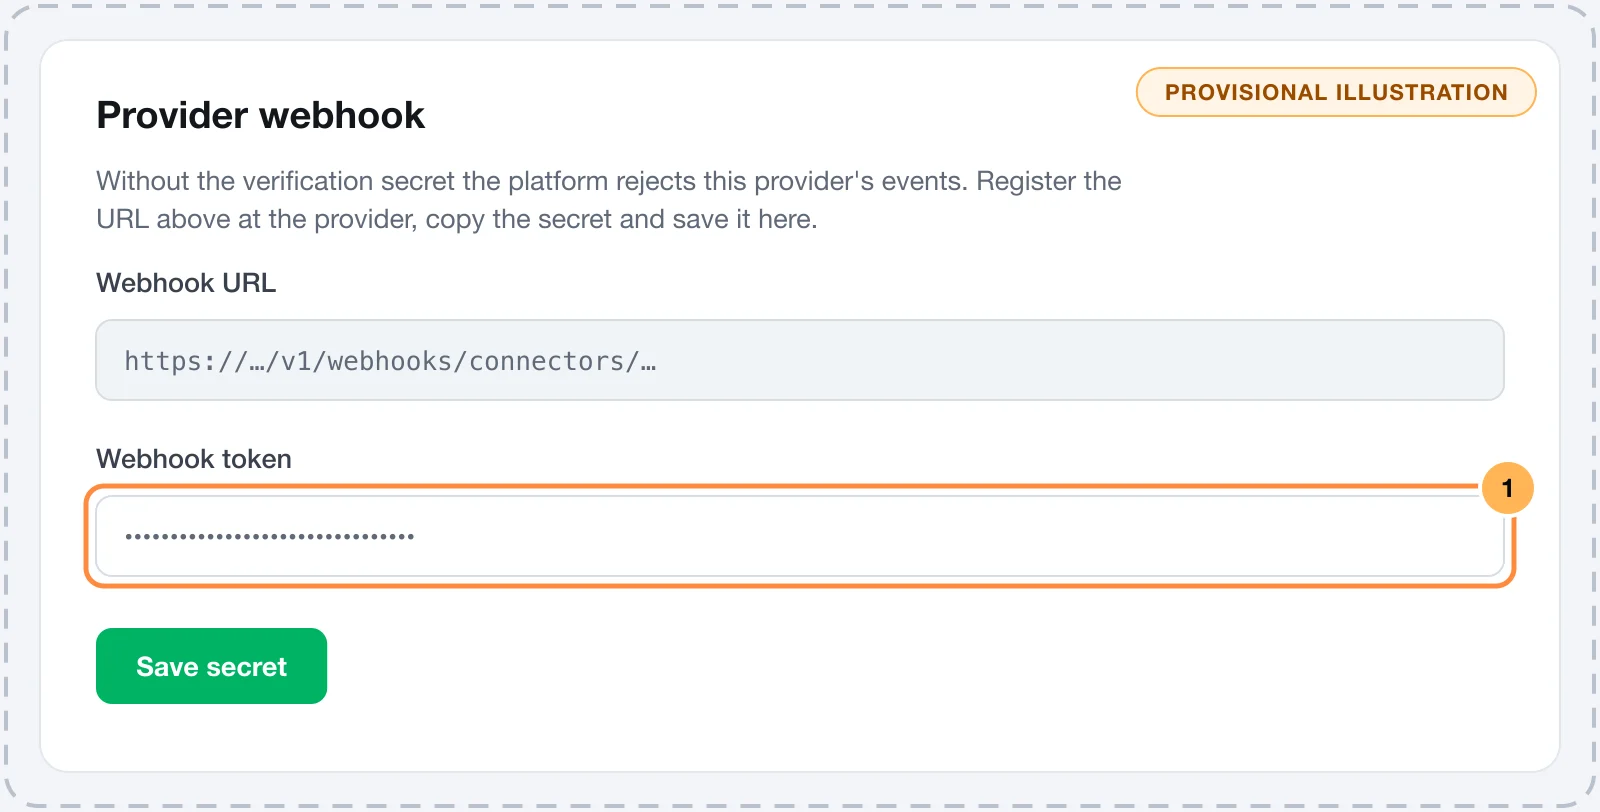
| # | Field | What to paste |
|---|---|---|
| 1 | Webhook token | The same authentication token as in item 4, 32 to 255 characters long, with no spaces. |
Step 4: test the connection
- On the connection card, click Test. Vipter calls Asaas with the saved key.
- Make a test purchase on an offer's checkout, using the Sandbox connection:
- Card: in the Sandbox, any valid dummy card number with a future date and a three-digit CVV is approved. The cards
5184 0197 4037 3151(Mastercard) and4916 5613 5824 0741(Visa) simulate a decline. - PIX: the Sandbox account needs a registered PIX key. Generate the PIX on the checkout and confirm the charge's payment in the Asaas Sandbox interface.
- Card: in the Sandbox, any valid dummy card number with a future date and a three-digit CVV is approved. The cards
It worked if
You see the message Connection OK., the card shows Verification secret configured. and the test purchase appears in SalesTransactions as paid.
Common problems
-
Your plan allows N active connector(s). Upgrade to add more.
Your plan reached its limit of active connections. Deactivate a connection you no longer use or change plans in Vipter plan.
-
Invalid value on the key field
The key must start with
$aact_. Copy the whole key again, with the leading$. -
Invalid value on the token field
The token is shorter than 32 characters or has spaces. Use the token Asaas generated and save the same value on both sides.
-
Asaas rejected the key
The key is from the other environment: a
$aact_hmlg_key needs the Test connection switch on, and a$aact_prod_key needs it off. The key may also have been deleted or replaced in Asaas. -
Without the verification secret the platform rejects this provider's events. Register the URL above at the provider, copy the secret and save it here.
The webhook token was not saved in Vipter. Go through step 3 again.
-
The PIX was paid, but the order is still pending
The Asaas notice did not arrive or was rejected. Check that the webhook was created in the same environment as the connection, that the URL is the one on this connection's card, and that the token in Asaas matches the one saved in Vipter.
What to do next
- Set how many installments the store offers and with what interest in installments.
- Review the payment flows to decide which account charges each payment and which one is the fallback.