Create and edit a product
Add what you sell with a name, type, image, address and fiscal data, and get to know the tabs on the product page.
The product is what you sell: a course, a mug, a plan of your software. The price and the payment link live in the offers, which you create inside the product. A product can have several offers, such as a monthly plan and a yearly one.
Before you start
- The Admin or Owner role in the Vipter project.
- Knowing the product's type. If you're unsure, see Product types.
- For products with delivery: at least one active shipping method in CatalogShipping.
Step 1: open the form
- In the Vipter dashboard, open CatalogProducts.
- Click New product.
Step 2: fill in the details
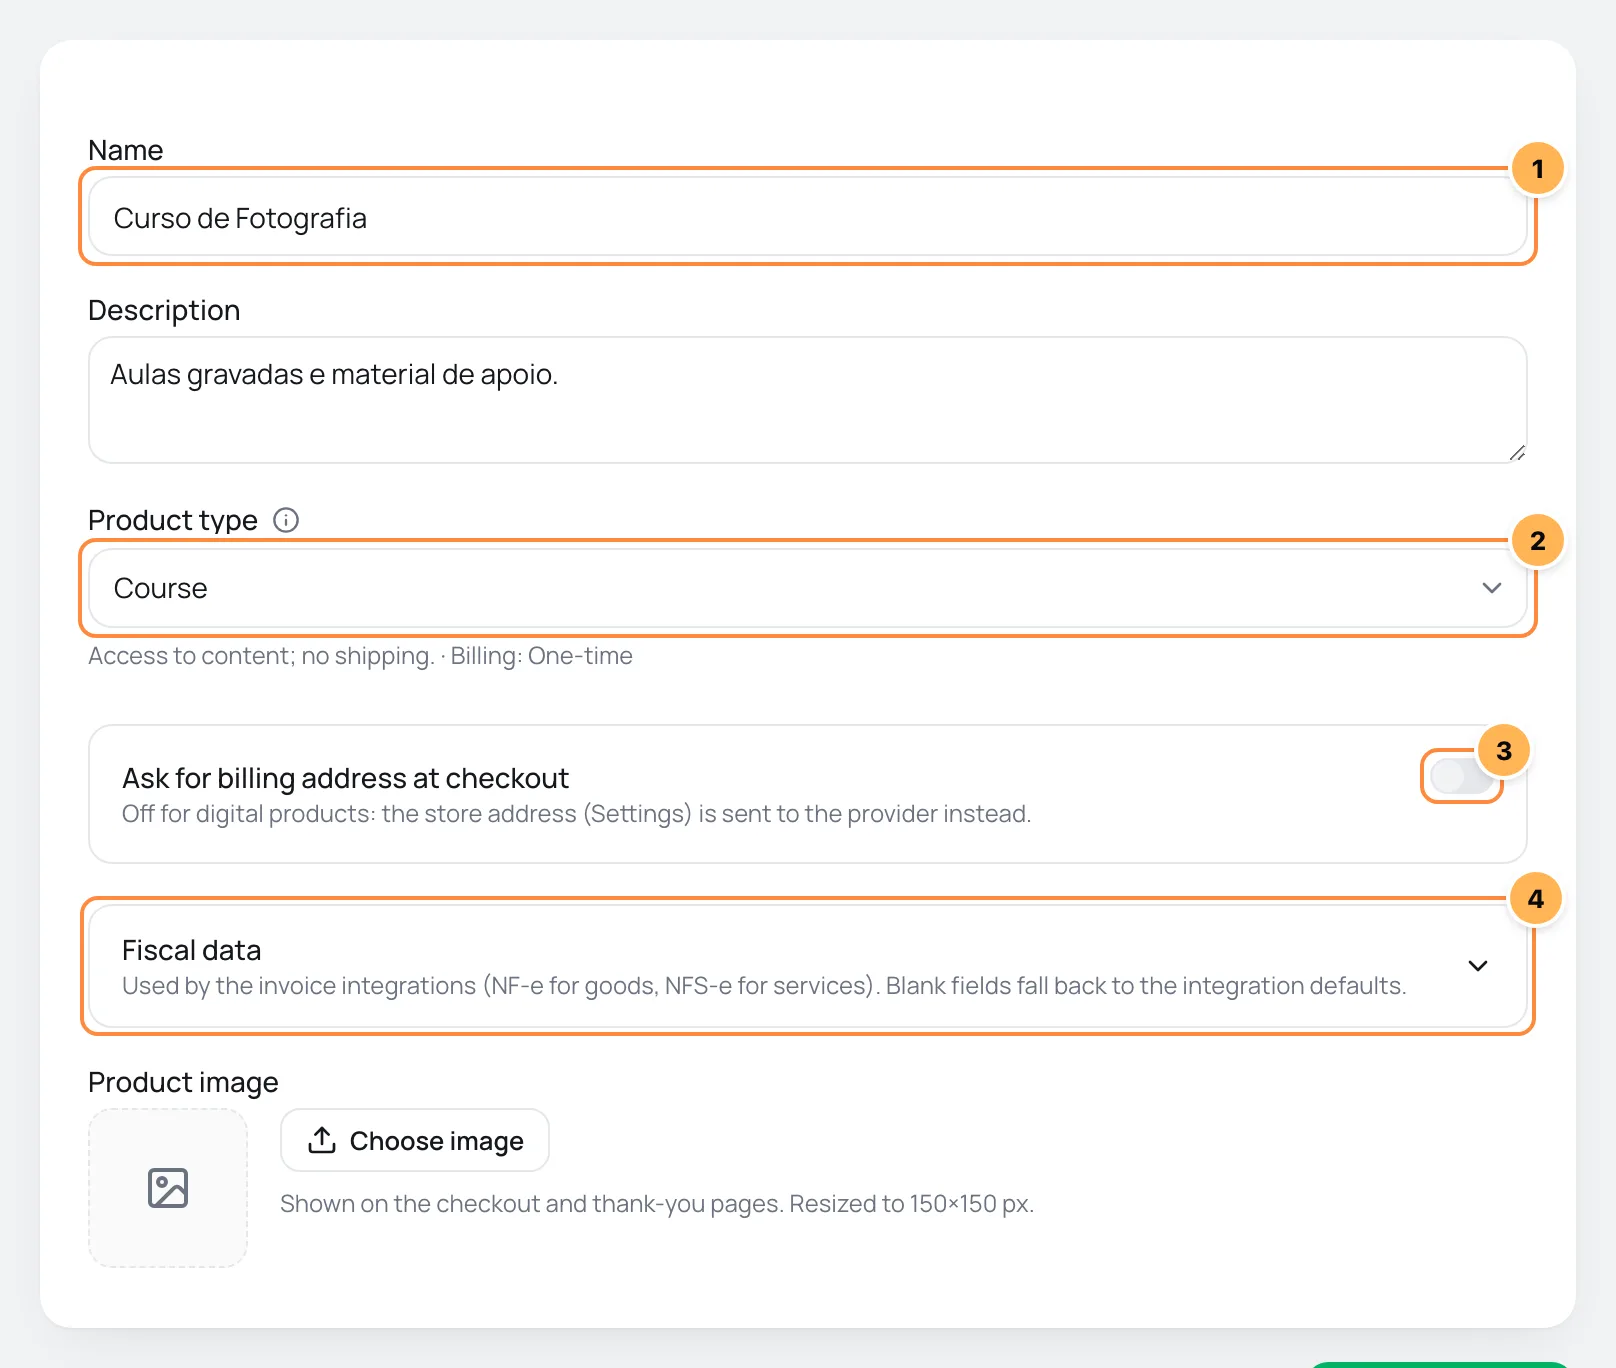
- Name: the name the buyer sees at checkout and on the thank-you page. Use 2 to 120 characters. The Description, right below, is optional.
- Product type: decides billing, address, shipping, downloads and the invoice. Billing (one-time or recurring) can't change after you create the product.
- Ask for billing address at checkout: shows for types without delivery. When off, the checkout doesn't ask for an address and Vipter uses the Store address from the settings. Turn it on if you need the buyer's billing address.
- Fiscal data: codes used by invoice integrations. See Fiscal data below.
At the end of the form is the Product image, which is optional. Upload a PNG, JPEG or WebP of up to 5 MB. Vipter shrinks the image to fit 150×150 px and shows it at checkout and on the thank-you page.
The form changes with the type:
- Types with delivery replace item 3 with the Shipping block: weight in grams, length, width and height in centimeters, and the Shipping class, which changes the shipping cost in methods that charge by class.
- Subscriptions get the Product family field, which is optional. Use a family only when the subscriber can switch from this plan to another (upgrade and downgrade). When you pick a family, also enter the Tier order: the higher number is the higher plan.
Step 3: create the product
Click Create product. Vipter opens the product page, still without offers.
It worked if
The product shows in CatalogProducts with the type you chose and the Active status.
A product without an offer has no payment link yet. The next step is to create an offer.
The product page
Click the product's name in the list to open its page. The tabs change with the type:

- Offers: the product's offers, with the cycle, prices, payment link and status of each one. The New offer button is here.
- Plan change: subscriptions only. Sets the product's family and plan level, which let the subscriber change plans.
- Downloads: Digital product and Course only. The links to the files delivered after payment.
- Edit details: the same form as when you created it, to change the details.
- Tracking: which conversion accounts (Meta, Google and others) receive the events for this product's sales.
Edit a product
- On the product page, open the Edit details tab.
- Change what you need and click Save product.
You can change the name, description, image, address, shipping and fiscal data. The Product type field only offers types with the same billing as the product: a one-time product can't become a subscription, nor the other way around. A subscription's family and level are on the Plan change tab.
Fiscal data
The Fiscal data section starts collapsed. Click it to open it. The fields depend on the type:
- Types with delivery (NF-e, Brazil's electronic invoice for goods): NCM (Brazilian product classification code), CFOP (Brazilian tax operation code), Unit, Origin (0–8) and CEST (Brazilian tax substitution code).
- Other types (NFS-e, Brazil's electronic invoice for services): LC 116 item, Municipal code, CNAE (Brazilian business activity code) and ISS rate (%) (ISS is Brazil's municipal tax on services; LC 116 is the federal list of services).
- All: Invoice description, the text that goes on the invoice.
Everything is optional. A blank field uses the default set in the invoice integration, in GeneralIntegrationsInvoices. Check the codes with your accountant.
Archive a product
At the top of the product page, click Archive and confirm. The dashboard warns you: Archive this product? Its offers stop accepting new purchases. The product's status changes to Archived. To undo it, click Unarchive.
Common problems
-
Creating new items is paused until the plan payment is resolved.
The payment for your Vipter plan is overdue. Settle it in Vipter plan to create products and offers again. The ones that already exist can still be edited.
-
Enter the plan level in the family.
You picked a family for the subscription but didn't enter the Tier order. Fill in the number or set the Product family field to No family (standalone).
-
No active shipping method: set up Shipping before selling this product.
The product has delivery, but the store has no active shipping method. Create one in CatalogShipping.
-
Fill in the store address in Settings so digital-product charges carry a billing address.
Shows in the product list when a product doesn't ask for an address and the store has no address saved. Fill in the Store address in GeneralSettingsGeneral.
What to do next
- Create an offer with a price and a payment link.
- For digital products and courses, add the files on the Downloads tab.