Connect via SMTP
Send your store's e-mails through any SMTP server, such as Amazon SES, Brevo, Zoho Mail or Google Workspace, using your domain.
With SMTP, the store sends its e-mails through any service that offers an SMTP server with a username and password. This is the way to use Amazon SES, Brevo, Zoho Mail, Google Workspace and your domain's e-mail hosting. Before you start, it helps to read how transactional e-mail works.
Before you start
- The SMTP server address, port, username and password from your e-mail service.
- A sender on a domain verified with that service.
- The Admin or Owner role in the Vipter project.
No delivery status
SMTP servers do not tell Vipter whether an e-mail was delivered, bounced or marked as spam. The history only shows Sent, and addresses that do not exist are not added to the blocked list on their own. If you need that control, choose SendGrid, Postmark, Mailgun or Resend instead.
Step 1: get the server details
Each service has its own address and its own way of generating the password. Vipter accepts ports 587 and 2525 (with STARTTLS) and 465 (with SSL).
- Server:
email-smtp.<region>.amazonaws.com, with the region where SES is set up, such asemail-smtp.us-east-1.amazonaws.com. - Port: 587 or 465.
- Username and password: the SMTP credentials created in the SES console. They are different from AWS access keys.
- Verify the sender's domain as an identity in SES. While the account is in the SES sandbox, it only sends to verified addresses: request production access before you sell.
Your e-mail service's help page always has these details; search for "SMTP".
Step 2: connect in Vipter
- In the Vipter dashboard, open GeneralIntegrationsE-mailSMTP.
- Under Sender and credentials, fill in the numbered fields:
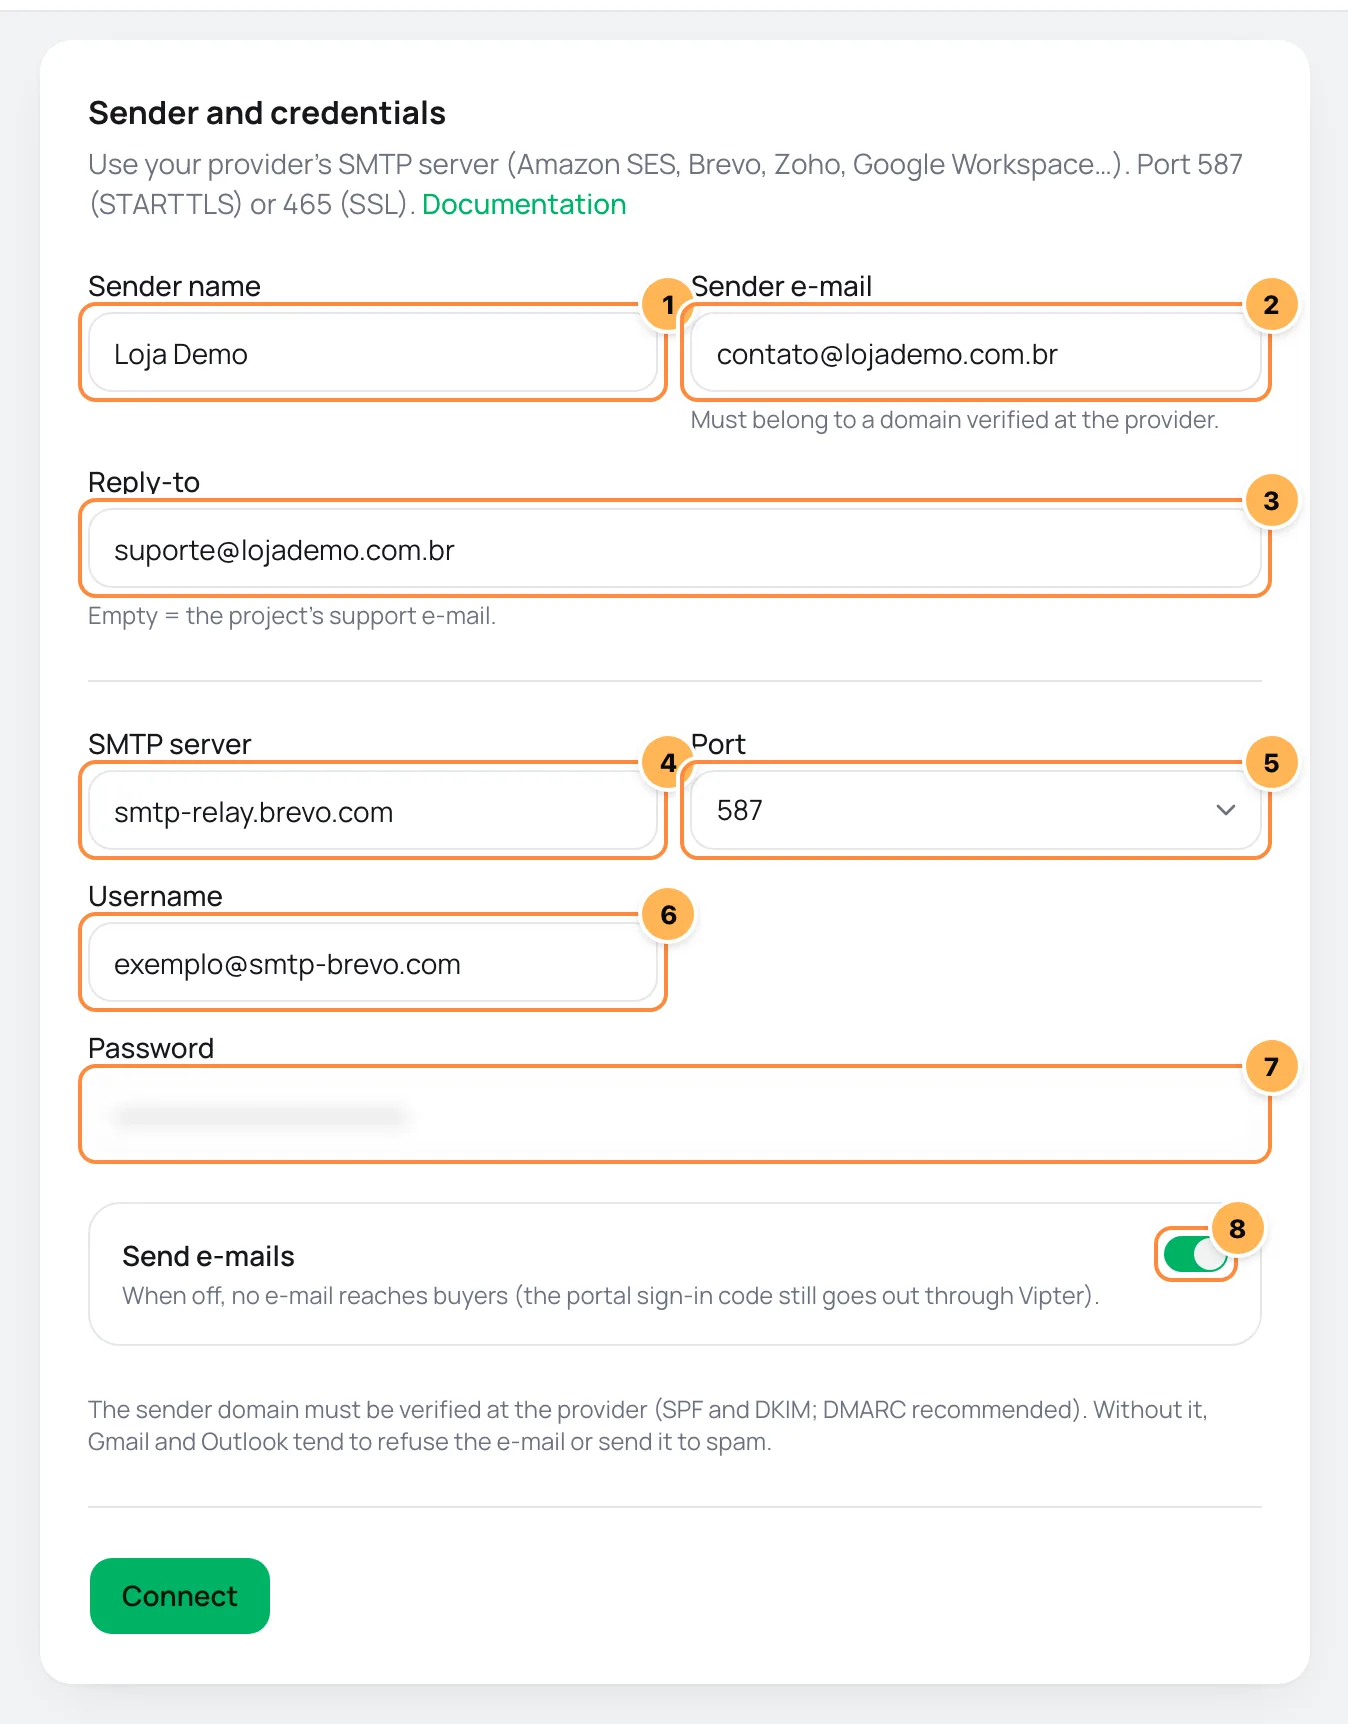
| # | Field | What to paste |
|---|---|---|
| 1 | Sender name | The name the buyer sees in the inbox, such as the store name. If blank, the project name is used. |
| 2 | Sender e-mail | An address the server accepts as sender, on a domain verified with it. |
| 3 | Reply-to | Where the buyer's replies go, such as your support e-mail. If blank, the project's support e-mail is used. |
| 4 | SMTP server | The server address from step 1, such as smtp-relay.brevo.com. Just the name, without smtp:// or a port. IP addresses are not accepted. |
| 5 | Port | 587 for most services. Use 465 if the service asks for SSL, or 2525 if 587 is blocked. |
| 6 | Username | The SMTP username from step 1. |
| 7 | Password | The SMTP password or key from step 1. Once saved, leave it blank to keep the current one. |
| 8 | Send e-mails | Leave it on. When off, no e-mail goes out to buyers. |
- Click Connect. Vipter connects to the server and signs in with the username and password, without sending anything.
Step 3: test
- Under Send test e-mail, check the address in Send to and click Send test e-mail.
- Open that address's inbox.
It worked if
You see the message Test e-mail sent to you@yourcompany.com., the status changes to Working and the e-mail arrives outside spam.
With SMTP, the domain card shows The provider does not report verification for this key: Vipter only checks SPF and DMARC in the DNS. See verify the sending domain.
Common problems
-
Enter a valid domain (e.g. smtp.yourdomain.com).
The server was typed with
smtp://, a port, a space or as an IP address. Enter just the name, such assmtp.gmail.com. -
That server points to an internal address and cannot be used.
The name points to an internal network address, which Vipter cannot reach. Use your service's public SMTP server address.
-
The check fails with
Invalid loginor code535Wrong username or password. On Google Workspace and on Zoho with two-factor authentication, use an app password. On Brevo, use the SMTP key, not the API key.
-
The check fails with a timeout or connection refused
The port is not the one the server uses, or the server blocks outside connections. Switch between 587 and 465 and check the address.
-
The test arrives, but from another sender, or the server refuses it
The server does not accept the Sender e-mail. Use the account's own address, one of its aliases, or an address on a domain verified with the service.
What to do next
- Verify the sending domain and add a DMARC record.
- Review which e-mails go out and the text of each one in GeneralSettingsE-mails.
Connect Resend
Send your store's e-mails through your Resend account, with your domain, and get each message's delivery status in Vipter.
Verify the sending domain (SPF, DKIM and DMARC)
Learn about the DNS records that prove your store's e-mails are yours, where to get each one and how to read Vipter's domain check.