Connect Cademí
Grant access in Cademí when the sale is approved and remove it on refund, chargeback or subscription cancellation.
With Cademí connected, every approved sale of an offer with a rule is sent to Cademí as an approved purchase of the delivery you chose. When the sale is refunded, charged back, or the subscription is cancelled or expires, Vipter sends the same purchase as cancelled and Cademí removes the access. To understand the rules in general, see How member areas work.
Before you start
- A school in Cademí with administrator access and the courses already created.
- The Admin or Owner role in the Vipter project.
- A product with at least one offer in Vipter, usually of the Course type.
Step 1: create the Customizado delivery in Cademí
In Cademí, all access goes through a delivery (entrega). Vipter uses the Customizado (Custom) delivery type.
- In Cademí, open VitrinesEntregasNova Entrega (Showcases › Deliveries › New delivery) and choose Customizado (Custom).
- Give it a name and an ID that are easy to recognize, such as
Curso X - 3 MesesandCURSOX3MESES. Keep the ID: it goes in the rule in step 4. - Choose Venda Única (One-time sale) or Assinatura (Subscription), turn on the courses this delivery grants and save.
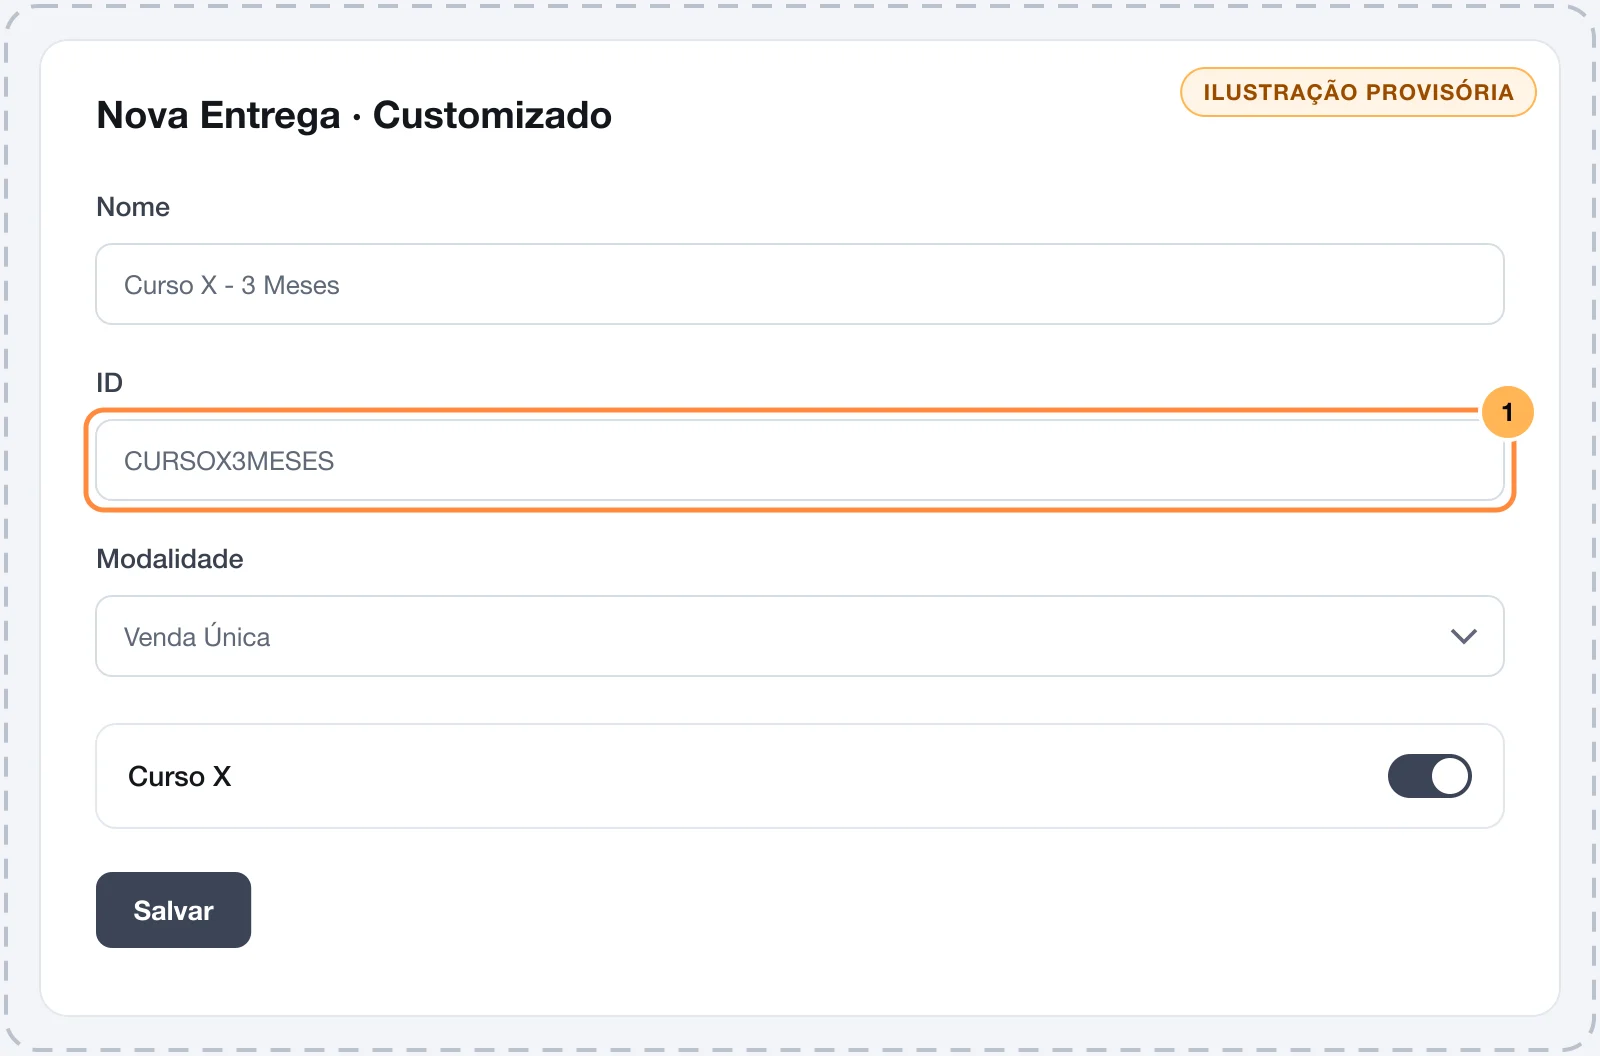
Create one delivery for each combination of courses and access period you sell. In Cademí, the access period of a one-time sale delivery is set per course. A subscription delivery has no end date: it lasts until Vipter reports the cancellation.
Step 2: copy the domain, API key and token
You need three pieces of data from Cademí:
- Your school's domain, such as
escola.cademi.com.br. - The API key, created in Cademí's settings.
- The Cademí Token, under ConfiguraçõesDomínio (Settings › Domain).
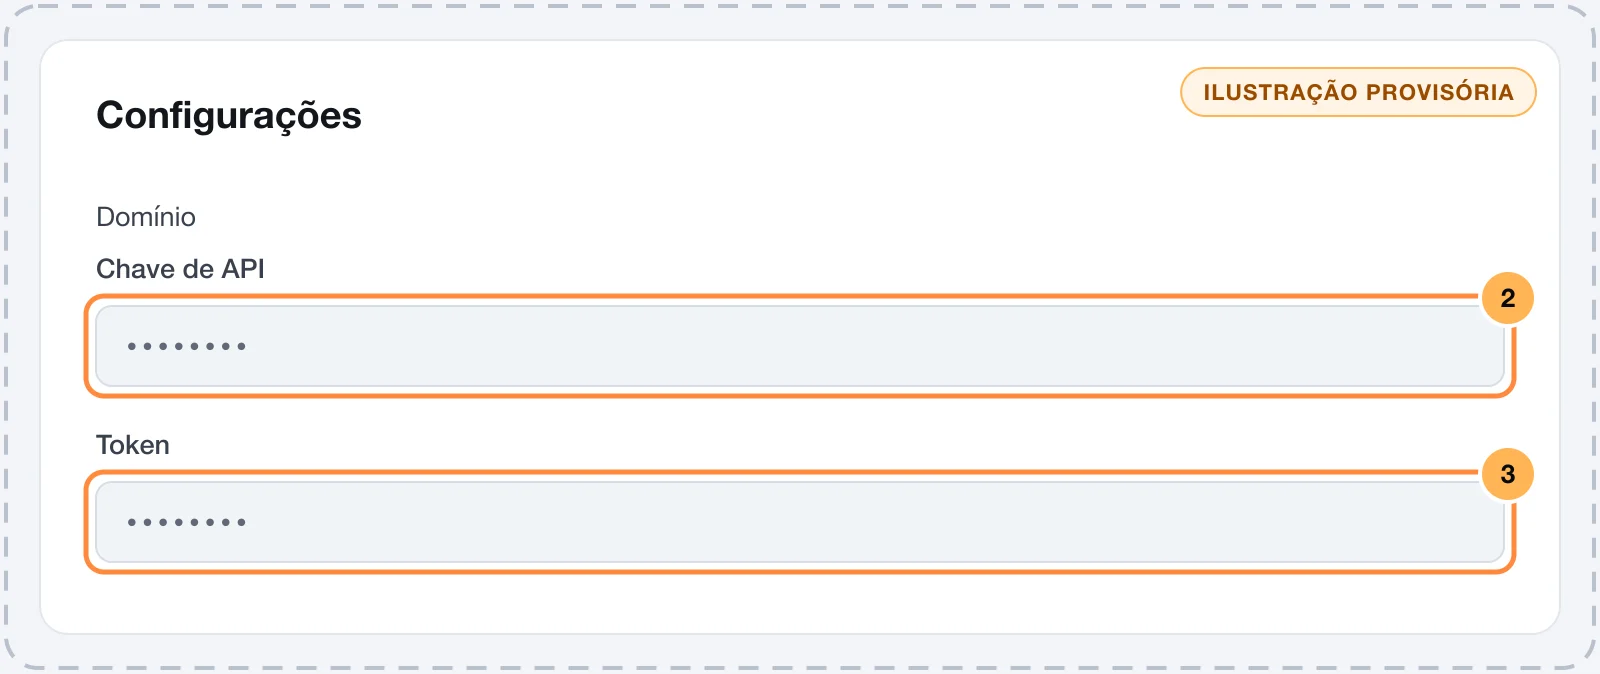
Keep the key and the token safe
With the key and the token, anyone can grant access to any course in your school. Paste both only into Vipter. Once saved, they are not shown again: the field only shows the last characters of each.
Step 3: paste the data into Vipter
- In the Vipter dashboard, open GeneralIntegrationsMember areasCademí.
- Under Connection, fill in the numbered fields and leave Active — send access to this platform on.
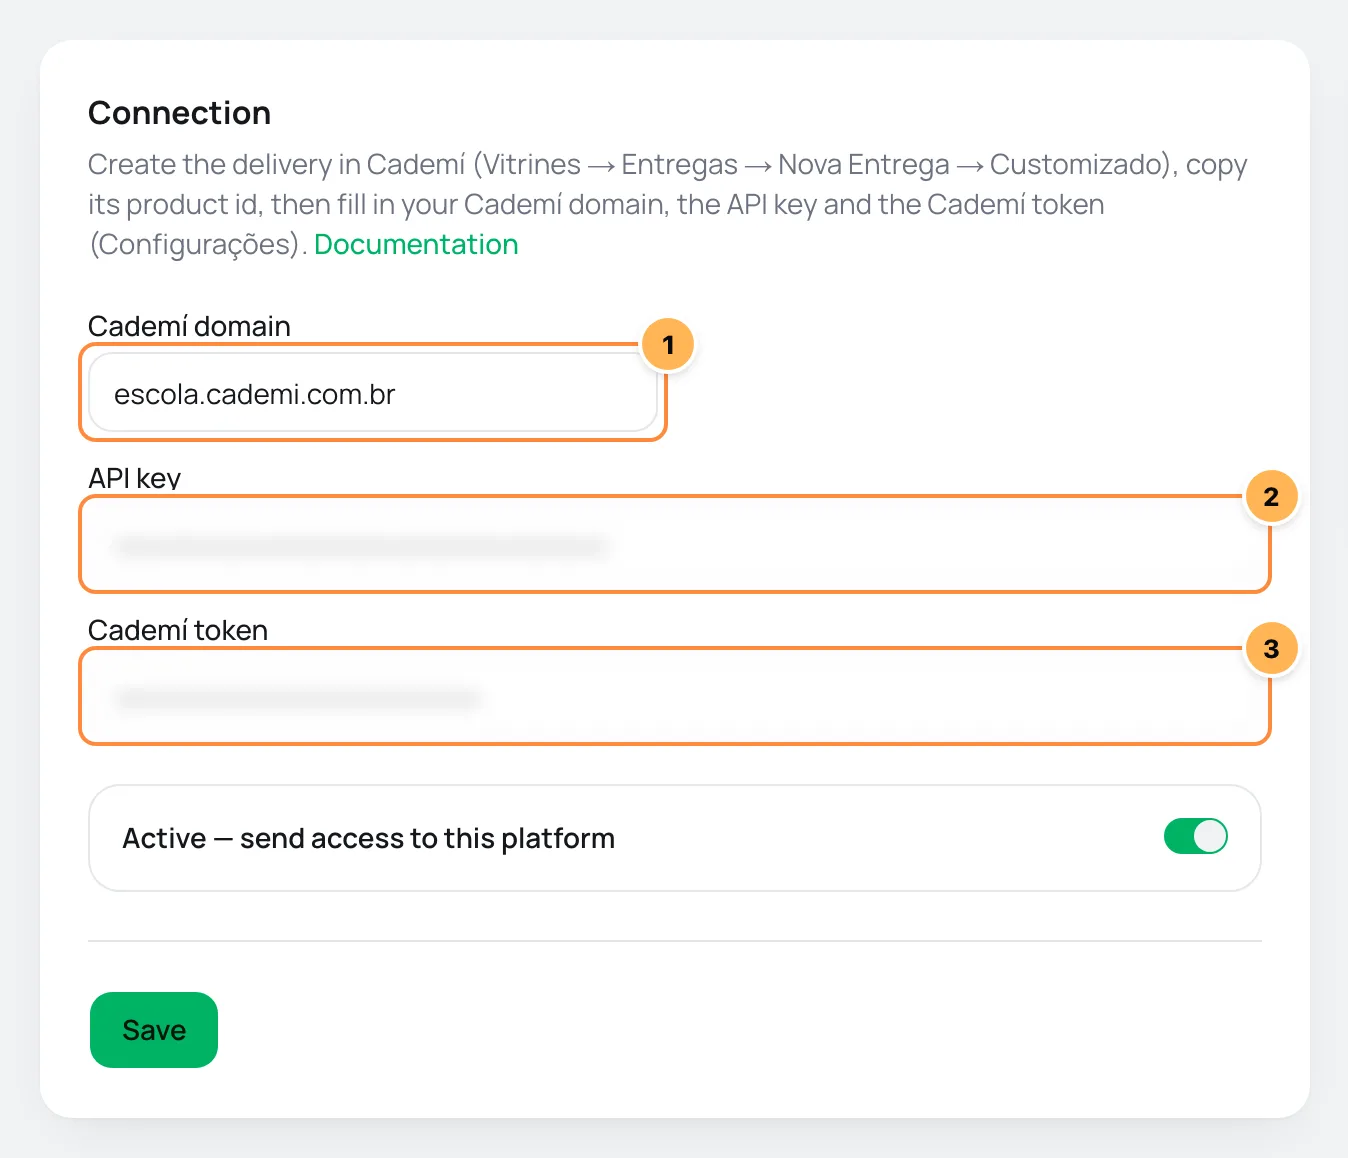
| # | Field | What to paste |
|---|---|---|
| 1 | Cademí domain | Your school address, such as escola.cademi.com.br. If you paste it with https:// or with a path at the end, Vipter keeps only the domain. |
| 2 | API key | The API key you created in step 2. |
| 3 | Cademí token | The Cademí Token, from Configurações › Domínio (Settings › Domain). |
- Click Save.
To change just one of these later, fill in only that field. The ones left blank keep the saved value.
Step 4: link each offer to the delivery
Vipter only sends sales from offers that have a rule.
- Under Access rules, pick the Offer.
- In Product id in Cademí, type the ID of the delivery from step 1, such as
CURSOX3MESES. Use exactly the same text. - Click Add rule. Repeat for every offer that grants access.
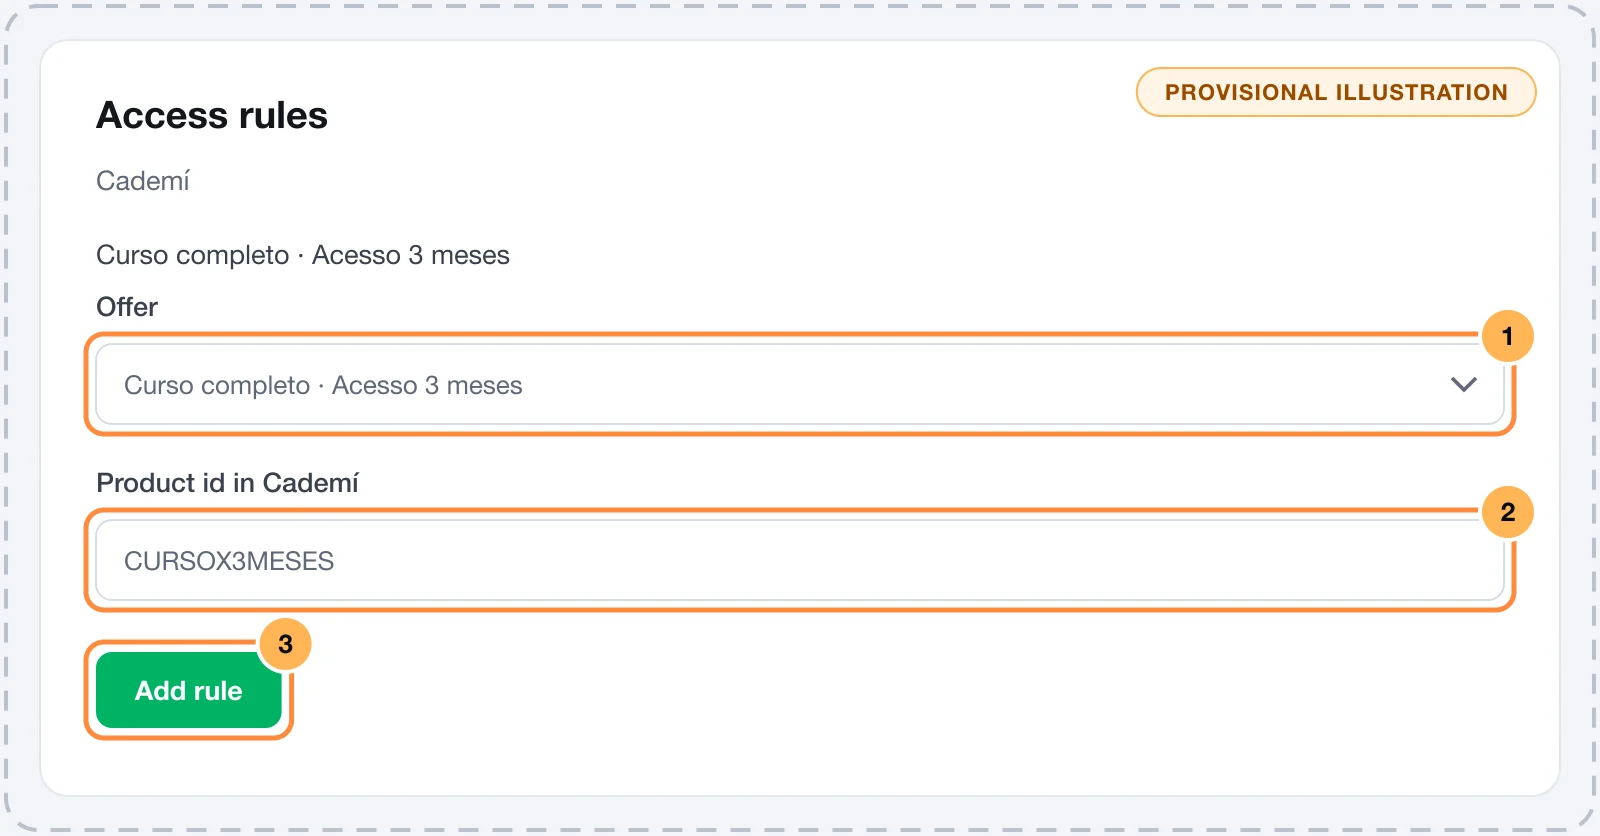
An offer that grants two deliveries needs two rules, one for each ID.
Step 5: test with a purchase
The Cademí page in Vipter has no test button. To check the connection, make a test purchase of an offer with a rule. See Test your store.
It worked if
The purchase shows up under Recent deliveries as Access granted, with no error in red, and the buyer shows up in Cademí with the delivery on the purchases tab of their profile.
How it works afterwards
- Approved sale: Vipter sends the purchase with status
aprovado(approved), the delivery ID, and the buyer's name and e-mail. CPF or CNPJ (Brazilian individual or company taxpayer ID) and mobile number go along when present, the mobile number without Brazil's 55. The purchase code in Cademí is the order ID in Vipter. - Subscription: the purchase also carries the subscription ID in Vipter and the status
ativo(active). - Refund or chargeback: Vipter sends the same order with status
cancelado(cancelled), and Cademí removes access to that delivery. - Subscription cancelled or expired: Vipter sends
canceladowith the subscription ID and the subscription statuscancelado. - Paid renewal: each paid charge reaches Cademí as an approved purchase of the same subscription.
Common problems
-
Enter a valid domain, such as escola.cademi.com.br
The domain field needs a full address, with a dot. Copy your school's address from the browser bar and paste only the domain part.
-
The delivery shows in red under Recent deliveries
Read Cademí's response right below. The most common reasons are a wrong API key or token and a delivery ID that does not exist or is not of the Customizado type. Fix it and grant this buyer access by hand in Cademí: Vipter does not repeat the delivery.
-
The sale was approved, but nothing shows under Recent deliveries
The offer sold has no rule, or the Active — send access to this platform switch was off at the time of the sale.
-
The subscription was cancelled, but the student still has access
Check under Recent deliveries whether the Access revoked delivery worked. If it worked and the access remains, remove the access by hand in the student's profile in Cademí and contact Vipter support.
What to do next
- See How member areas work for the rules per offer and what happens in each case.
- If the course also has files to download, set up digital delivery on the product.