Connect Snapchat Ads (Snap Pixel and Conversions API)
Send checkout visits, leads and purchases to your Snap Pixel, from the browser and through the Conversions API, including PIX paid after the page was closed.
With Snapchat Ads connected, the Snap Pixel fires on the checkout and the thank-you page, and the Snapchat Conversions API sends the events from the server. The purchase is reported when the payment is confirmed, including a PIX (Brazil's instant payment) paid after the buyer closed the page. Both deliveries carry the same identifier, and Snapchat counts each sale once.
Before you start, it helps to read how conversion tracking works.
Before you start
- An account in Snapchat Ads Manager with a Snap Pixel created.
- The Organization Admin role in Snapchat, to generate the token.
- The Admin or Owner role in the Vipter project.
- At least one product created in Vipter.
Step 1: copy the pixel ID and generate the token in Snapchat
- In Ads Manager, open Events Manager and choose your Snap Pixel.
- Copy the Pixel ID. It has letters, numbers and hyphens, such as
1ec32188-754e-4be2-8e55-c949a984a39f. - Open the menu in the corner of Ads Manager and click Business Details.
- In the Conversions API Tokens section, click Generate Token and copy the token. Only organization admins see this section.
Keep the token safe
With the token, anyone can send conversions to your pixel. Paste the token only into Vipter. Once saved, it is stored encrypted and not shown again; the screen only shows its last characters.
Step 2: connect the account in Vipter
- In the Vipter dashboard, open GeneralConversionsAccounts and click Connect account. Choose Snapchat Ads.
- Fill in the numbered fields. Test mode is under Advanced: test mode.
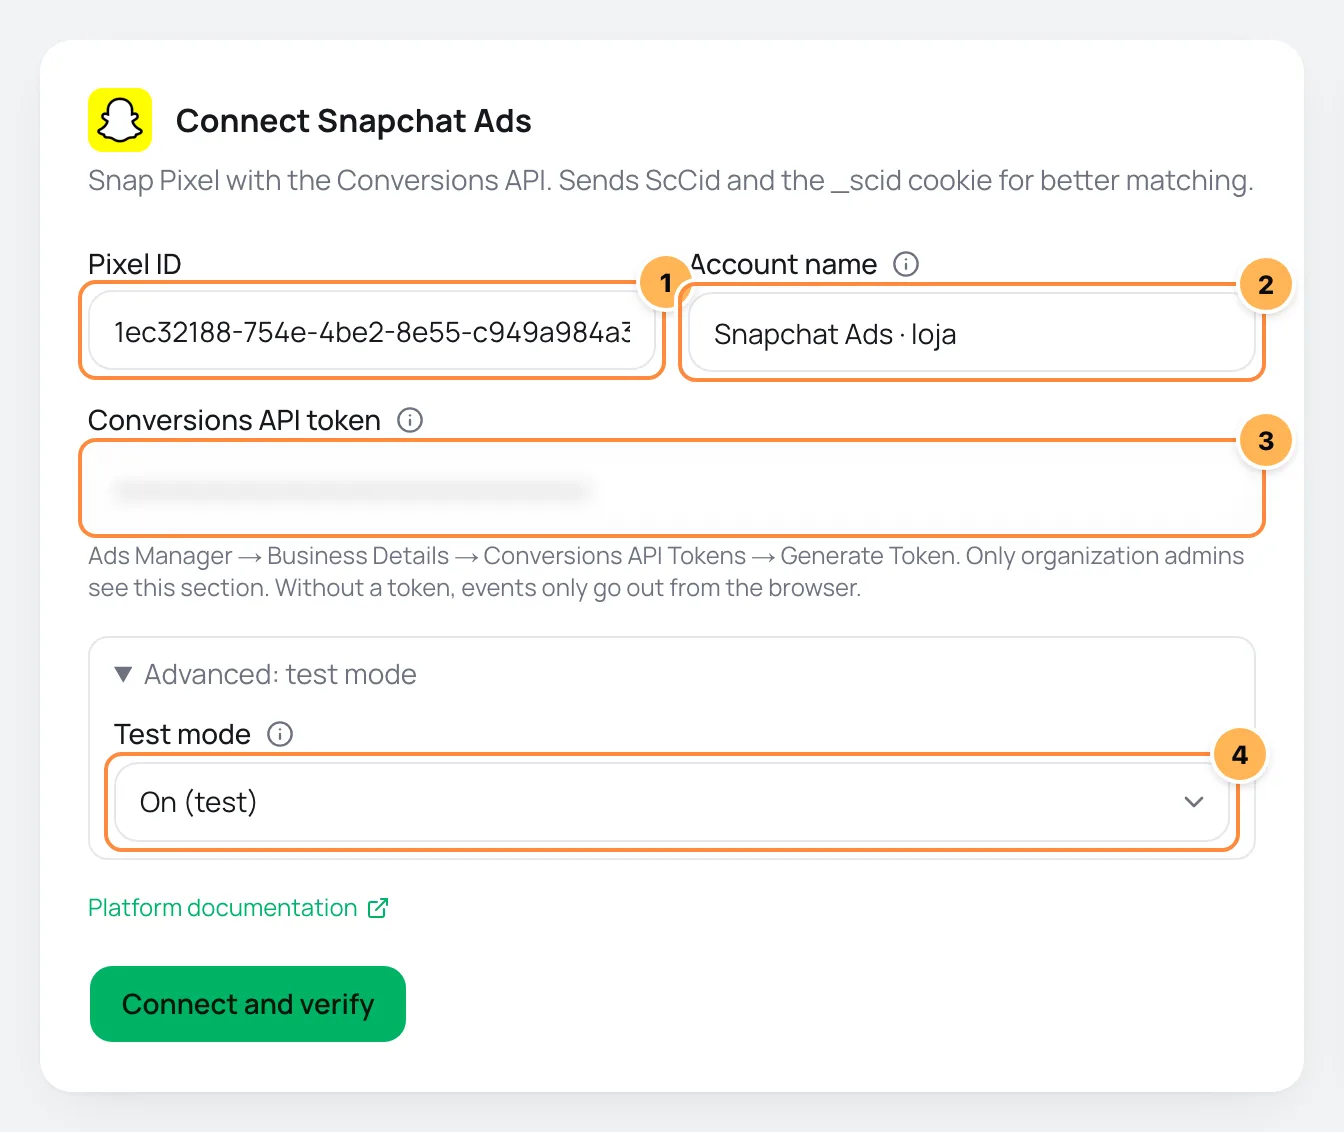
| # | Field | What to paste |
|---|---|---|
| 1 | Pixel ID | The Pixel ID from step 1, with the hyphens. |
| 2 | Account name | A name to recognize the account, such as "Store Snapchat". If left blank, it is "Snapchat Ads". |
| 3 | Conversions API token | The Conversions API token from step 1. Without it, events only go out from the browser and a PIX paid after the page was closed is not counted. |
| 4 | Test mode | When on, server events go to Snapchat's validation: they show as tests in Events Manager and don't become conversions. Leave it off to sell. |
- Click Connect and verify. Vipter saves the account and checks the ID's format. With the token filled in, it also sends an event to Snapchat's validation, which confirms the token without recording a conversion.
- Click Continue, check the products the pixel should fire on and click Finish. Turn on Use automatically on new products to include products created later.
Step 3: verify and test
- Open the account in Accounts, on the Connection tab.
- Click Verify now to check the token again.
- Click Send test event. Vipter sends a 1.00 test purchase in the project's currency to Snapchat's validation, even with test mode off. It shows among the test events in Events Manager and doesn't become a conversion.
It worked if
The verification shows Token accepted by the platform and the test shows Test event accepted by the platform (HTTP 200).. After the first real sale, the list also shows the first event received and the first sale sent from the server.
If you turned test mode on, turn it off in Connection and click Save.
What Vipter sends to Snapchat
| Event in Vipter | Name in Snapchat |
|---|---|
| Page view | PAGE_VIEW |
| Checkout started | START_CHECKOUT |
| Lead (contact filled) | SIGN_UP |
| Payment started | ADD_BILLING |
| PIX generated | CUSTOM_EVENT_1 |
| Purchase | PURCHASE |
| Subscription started | SUBSCRIBE |
- Snapchat does not accept freely named events. PIX generated uses the first of Snapchat's five numbered custom events,
CUSTOM_EVENT_1. - Snapchat does not receive Shipping chosen, Renewal or Refund / chargeback.
- From the browser, every enabled event goes out. From the server, Lead (contact filled), PIX generated, Purchase and Subscription started go out.
- Every event except Page view carries value, currency, the item IDs and the quantity. The purchase carries the order ID, which Snapchat also uses so it doesn't count the same sale twice.
- In What to send, choose the events, the Conversion value and the Value currency. See events and values.
To find who clicked the ad, Snapchat uses:
- the
ScCid, the click identifier Snapchat adds to the ad's address, and the pixel's_scidcookie; - the buyer's IP and browser;
- from the server, the data checked in Matching data, hashed with SHA-256: e-mail, phone, name, address and customer ID;
- in the browser, the e-mail and the phone, which the pixel hashes itself.
The UTM script carries the ScCid and the _scid cookie from your sales page to the checkout.
Common problems
-
Invalid format on the Pixel ID field
The ID has 36 characters with four hyphens. Copy the Pixel ID again in Events Manager.
-
Token rejected by the platform
The token was revoked or belongs to another organization. Generate another one in Business Details and paste it in Connection. Snapchat's answer shows below the item.
-
I can't find the Conversions API tokens section
Only organization admins in Snapchat see the section. Ask an admin to generate the token or to give you that role.
-
PIX generated mixes with another custom event
If you already use
CUSTOM_EVENT_1on the same pixel for something else, turn off PIX generated in What to send. -
Two Snapchat accounts on the same product receive each other's events
In the browser, the Snap Pixel delivers each event to every Snapchat pixel loaded on the page. To keep two accounts' numbers apart, use each one on different products.
-
Your plan does not allow another account sending from the server. Upgrade to connect one more.
The plan has reached its limit of accounts with server delivery. Remove the token from an account you no longer use or change plans in Vipter plan.
What to do next
- Paste the UTM script on your sales page so you don't lose the ad's
ScCid. - Also connect Meta Ads or TikTok Ads.
Connect Reddit Ads (Pixel and Conversions API)
Send checkout visits, leads and purchases to your Reddit pixel, from the browser and through the Conversions API, including PIX paid after the page was closed.
Connect Kwai Ads (Pixel and Event API)
Send checkout visits and steps to your Kwai pixel and, with the Event API token, the sales of buyers who came from the ad, including PIX paid after the page was closed.