Connect Kwai Ads (Pixel and Event API)
Send checkout visits and steps to your Kwai pixel and, with the Event API token, the sales of buyers who came from the ad, including PIX paid after the page was closed.
With Kwai Ads connected, the Kwai pixel fires on the checkout and the thank-you page. With the Event API token, Vipter also sends the sales from the server, including a PIX (Brazil's instant payment) paid after the buyer closed the page.
Kwai only accepts server events from buyers who came from one of its ads, identified by the click_id parameter in the address. That is why the account works like a postback: with the token, it shows Browser + postback.
Before you start, it helps to read how conversion tracking works.
Kwai does not publish the Event API documentation
Kwai keeps no public reference for the Event API. Vipter uses the format the integrations in production use. The API address, the field names and the click_id parameter are confirmed. The exact effect of test mode comes from those integrations, with no official confirmation.
Before you start
- A Kwai for Business account with a website pixel created.
- The Admin or Owner role in the Vipter project.
- At least one product created in Vipter.
Step 1: copy the pixel ID and generate the token in Kwai
- In Kwai for Business, open AssetsPixel and choose your pixel.
- Copy the pixel ID, numbers only, such as
525567814242672725. - In the pixel settings, click Generate access token and copy the token.
Keep the token safe
With the token, anyone can send events to your pixel. Paste the token only into Vipter. Once saved, it is stored encrypted and not shown again; the screen only shows its last characters.
Step 2: carry the click_id to the checkout
Without the click_id, nothing goes out from the server. Prepare the ads' URL before selling.
- In the ad's destination URL in Kwai, add
click_id=__CALLBACK__. Kwai replaces the__CALLBACK__macro with the identifier of each click. - Also add
utm_source=kwai. The Sales sources report only puts the sale in the Kwai Ads channel when theutm_sourcecontains "kwai" or "snack" (from SnackVideo), because other networks also use the nameclick_id. - If the ad leads to a sales page on another domain, paste the UTM script on it. It carries the
click_idand the UTMs to the checkout.
A ready destination looks like this:
https://yourstore.com/offer?utm_source=kwai&click_id=__CALLBACK__If the URL already has a ?, join the new parameters with &.
Step 3: connect the account in Vipter
- In the Vipter dashboard, open GeneralConversionsAccounts and click Connect account. Choose Kwai Ads.
- Fill in the numbered fields. Test mode is under Advanced: test mode.
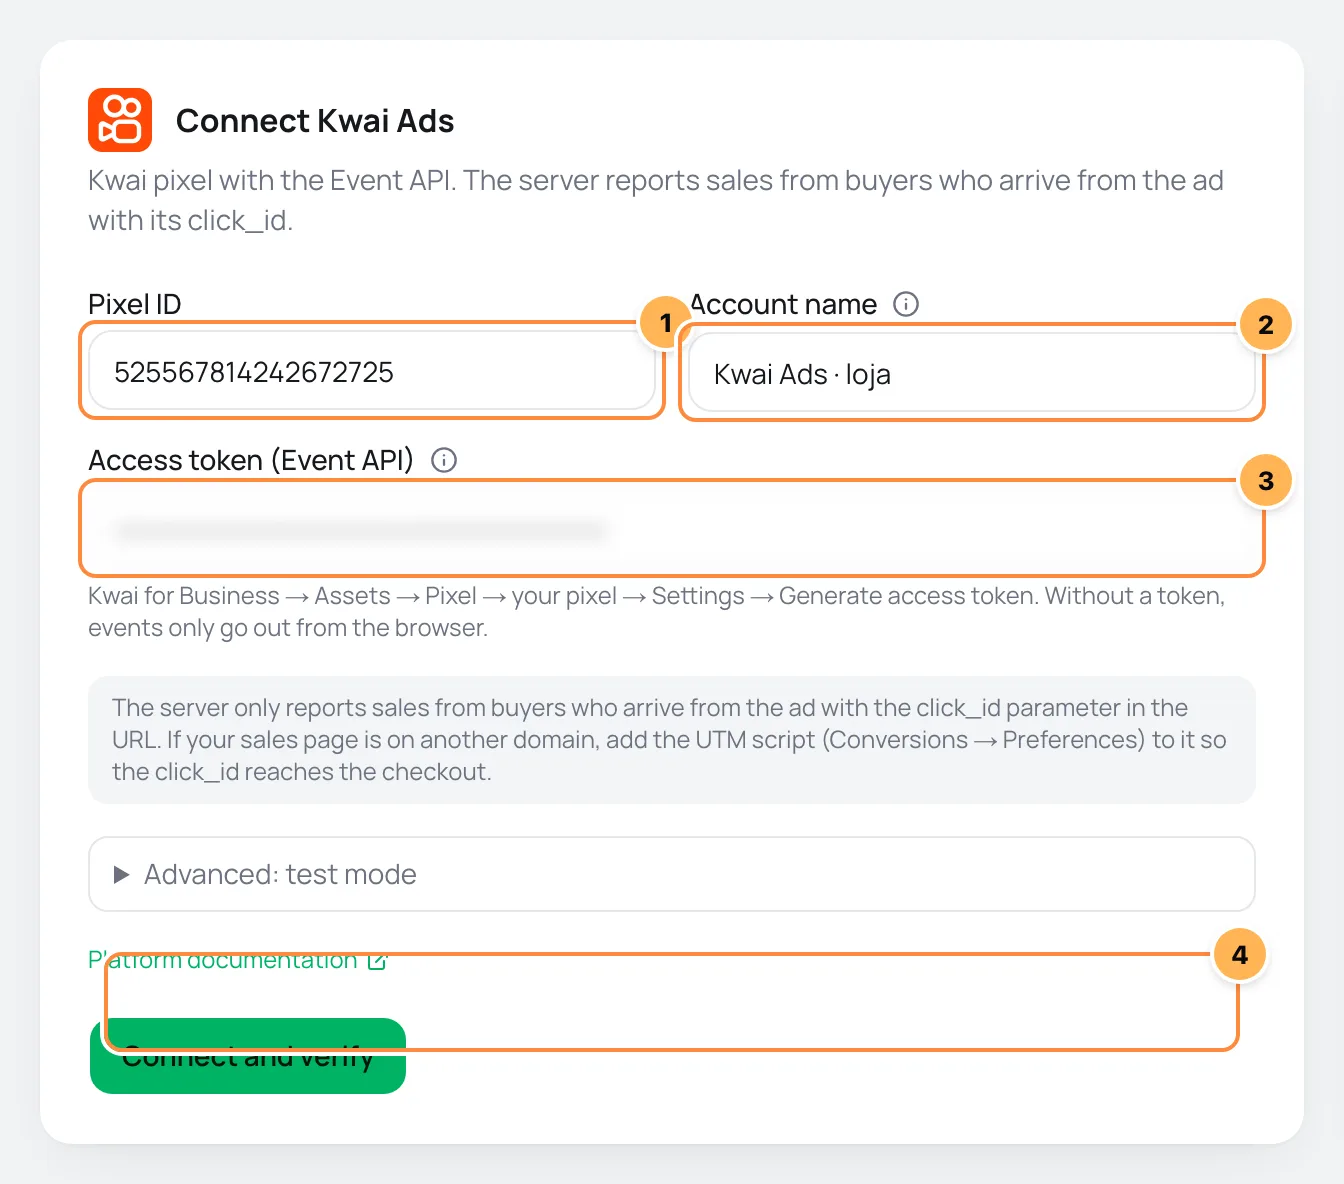
| # | Field | What to paste |
|---|---|---|
| 1 | Pixel ID | The pixel ID from step 1. Numbers only. |
| 2 | Account name | A name to recognize the account, such as "Store Kwai". If left blank, it is "Kwai Ads". |
| 3 | Access token (Event API) | The access token from step 1. Without it, events only go out from the browser and a PIX paid after the page was closed is not counted. |
| 4 | Test mode | When on, server events carry the Kwai test flag. Use it only while you check the first sale from an ad, then turn it off. The browser pixel does not change. |
- Click Connect and verify. Vipter saves the account and checks the ID's format. The token is not tested now: Kwai only accepts events from buyers who arrived from the ad with its click_id. The token is confirmed on the first sale that comes from an ad.
- Click Continue, check the products the pixel should fire on and click Finish. Turn on Use automatically on new products to include products created later.
Step 4: test
Kwai refuses events without a click on an ad, so the account has no test event button. The verification completes by itself:
- Open the account in Accounts, on the Connection tab, and click Verify now.
- Once the first buyer fills in their details at the checkout, the list shows the first event received.
- After the first sale from a Kwai ad, the list shows the first sale sent from the server. In GeneralConversionsActivity, the purchase shows on the Server channel as
EVENT_PURCHASE.
It worked if
The verification shows ID in the expected format, the first event and the first sale sent from the server, which also confirms the token.
What Vipter sends to Kwai
| Event in Vipter | Name in the Event API | Name in the pixel |
|---|---|---|
| Page view | EVENT_CONTENT_VIEW | contentView |
| Checkout started | EVENT_INITIATED_CHECKOUT | initiatedCheckout |
| Lead (contact filled) | EVENT_FORM_SUBMIT | formSubmit |
| Payment started | EVENT_ADD_PAYMENT_INFO | addPaymentInfo |
| PIX generated | EVENT_PLACE_ORDER | placeOrder |
| Purchase | EVENT_PURCHASE | purchase |
| Subscription started | EVENT_SUBSCRIBE | subscribe |
- Kwai has no custom events. PIX generated goes as an order placed (
EVENT_PLACE_ORDER). - Kwai does not receive Shipping chosen, Renewal or Refund / chargeback.
- Without a token, every enabled event goes out from the browser.
- With a token, Page view, Checkout started and Payment started stay in the browser. Lead (contact filled), PIX generated, Purchase and Subscription started go out only from the server, and only for buyers who arrived with the
click_id. Kwai does not document how to join the browser event with the server one, so each of these events goes out by a single path, which keeps the sale from counting twice. - Events carry value, currency, the product, the quantity and, from the server, the order ID.
- Kwai finds who clicked only by the
click_id. That is why the account has no Matching data card, and no buyer data goes to Kwai. - In What to send, choose the events, the Conversion value and the Value currency. See events and values.
With a token, a sale from someone who didn't come from a Kwai ad doesn't reach Kwai. Without the click_id, Kwai couldn't link that sale to an ad either.
Common problems
-
Server delivery only happens when the ad brings its click identifier; without it, a PIX paid after the page was closed is not counted.
The ad doesn't carry
click_id=__CALLBACK__in the URL, or theclick_idgets lost on the sales page. Check step 2 and paste the UTM script on the sales page. -
Kwai sales show in Other campaigns (UTM) or Direct / no source in the report
The ad's
utm_sourcecontains neither "kwai" nor "snack". Addutm_source=kwaito the destination URL. Older sales stay in the channel they went into. -
Events with the Skipped status and the
no_click_idreasonThe buyer didn't come from a Kwai ad, or arrived without the
click_id. For buyers who didn't come from an ad, this is expected. -
Server deliveries fail in the activity
Kwai answers
{"result":1}when it accepts the event. Any other answer is a refusal, and a refusal gets no automatic retry. Common causes are a token from another pixel, a wrong pixel ID or aclick_idthat didn't come from Kwai. Generate another token, check the ID in Connection and resend the event in Activity. -
Your plan does not allow another account sending from the server. Upgrade to connect one more.
The plan has reached its limit of accounts with server delivery. Remove the token from an account you no longer use or change plans in Vipter plan.
What to do next
- Paste the UTM script on your sales page so you don't lose the ad's
click_id. - See where sales come from in the Sales sources report.
- Also connect TikTok Ads.
Connect Snapchat Ads (Snap Pixel and Conversions API)
Send checkout visits, leads and purchases to your Snap Pixel, from the browser and through the Conversions API, including PIX paid after the page was closed.
Connect Plausible
Record checkout visits and the checkout, lead, PIX generated and purchase-with-revenue goals on your Plausible site.