Connect Melhor Envio
Quote PAC, SEDEX, Jadlog and the other Melhor Envio carriers at checkout, buy the label on the order page with your wallet balance and let tracking update the order.
With Melhor Envio connected, the checkout quotes your account's services for the buyer's CEP, such as PAC, SEDEX, Jadlog and Loggi. After the sale, the team buys the label on the order page, paid with your Melhor Envio wallet balance, and tracking marks the order as shipped and delivered on its own.
Before you start, read how carrier shipping works.
Before you start
- A Melhor Envio account. To test without spending, also create an account in the sandbox, at
sandbox.melhorenvio.com.br: it is a separate account, with a fake balance. - Balance in the Melhor Envio wallet to buy labels. To only quote, you don't need it.
- The store address in Brazil, with CEP, in Project settings, or another origin address.
- The CPF or CNPJ of the sender, for the labels.
- The Admin or Owner role in the Vipter project.
Step 1: generate the token in Melhor Envio
- Sign in to Melhor Envio in the environment you will use: the production account or the sandbox one.
- Open IntegraçõesPermissões de acessoTokens (Integrations › Access permissions › Tokens) and generate a new token.
- Tick the permissions for quotes, cart, purchase, label generation and printing, cancellation and tracking. Without them, Melhor Envio refuses the label.
- Copy the token and keep it for step 2.
Keep the token safe
This token can buy labels with your wallet balance. Paste it only into Vipter. Once saved, it is not shown again: the field only shows its last characters.
Connect with the Melhor Envio account, without a token
When Vipter has the Melhor Envio app enabled in the chosen environment, the connection card shows the How to connect field. Choose Connect with Melhor Envio, click the Connect with Melhor Envio button, sign in to your account and authorize. You come back to Vipter with Connected to Melhor Envio and the account name.
Connected through Melhor Envio, tracking arrives right away. With a token, Vipter checks the tracking every hour. Vipter renews the access on its own. If you see The connection expired, click Connect again.
Without that field, use the token.
Step 2: connect in Vipter
- In the Vipter dashboard, open GeneralIntegrationsShippingMelhor Envio.
- Fill in the Connection card.
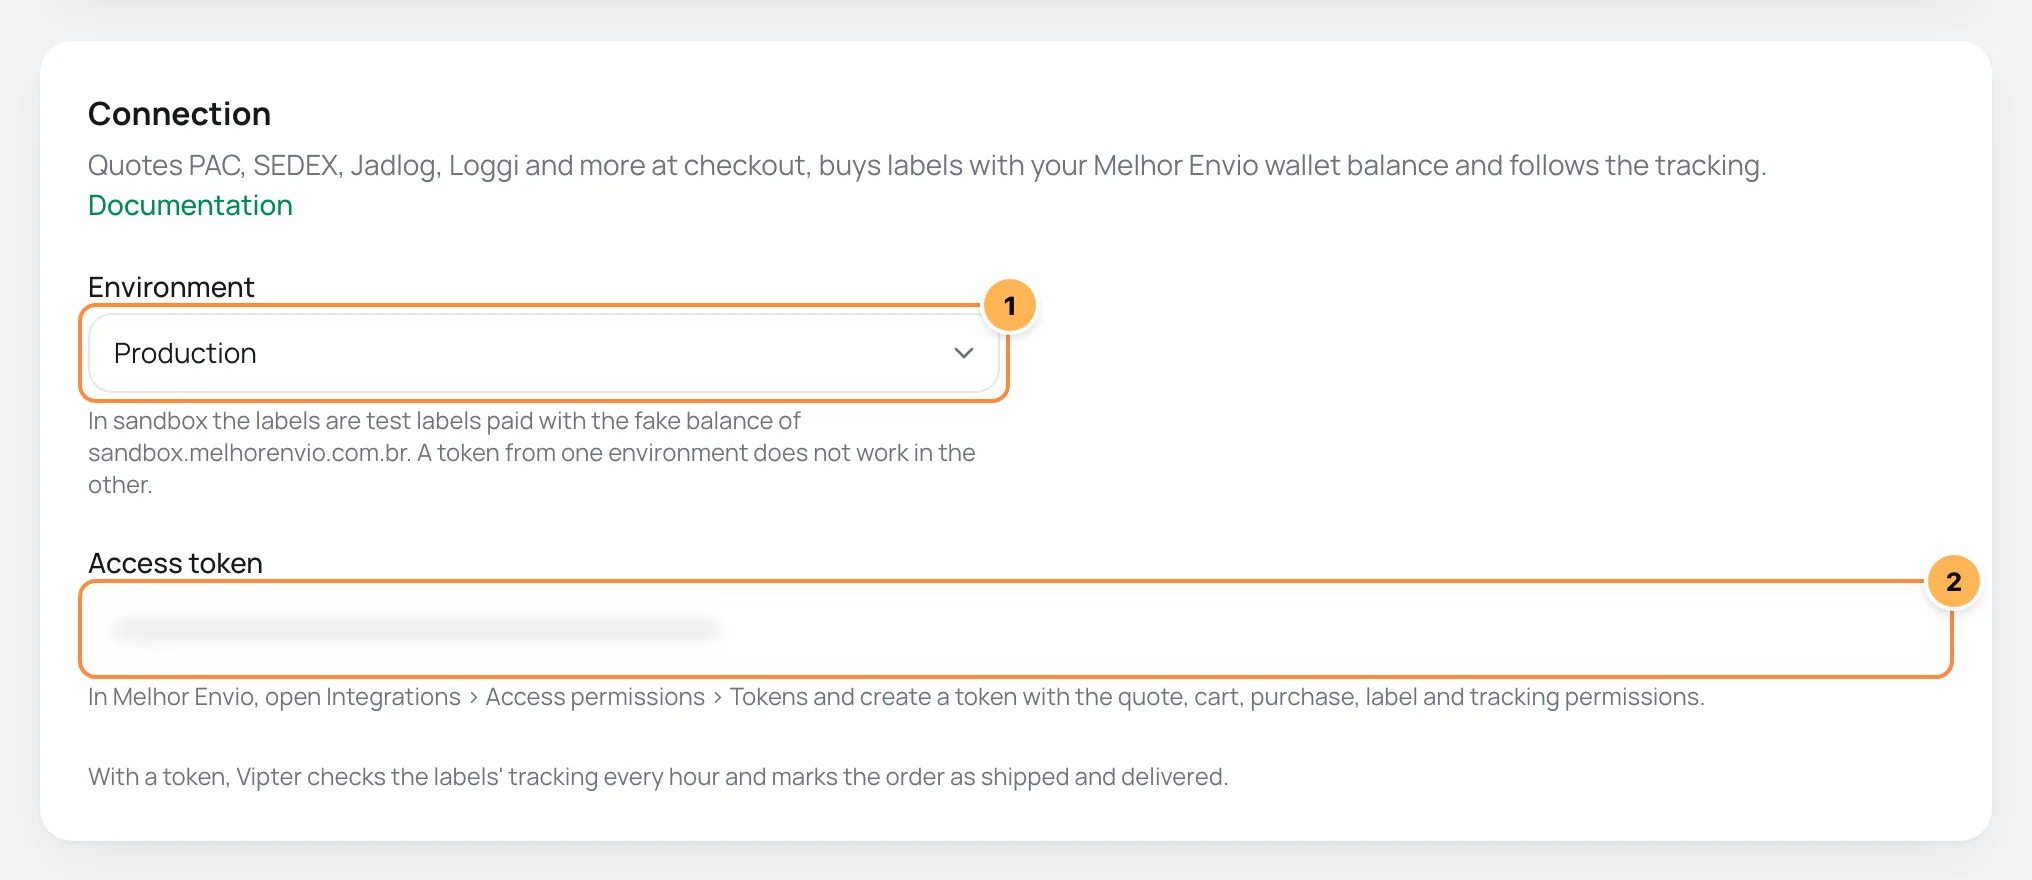
| # | Field | What to paste |
|---|---|---|
| 1 | Environment | Production to sell for real. Sandbox to test with the sandbox account and fake balance. A token from one environment does not work in the other. |
| 2 | Access token | The token from step 1, generated in the same environment chosen next to it. When editing later, leave it blank to keep the saved token. |
Step 3: origin and sender
The Origin and sender card says where packages leave from and who shows as the sender on the label.
- Ship from the store address: on, the origin is the store address, shown right below. Off, fill in CEP, State, Street, Number, Complement, District and City.
- In Label sender, fill in the sender's details:
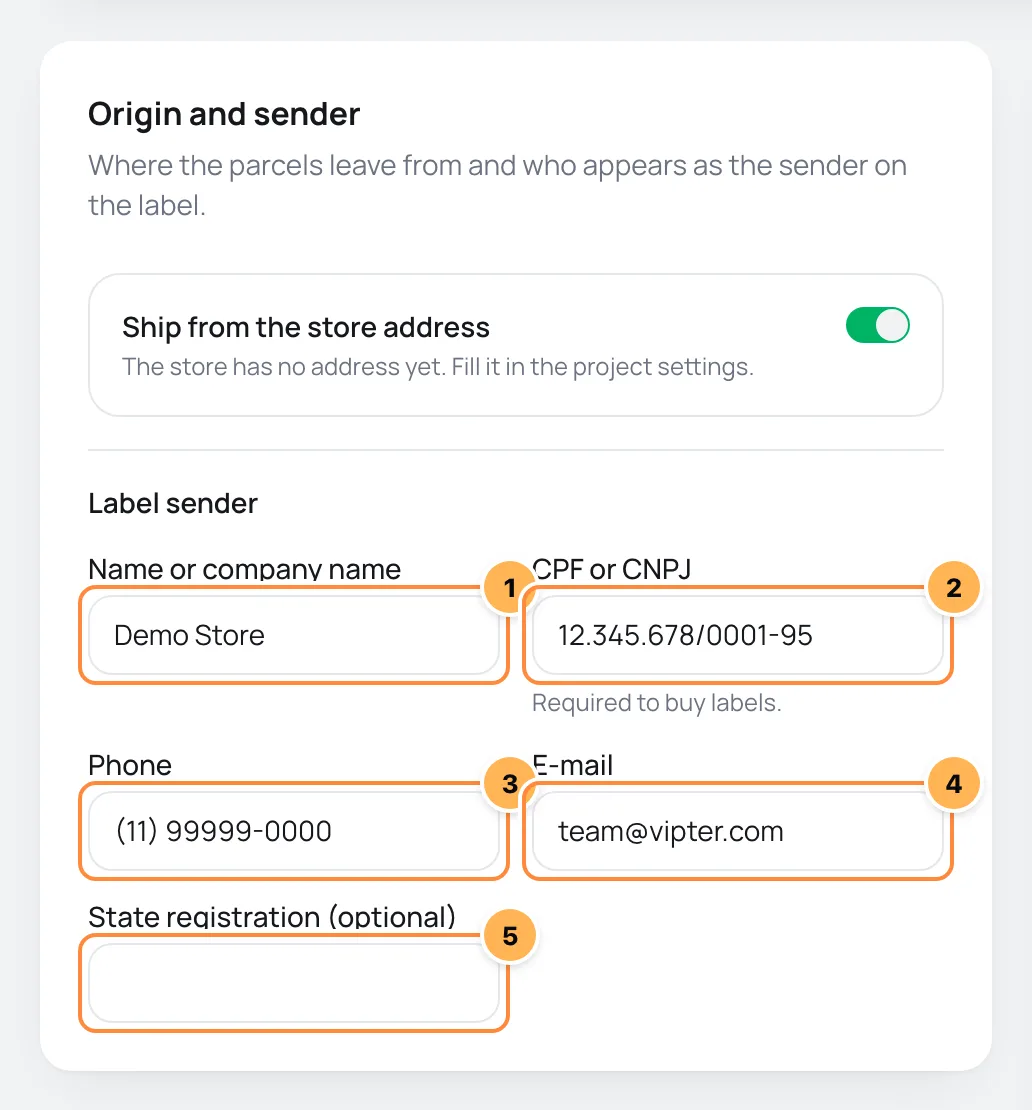
| # | Field | What to paste |
|---|---|---|
| 1 | Name or company name | The name printed on the label. It comes filled in with the store name. |
| 2 | CPF or CNPJ | The CPF or CNPJ of the sender. It can stay blank to only quote, but without it the label is not bought. |
| 3 | Phone | A contact phone number, with area code. |
| 4 | It comes filled in with the store support e-mail. | |
| 5 | State registration (optional) | The state registration, if the company has one. |
The label needs the origin district
With Ship from the store address on, Vipter reads the district from the second line of the store address (project settings), on its own ("Centro") or after the complement ("Sala 4 - Centro"). If label generation says the origin address is incomplete, check that line or turn off Ship from the store address and fill in the full origin here.
Step 4: adjust the checkout quote
The Checkout quotes card applies to every zone. Applies to every zone. Each "Carrier" method can still add its own markup and days.
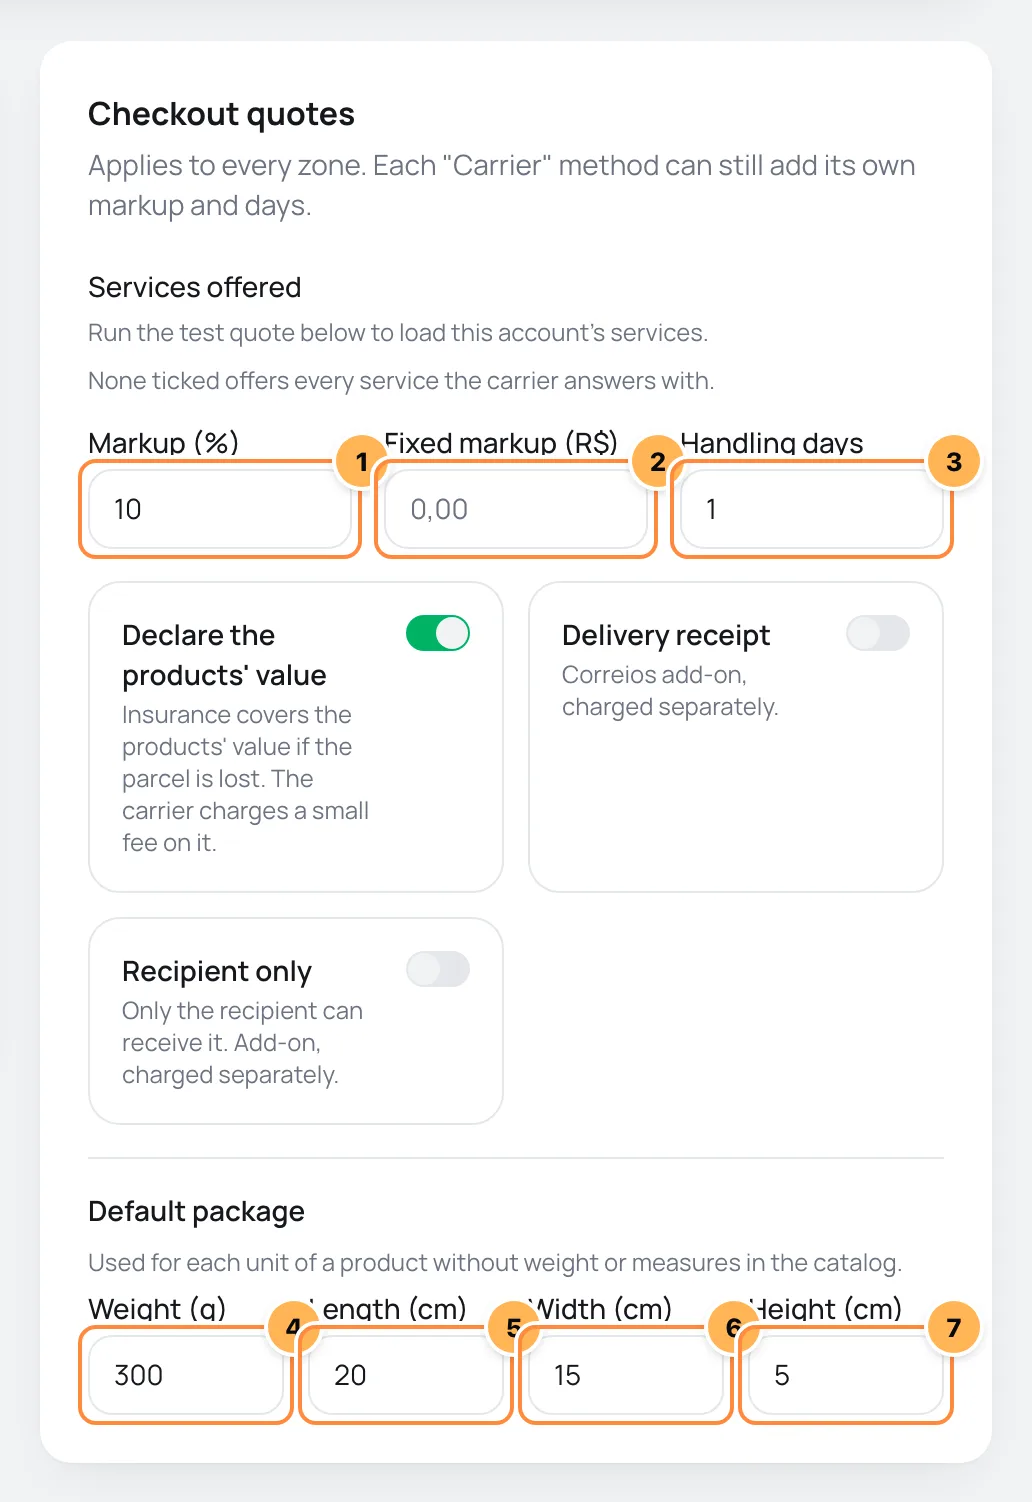
| # | Field | What to paste |
|---|---|---|
| 1 | Markup (%) | A percentage added to the Melhor Envio price, such as 10. Blank, nothing is added. |
| 2 | Fixed markup (R$) | An amount in reais added after the percentage, such as 2.00. |
| 3 | Handling days | Business days added to the delivery time, the time the store takes to ship. |
| 4 | Weight (g) | The weight, in grams, used for each unit of a product without weight in the catalog. |
| 5 | Length (cm) | The length used for each unit of a product without measures. |
| 6 | Width (cm) | The width used for each unit of a product without measures. |
| 7 | Height (cm) | The height used for each unit of a product without measures. |
On the same card:
- Services offered: they show after the test in step 5. None ticked offers every service the carrier answers with.
- Declare the products' value: Insurance covers the products' value if the parcel is lost. The carrier charges a small fee on it. It comes on.
- Delivery receipt and Recipient only: extra Correios services, charged separately. When on, they go into the quote and the label.
Finally, leave Active on and click Save.
Step 5: test the quote
- After saving, the Test quote card shows at the bottom of the page. Quotes the default package, declared at R$ 100, from the origin to the CEP you enter. Without a CEP, it quotes to the origin itself.
- Type a CEP and click Quote.
- Tick the services you want to offer in Services offered and save again.
It worked if
The list shows the services with the price the checkout would charge. When you have a markup, the Melhor Envio price shows right below. The top line shows the connected account.
Step 6: create the method in the zone
The checkout only quotes once a shipping zone has the Carrier method with Melhor Envio. See the walkthrough in Carrier shipping.
How it works afterwards
- At checkout: each service becomes a shipping option, with its price and delivery time.
- On the order page: the team buys the label with the wallet balance, prints it and cancels it if needed. See Labels and tracking.
- Tracking with a token: With a token, Vipter checks the labels' tracking every hour and marks the order as shipped and delivered.
- Tracking with the connected account: Melhor Envio tells Vipter about every change, and the periodic check is only a fallback.
The Recent labels card shows the latest labels bought, with status, service, tracking code and price.
Turn on, turn off and remove
- Active: Off, the checkout stops quoting with this platform.
- Remove: Remove this carrier? The checkout stops quoting with it and the labels already bought stay on the orders.
- Disconnect, on the account connection: Disconnect Melhor Envio? The checkout stops quoting until you connect again or paste a token.
Common problems
-
The carrier refused the token. Create a new one and save again.
The token was deleted in Melhor Envio, lacks the permissions from step 1 or belongs to the other environment. Generate another one in the right environment and save.
-
The store has no Brazilian address with a CEP. Fill it in the project settings or enter another origin.
Fill in the address in Project settings or turn off Ship from the store address and enter the origin.
-
Enter a CPF (11 digits) or CNPJ (14 digits).
The sender's CPF or CNPJ has too few or too many digits.
-
Connecting through Melhor Envio is not available in this environment. Use a token.
The account connection is not enabled in the chosen environment. Use a token.
-
The connection was made in another environment. Connect again to use this one.
You changed the environment after connecting. Click Connect again.
-
The carrier has no service for this CEP.
No service in your account serves that CEP with the default package. Check the carriers enabled in your Melhor Envio account.
-
The test says The carrier refused the quote
The Melhor Envio answer shows right after, with the code and the reason for the refusal. Fix what it points to, such as the origin CEP or the default package measures, and test again.
What to do next
- Create the Carrier method in a zone in Carrier shipping.
- Generate your first label in Labels and tracking.
Carrier shipping
Quote shipping live from Melhor Envio, SuperFrete or Frenet right at checkout, with markups, free shipping above an amount and a reserve price for when the carrier does not answer.
Connect SuperFrete
Quote PAC, SEDEX, Mini Envios, Jadlog and Loggi through SuperFrete at checkout, buy the label on the order page with your wallet balance and get tracking updates right away.