Connect ERP Olist (Tiny)
Send each paid order to ERP Olist as a sales order, with optional NF-e and stock, and get the invoice and the tracking back, with an app created in your account.
With ERP Olist connected, every paid order in Vipter becomes an approved sales order in ERP Olist, with the contact, the items, the shipping, the discount and the installments. ERP Olist can generate the NF-e and take the goods out of stock, and the invoice and the tracking come back to the order in Vipter. ERP Olist is the former Tiny ERP, and the integration uses its API v3.
Before you start, read how the ERP integration works: what goes into the sales order, how products are found and what happens on a refund.
Before you start
- An ERP Olist account, with a user who can create apps and has access to orders, products, invoices and stock. The app can only do what that user can do in the ERP.
- The products registered in ERP Olist, each with a code (SKU).
- For ERP Olist to generate the NF-e: NF-e issuing set up in it, with the digital certificate, operation nature and taxes.
- To get the invoice and tracking notifications: ERP Olist's Webhooks app, which depends on your ERP plan.
- The Admin or Owner role in the Vipter project.
Step 1: create the app in ERP Olist
ERP Olist always needs an app created in your account.
- In the Vipter dashboard, open GeneralIntegrationsERPERP Olist (Tiny) and copy the Redirect URL from the Connection card, with the copy button.
- In ERP Olist, open ConfiguraçõesAplicativos (Settings › Apps) and create an API v3 app.
- In URL de redirecionamento (Redirect URL), paste the URL you copied from Vipter, without changing anything.
- Grant the Contatos, Produtos, Pedidos de venda, Notas fiscais, Formas de recebimento, Estoque and Dados da empresa permissions (contacts, products, sales orders, invoices, receipt methods, stock and company data).
- Save the app and copy the Client ID and the Client Secret for step 2.
Keep the Client Secret safe
With the Client ID and the Client Secret, anyone can request access to your ERP Olist account. Paste them only into Vipter. Once saved, they don't show again: the field shows only the end.
Step 2: connect in Vipter
- Open GeneralIntegrationsERPERP Olist (Tiny).
- Fill in the fields of the Connection card:
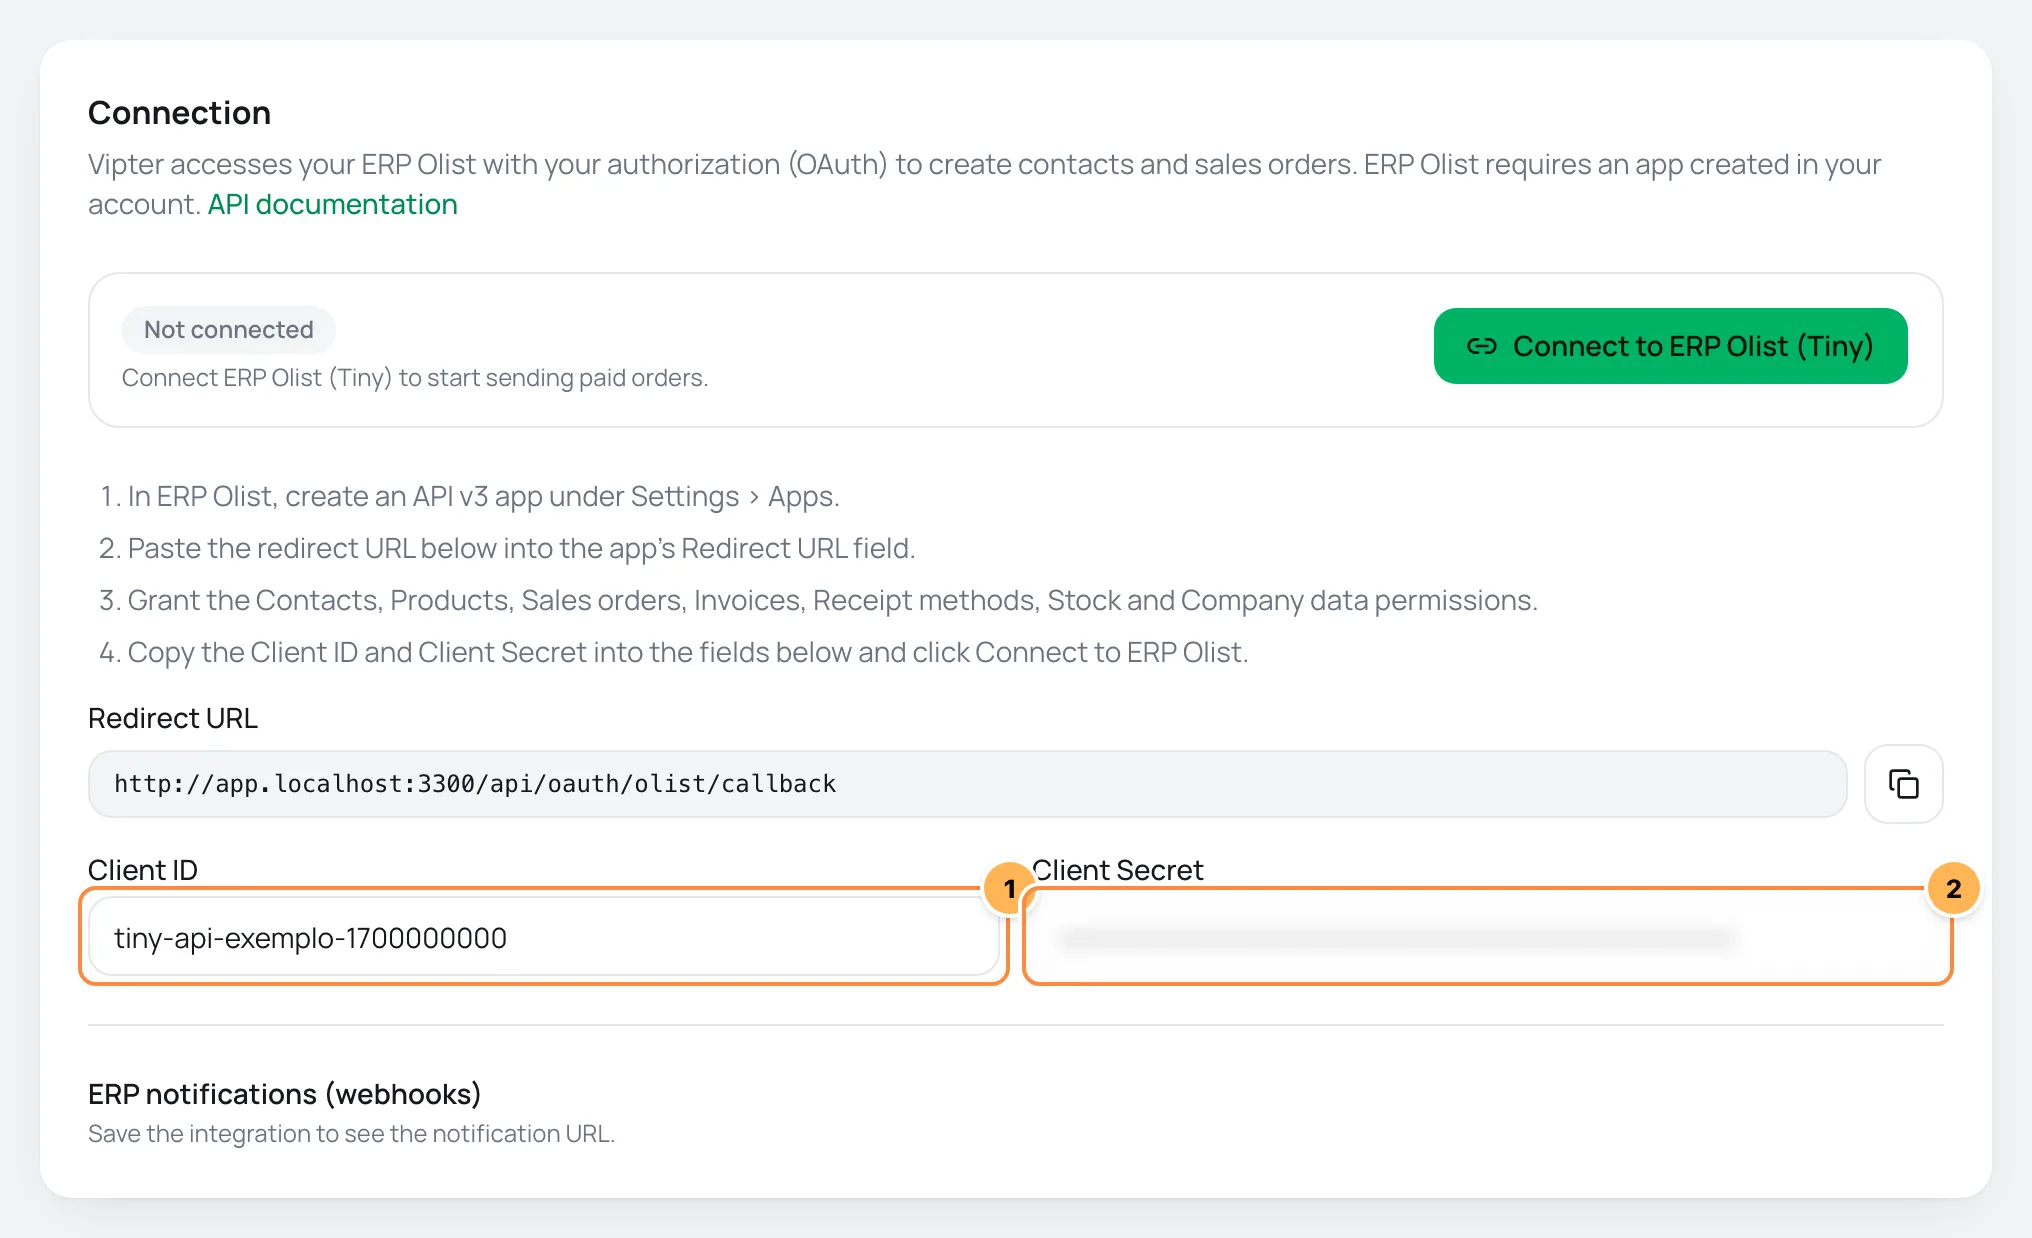
| # | Field | What to paste |
|---|---|---|
| 1 | Client ID | The Client ID of the app created in step 1. |
| 2 | Client Secret | The same app Client Secret. When editing later, leave it blank to keep the saved one. |
- Click Connect to ERP Olist (Tiny). Vipter saves the page and opens the ERP Olist sign-in.
- Sign in with the ERP Olist user and authorize the access.
It worked if
You come back to Vipter with the message ERP Olist (Tiny) connected.. The card shows Connected and the company name and CNPJ, such as Account: Loja Exemplo · CNPJ 12.345.678/0001-95.
Access renewal, every day
ERP Olist gives Vipter a 4-hour access, which can be renewed for up to 1 day. Vipter renews it on its own before it expires, several times a day, and the line under the state shows until when the current access is valid. You don't need to do anything.
The connection only expires if Vipter goes more than a day without being able to renew: when the app was deleted or had its Client Secret changed, when the access was revoked or when ERP Olist was down for a long time. In that case, the card shows Expired. Click Reconnect and authorize again.
Changed the app permissions in ERP Olist? They only apply after a new sign-in: click Reconnect.
Step 3: register the notifications in ERP Olist
Notifications bring the NF-e and the tracking from ERP Olist to Vipter as soon as they change. ERP Olist does not sign its notifications, so the Vipter URL carries a secret code at the end. Treat the URL like a password.
- After saving, the Connection card shows the Notification URL, under ERP notifications (webhooks). Copy the URL.
- In ERP Olist, install the Webhooks app from the app store.
- Open ConfiguraçõesGeralOutras configuraçõesWebhooks (Settings › General › Other settings › Webhooks).
- Paste the Vipter URL into Notificações de vendas (sales notifications), Notificações de pedidos enviados (shipped orders notifications) and Notificações de notas fiscais autorizadas (authorized invoices notifications). Vipter does not use the stock notifications.
- Save.
To check the URL before pasting it, open it in the browser. The answer {"ok":true} says it is right. A wrong or old URL answers {"error":"not_found"}.
When the first notification arrives, the card shows Last notification received on 10/04/2026 3:42 PM. Without notifications, Vipter checks ERP Olist every 3 hours, so the invoice and the tracking arrive anyway, just later.
Generate a new URL
If the URL leaked, click Generate a new URL. The current URL stops working right away. You will need to paste the new URL into ERP Olist. Continue? Paste the new URL into the three ERP Olist notifications.
Step 4: choose what to send
The What to send card says which orders go and what ERP Olist does with them.
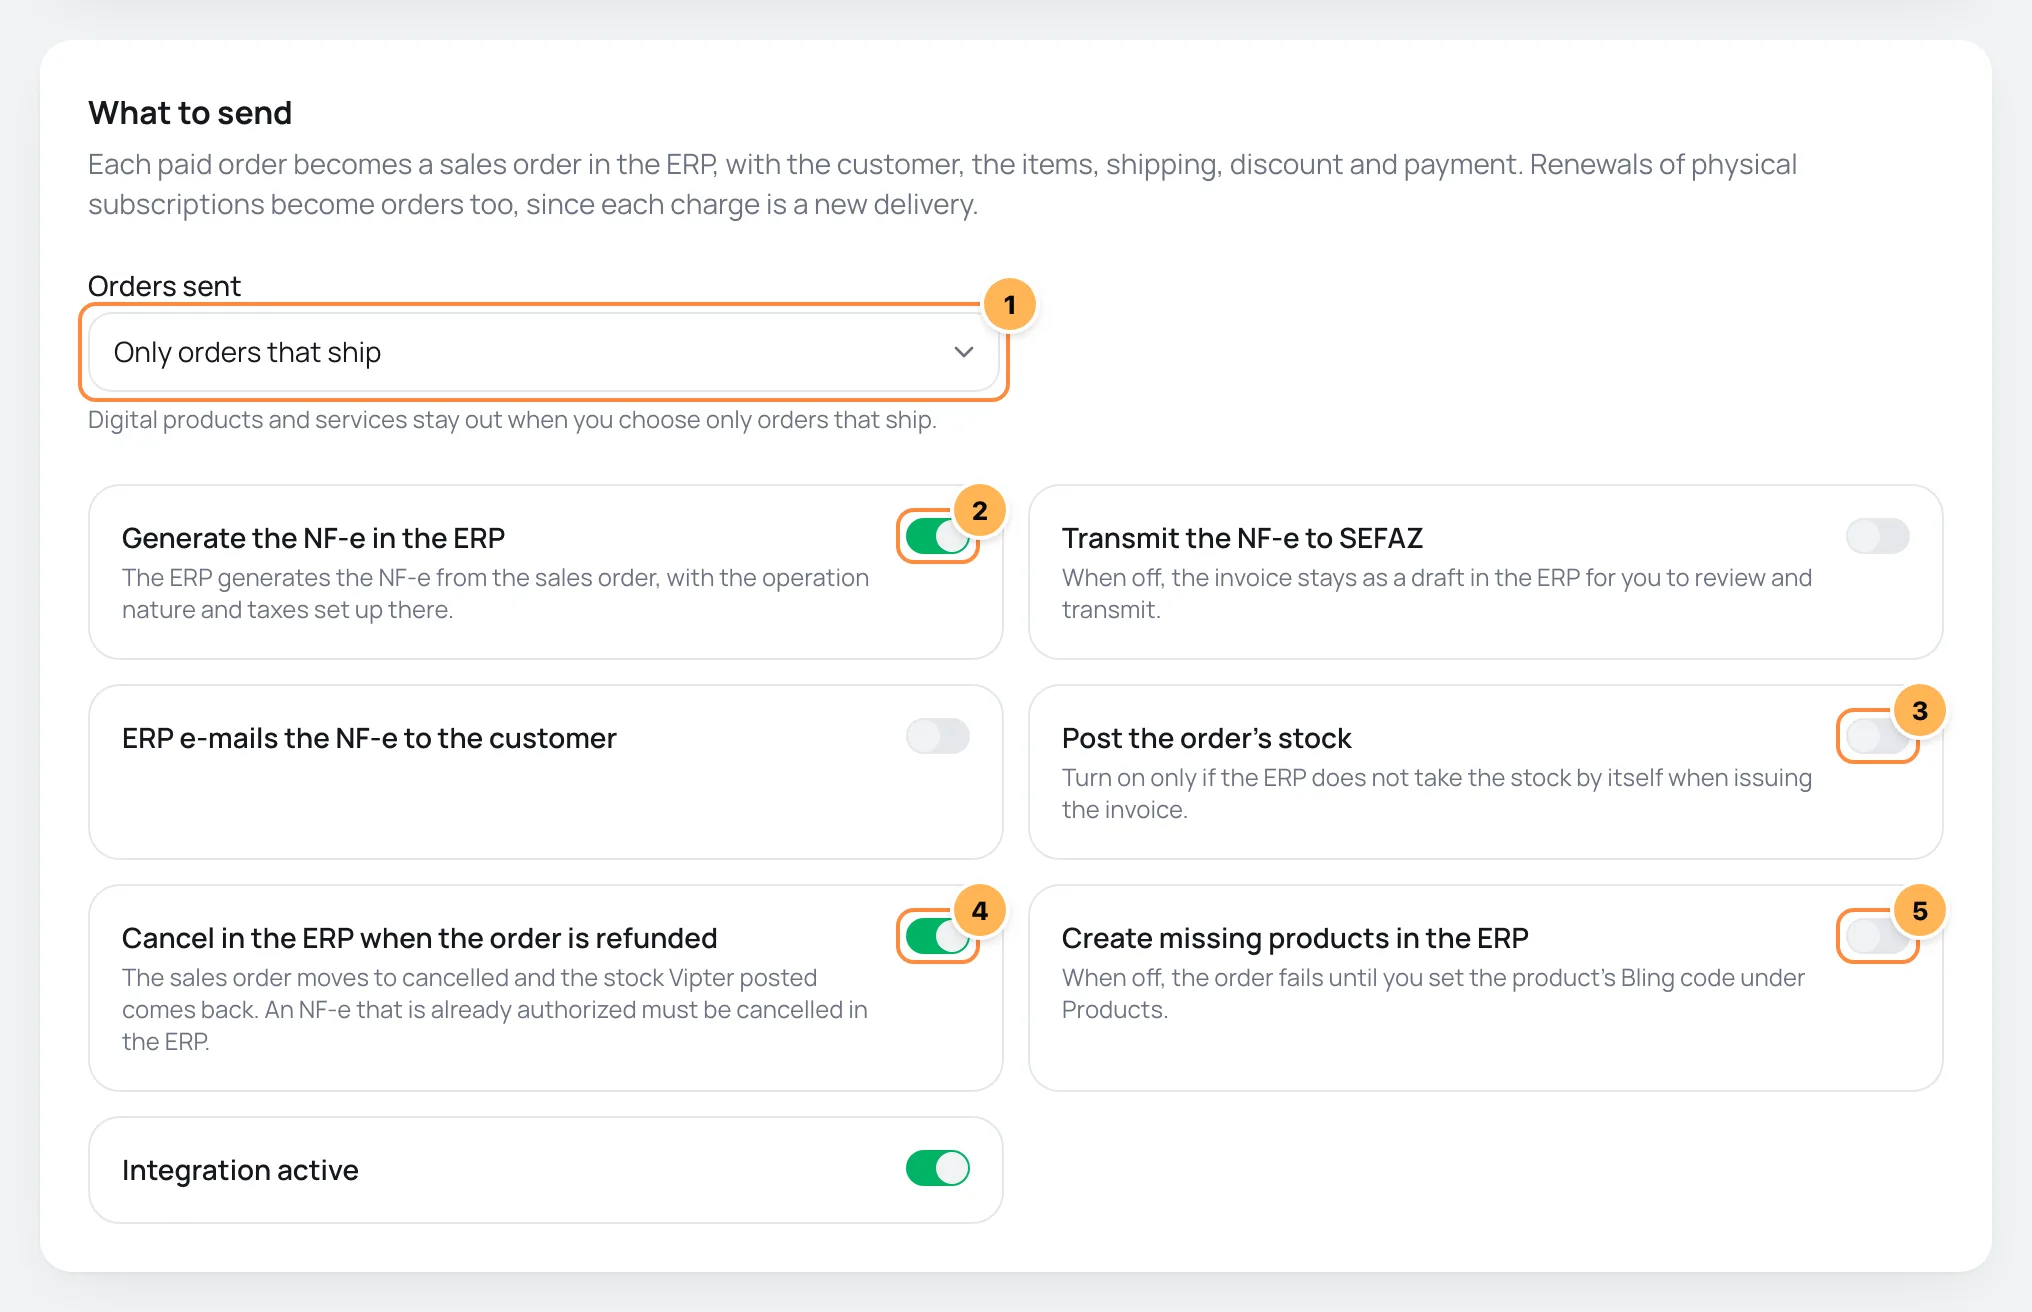
- Orders sent (1): Only orders that ship, the default, or Every paid order.
- Generate the NF-e in the ERP (2): ERP Olist generates the NF-e of the sales order. On, Transmit the NF-e to SEFAZ shows up, to issue right away instead of leaving a draft, along with ERP e-mails the NF-e to the customer.
- Post the order's stock (3): Vipter posts the stock movement in ERP Olist. Turn it on only if the ERP doesn't take stock out by itself when issuing the invoice.
- Cancel in the ERP when the order is refunded (4): on by default. On a full refund or a chargeback, the sales order becomes cancelled and the stock posted by Vipter comes back.
- Create missing products in the ERP (5): When off, the order fails until you set the product's ERP Olist code under Products. On, Vipter creates the missing product in ERP Olist.
- Integration active: off, nothing goes to ERP Olist and retries stop.
Each option is explained in how the ERP integration works.
For the first test
Leave Generate the NF-e in the ERP and Post the order's stock off. That way the first test order issues no invoice and doesn't touch the stock.
Step 5: fill in the ERP Olist data
The ERP data card takes the numbers of records from ERP Olist itself. Leave blank what you don't use.
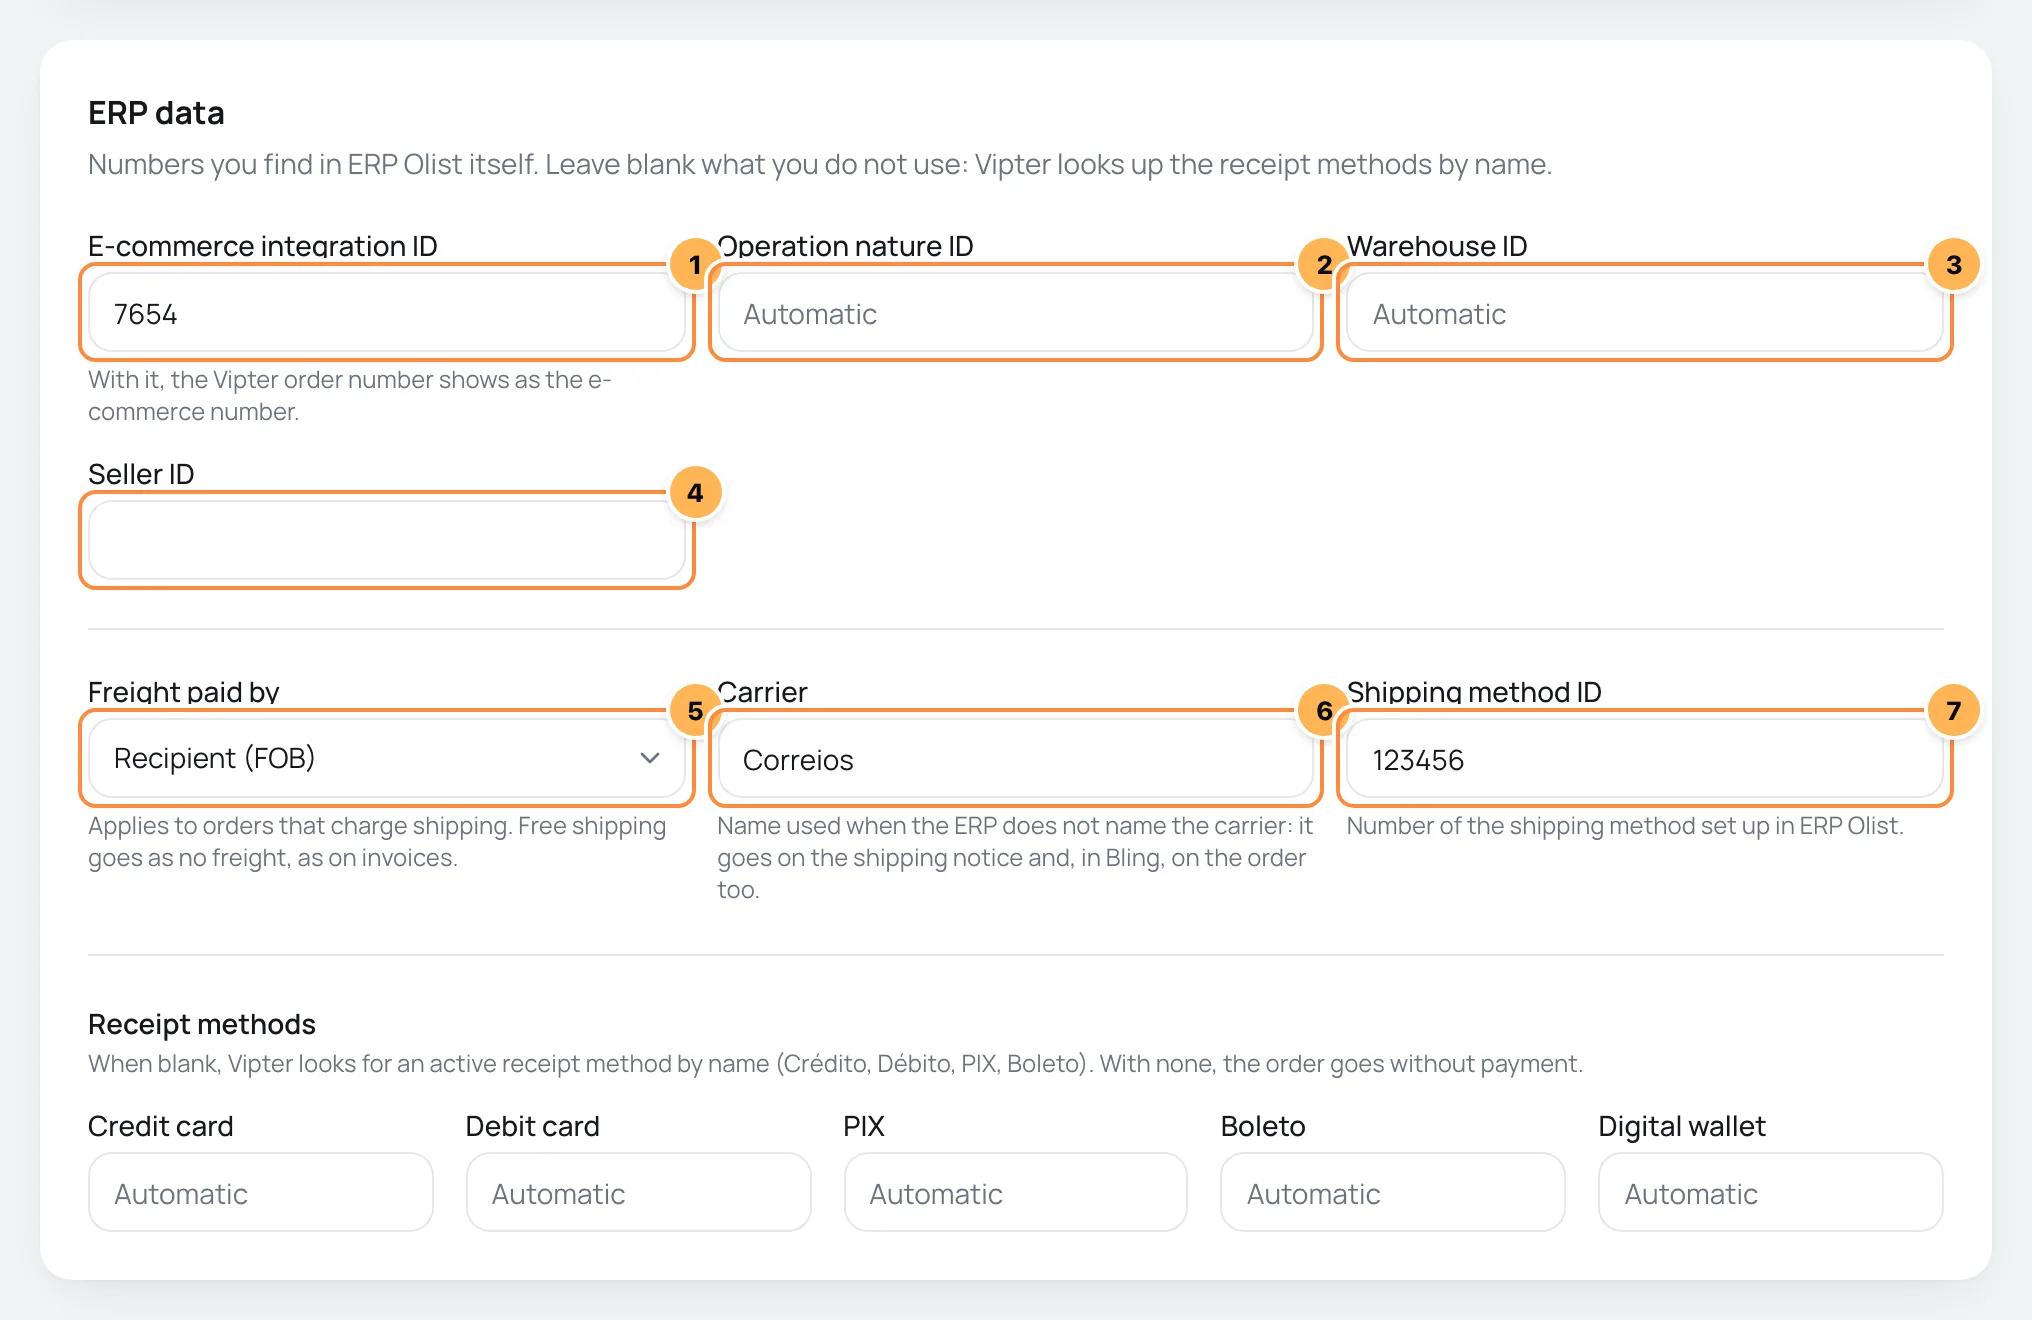
| # | Field | What to paste |
|---|---|---|
| 1 | E-commerce integration ID | The ID of the ERP Olist e-commerce integration. With it, the Vipter order ID shows as the e-commerce order number, and Vipter finds an interrupted order more precisely. |
| 2 | Operation nature ID | The ID of the order operation nature, used on the NF-e. Blank, ERP Olist uses its own settings. |
| 3 | Warehouse ID | The ID of the warehouse the stock comes out of. Blank, ERP Olist uses its own settings. |
| 4 | Seller ID | The ID of the ERP Olist seller recorded on the order. Optional. |
| 5 | Freight paid by | Who hires the freight when the order charges shipping: Recipient (FOB), the default, Sender (CIF) or own transport. Free shipping always goes as no freight. |
| 6 | Carrier | The carrier name that goes on the shipping notice, when ERP Olist does not report another one. |
| 7 | Shipping method ID | The number of the shipping method registered in ERP Olist. Numbers only. Blank, the order goes without a shipping method. |
Below, under Receipt methods, there is one field per Vipter payment method: Credit card, Debit card, PIX, Boleto and Digital wallet. When blank, Vipter looks for an active receipt method by name (Crédito, Débito, PIX, Boleto). With none, the order goes without payment.
IDs take numbers only. Click Save.
Step 6: set the product codes
The Products card lists the Vipter products, the ones that ship first. Vipter finds each product in ERP Olist by its code (SKU). When blank, the code is the product's Vipter ID.
- Next to each product, type the code it has in ERP Olist. Leave blank the products whose code in the ERP is already the Vipter ID.
- Click Save codes.
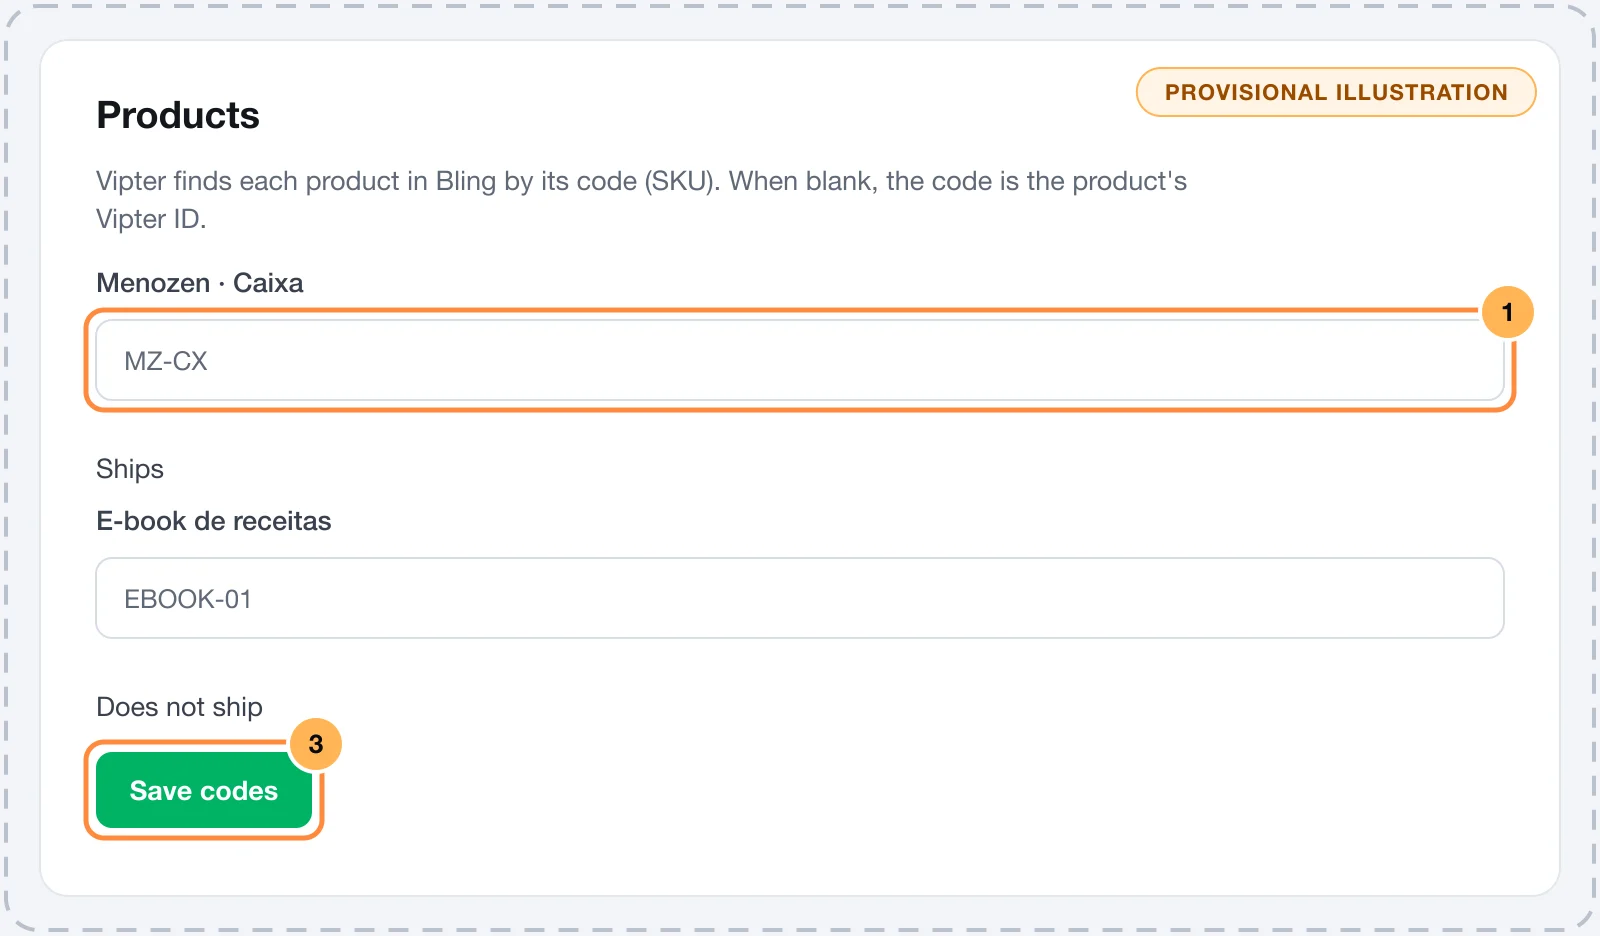
The ERP Olist sales order only accepts products that exist in it. Without the product and with Create missing products in the ERP off, the order fails with No product with this code in the ERP. Set the code under Products or turn on product creation
Step 7: test
- Click Test connection. Connection works shows up, with the company name and CNPJ.
- Make a test purchase of a product that ships, or open a paid order and click Send to ERP Olist (Tiny) in the ERP card.
- See the order under Orders sent, at the end of the integration page.
It worked if
The order line shows In the ERP and Order #1042 in the ERP, and the order shows up in ERP Olist's sales orders, with the Vipter order ID in the purchase order number.
The test order is a real sales order in ERP Olist. After checking, cancel it in the ERP. With everything right, turn on the NF-e and the stock, if you will use them, and save.
Turn on, turn off and remove
- Integration active: off, nothing goes to ERP Olist, retries stop and notifications are ignored. Orders paid in that period don't go later on their own: turn it back on and send each one from the order card.
- Remove integration: Remove the ERP Olist (Tiny) integration? The connection and the history of sent orders are deleted. Orders already in the ERP stay there.
Common problems
-
The connection was not completed: the ERP did not accept the authorization code
The dashboard shows The connection did not finish: … with the reason. Check the Client ID, the Client Secret and that the app's redirect URL is the same as the Redirect URL, with no extra slash at the end. Save and click Connect to ERP Olist (Tiny) again.
-
The connection was not completed: the authorization link expired
The link is valid for 20 minutes. Click Connect to ERP Olist (Tiny) again and authorize right after.
-
Enter your app's Client ID and Client Secret and save.
The app's Client ID or Client Secret is missing. Fill in both and save before connecting.
-
The card shows Expired
The ERP Olist authorization expired. Click Reconnect and authorize again. Orders that fail in the meantime are resent later. Orders that use up their retries in the meantime need Resend.
-
No product with this code in the ERP. Set the code under Products or turn on product creation
ERP Olist has no active product with the code shown in the error. Register the product in the ERP or set the right code in step 6. Then click Resend.
-
The order became Failed with a message from ERP Olist
ERP Olist refused some data, and the message says which, such as a nature or shipping method ID that does not exist in your account. Fix the field in step 5, save and click Resend.
-
The order went without payment
No active receipt method has the method's name, such as Crédito or PIX. Set the receipt method ID under Receipt methods and save. The next orders go with the payment.
-
429 errors, for the call limit
ERP Olist limits each account's calls per minute. Vipter waits its turn when the limit runs out and tries again later. Retries solve it on their own.
-
No notification received yet. Without them, Vipter checks the ERP every few hours.
Open the URL in the browser to check it. Then check that it is in the three ERP Olist notifications and that the Webhooks app is still installed. Generated a new URL? Update all three.
What to do next
- Understand the sales order, the NF-e, refunds and retries in how the ERP integration works.
- See the ERP card on an order page in Order detail.
Connect Bling
Send each paid order to Bling as a sales order, with optional NF-e and stock, and get the invoice and the tracking back, through Vipter's app or an app of your own.
Transactional e-mail: how it works
Learn how Vipter sends your store's e-mails through your own e-mail account, what each sender field does and how to check that everything is arriving.