Connect Bling
Send each paid order to Bling as a sales order, with optional NF-e and stock, and get the invoice and the tracking back, through Vipter's app or an app of your own.
With Bling connected, every paid order in Vipter becomes a sales order in Bling, with the contact, the items, the shipping, the discount and the installments. Bling can generate the NF-e and take the goods out of stock, and the invoice and the tracking come back to the order in Vipter.
Before you start, read how the ERP integration works: what goes into the sales order, how products are found and what happens on a refund.
Before you start
- A Bling account. To connect with an app of your own, access to the Central de Extensões (Extensions center).
- The products registered in Bling, each with a code (SKU).
- For Bling to generate the NF-e: NF-e issuing set up in it, with the digital certificate, operation nature and taxes.
- The Admin or Owner role in the Vipter project.
Two ways to connect
- Through Vipter's app: when the Connection card shows the Use my own Bling app switch, leave it off. Click Connect and authorize Vipter in your Bling account. You do not need to create an app. The invoice and tracking notifications also arrive on their own. Skip to step 2.
- Through an app of your own: when the card does not show the switch, or when your company requires its own app and you turn the switch on. Follow every step.
Switching from one way to the other undoes the connection. After saving, the dashboard says the app changed, connect again: click Reconnect.
Step 1: create the app in Bling
- In the Vipter dashboard, open GeneralIntegrationsERPBling and copy the Redirect URL from the Connection card, with the copy button.
- In Bling, open Central de ExtensõesÁrea do Integrador (Extensions center › Integrator area) and click Criar aplicativo (Create app).
- Choose the app for private use (uso privado) and fill in the details Bling asks for, such as the name.
- In Link de redirecionamento (Redirect link), paste the URL you copied from Vipter, without changing anything.
- In Lista de escopos (Scope list), click Adicionar (Add) and include: Contatos, Produtos, Pedidos de venda, Notas fiscais eletrônicas, Formas de pagamento, Situações, Logísticas and Dados básicos da empresa (contacts, products, sales orders, electronic invoices, payment methods, statuses, logistics and company basic data).
- Save the app. In the Informações do app (App information) tab, copy the Client ID and the Client Secret and keep them for step 2.
Keep the Client Secret safe
With the Client ID and the Client Secret, anyone can request access to your Bling account. Paste them only into Vipter. Once saved, they don't show again: the field shows only the end.
Step 2: connect in Vipter
- Open GeneralIntegrationsERPBling.
- With an app of your own, fill in the fields of the Connection card:
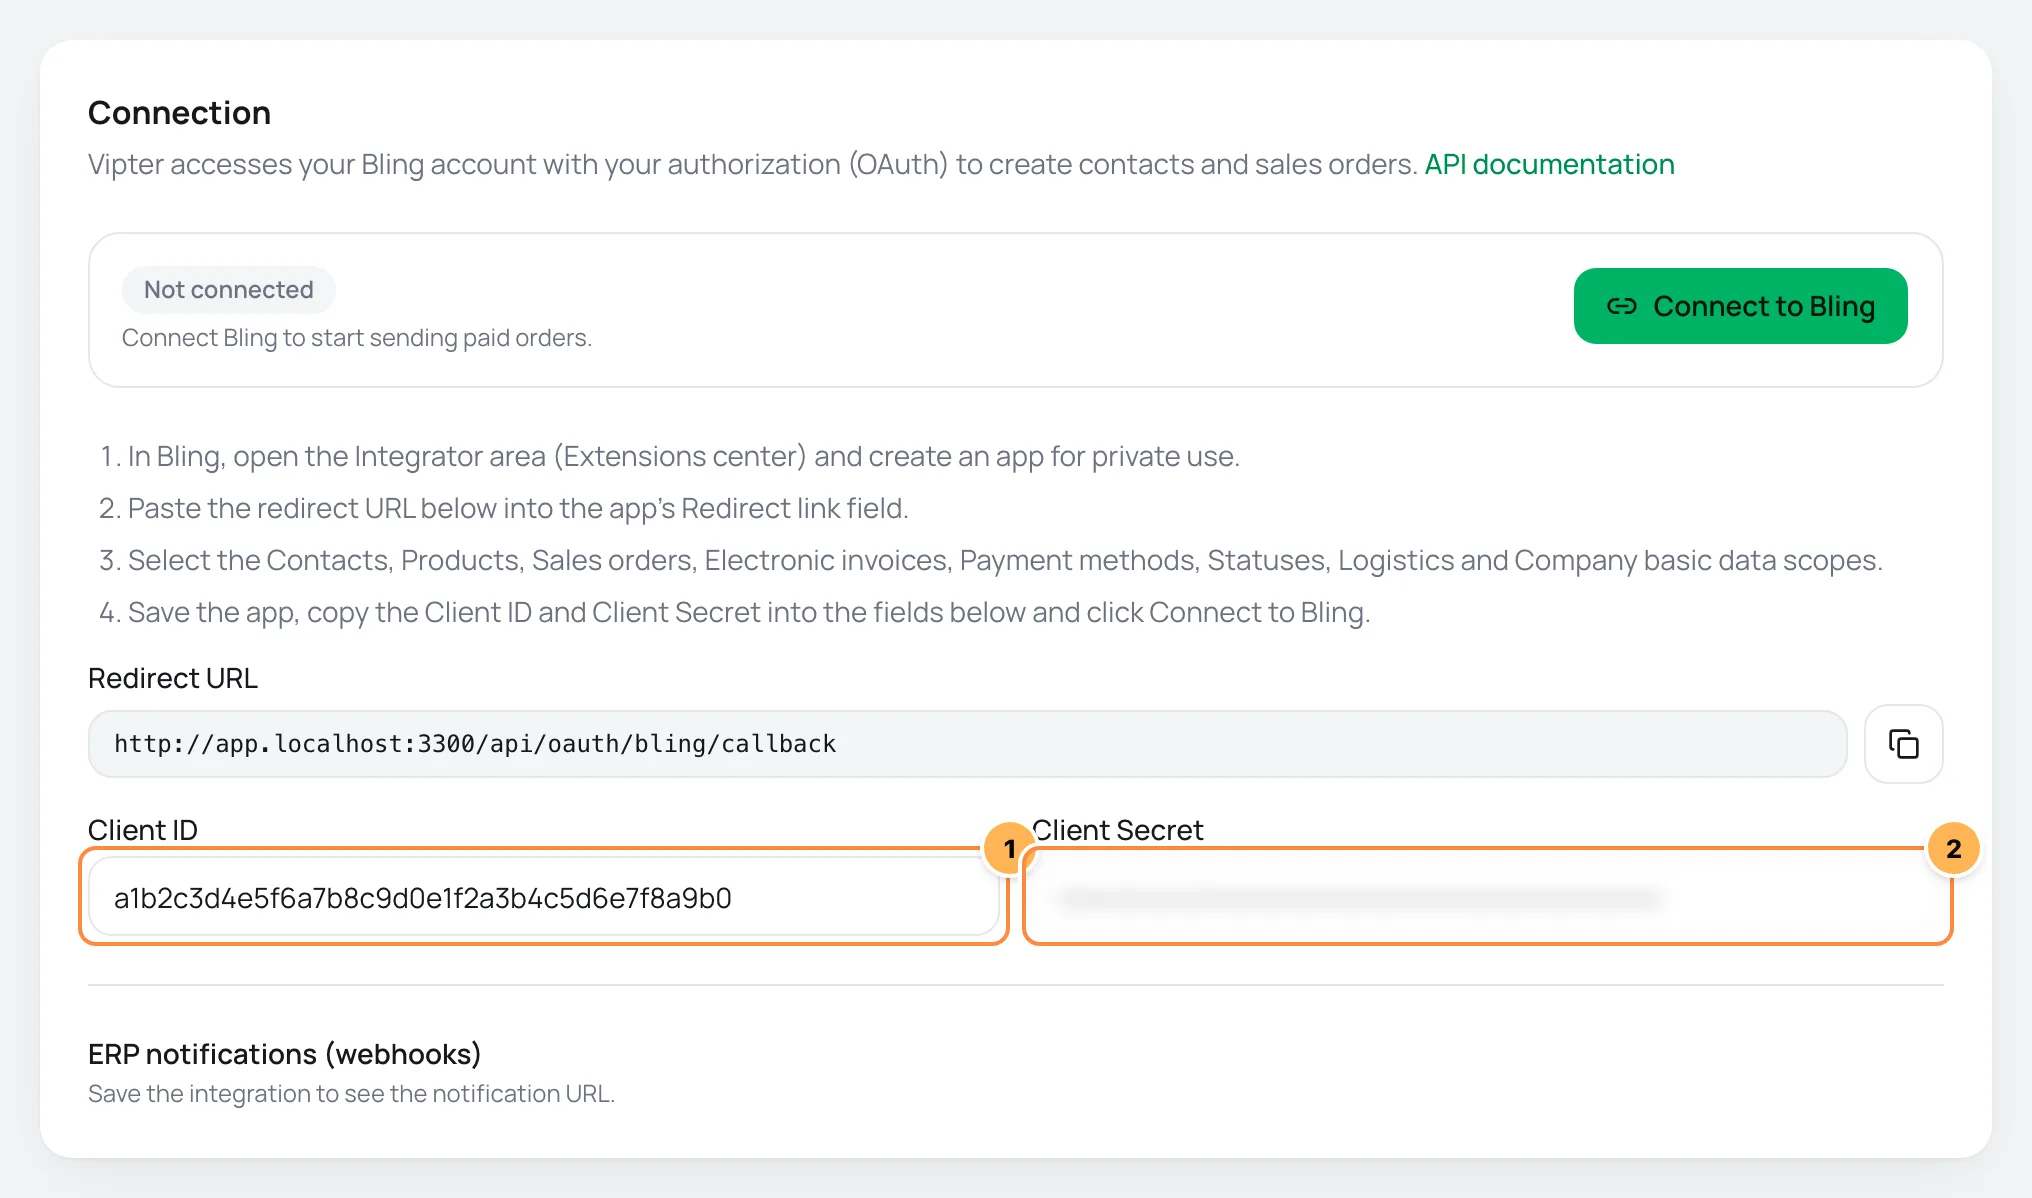
| # | Field | What to paste |
|---|---|---|
| 1 | Client ID | The app Client ID, from the Informações do app tab in Bling. |
| 2 | Client Secret | The same app Client Secret. When editing later, leave it blank to keep the saved one. |
- Click Connect to Bling. Vipter saves the page and opens Bling.
- Sign in to your company's Bling account and authorize the access.
It worked if
You come back to Vipter with the message Bling connected.. The card shows Connected and the company name and CNPJ, such as Account: Loja Exemplo · CNPJ 12.345.678/0001-95.
Access to Bling lasts a few hours and Vipter renews it on its own, before it expires. The line under the state shows until when the current access is valid.
Step 3: register the notifications in Bling
This step is only for those who connect with their own app. With Vipter's app, the card says Vipter's app receives Bling's notifications on its own. You do not need to register anything.
Notifications bring the NF-e and the tracking from Bling to Vipter as soon as they change.
- After saving, the Connection card shows the Notification URL, under ERP notifications (webhooks). Copy the URL.
- In Bling, open your app in the Área do Integrador and go to the Webhooks tab.
- Register the Vipter URL as a server.
- Turn on the Pedido de venda (Sales order) and Nota fiscal (Invoice) resources, with the create and update actions, on version 1 of the payload.
- Save.
Bling signs each notification with the app's Client Secret, and Vipter refuses notifications with another signature. If you generate a new Client Secret in Bling, paste the new one into Vipter and save.
When the first notification arrives, the card shows Last notification received on 10/04/2026 3:42 PM. Without notifications, Vipter checks Bling every 3 hours, so the invoice and the tracking arrive anyway, just later.
Step 4: choose what to send
The What to send card says which orders go and what Bling does with them.
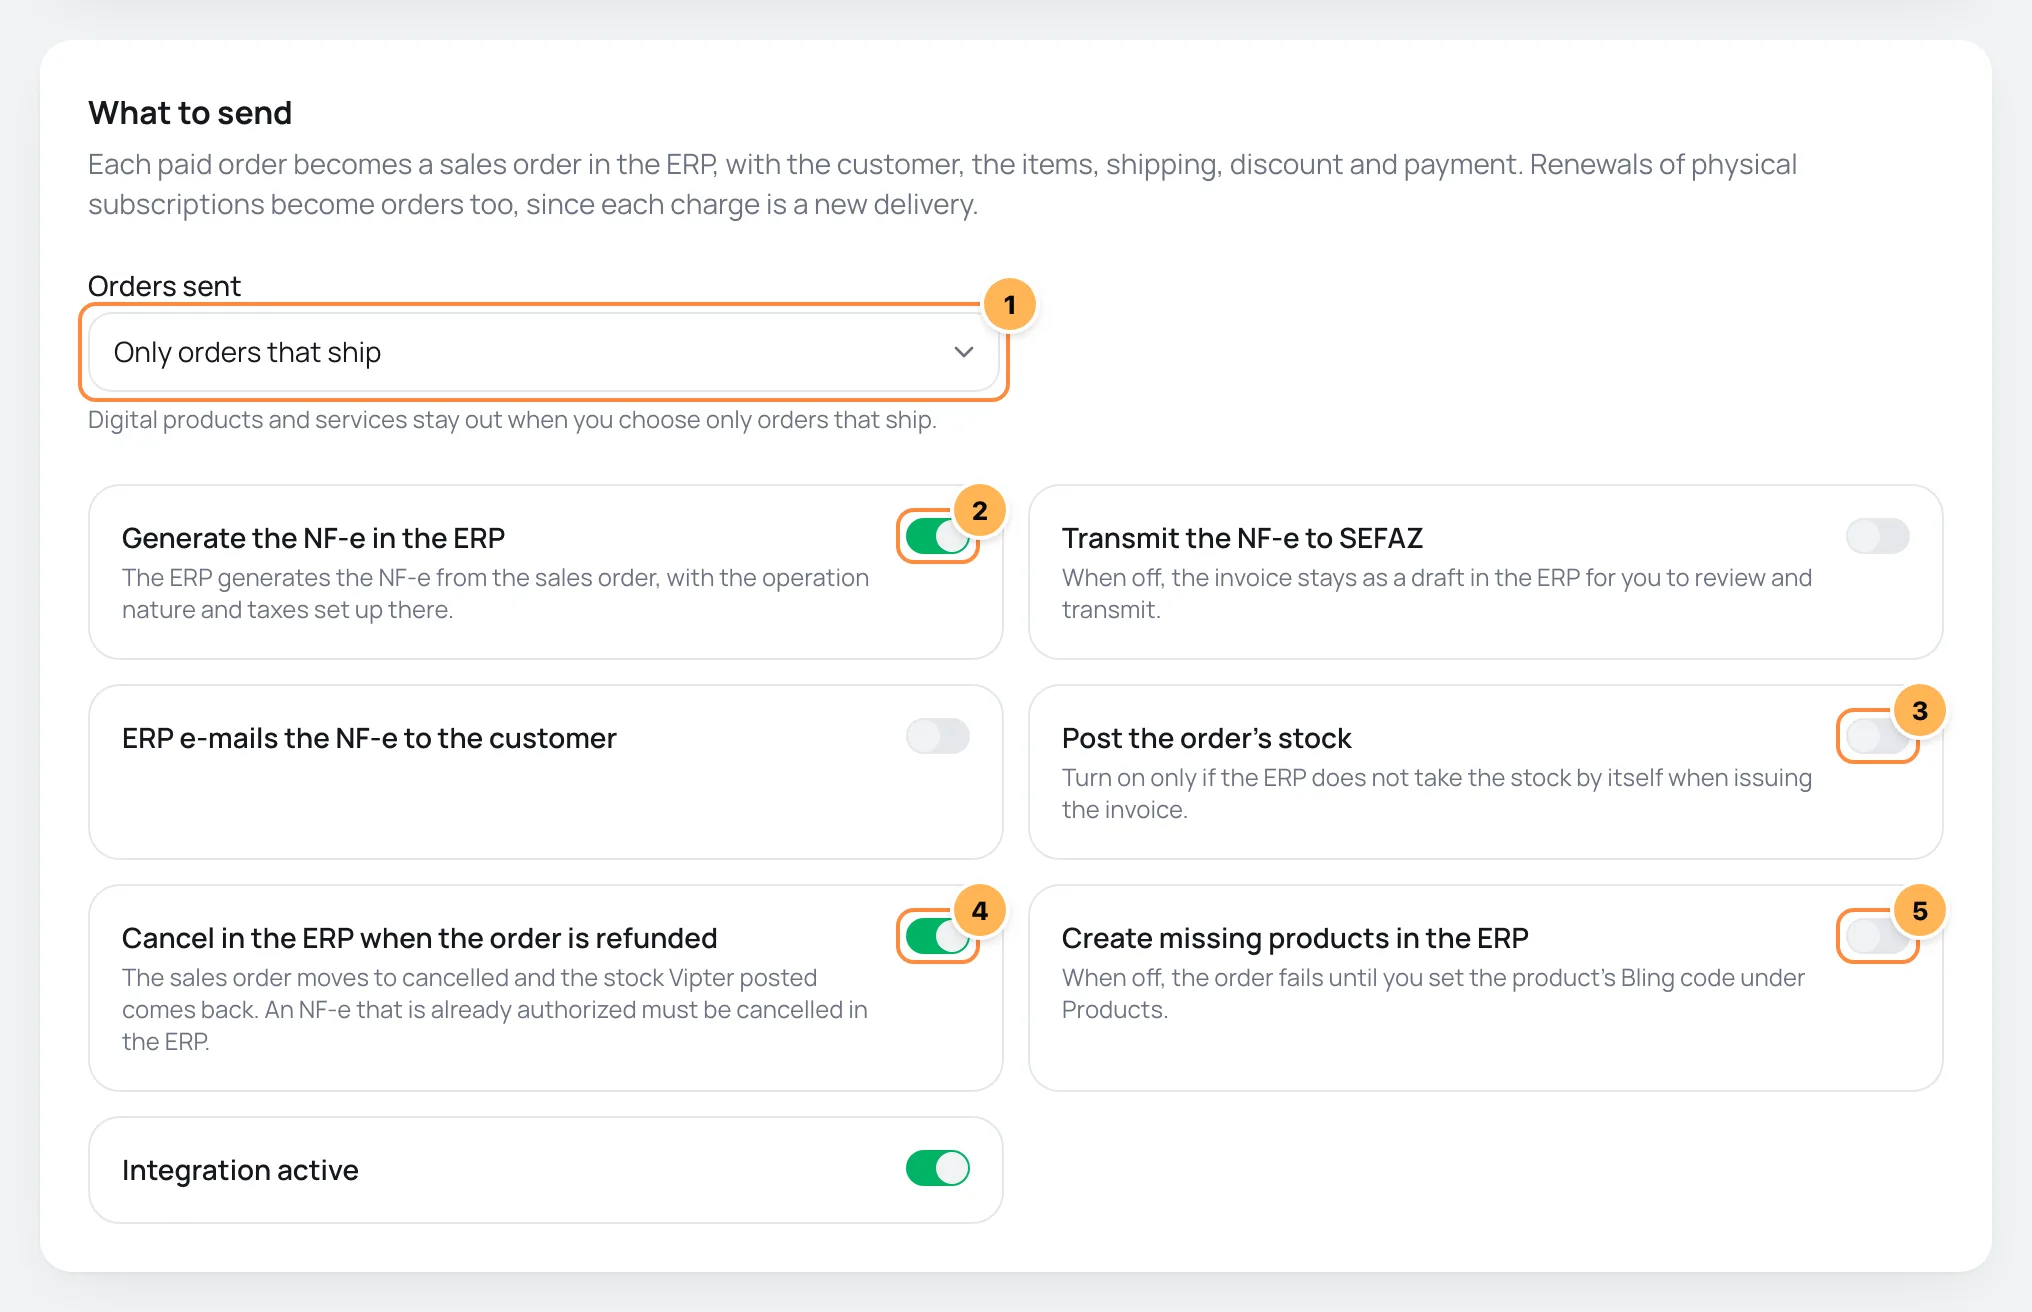
- Orders sent (1): Only orders that ship, the default, or Every paid order.
- Generate the NF-e in the ERP (2): Bling generates the NF-e of the sales order. On, Transmit the NF-e to SEFAZ shows up, to transmit right away instead of leaving a draft, along with ERP e-mails the NF-e to the customer.
- Post the order's stock (3): Vipter posts the stock movement in Bling. Turn it on only if Bling doesn't take stock out by itself when issuing the invoice.
- Cancel in the ERP when the order is refunded (4): on by default. On a full refund or a chargeback, the sales order moves to the Cancelado status and the stock posted by Vipter comes back.
- Create missing products in the ERP (5): When off, the order fails until you set the product's Bling code under Products. On, Vipter creates the missing product in Bling.
- Integration active: off, nothing goes to Bling and retries stop.
Each option is explained in how the ERP integration works.
For the first test
Leave Generate the NF-e in the ERP and Post the order's stock off. That way the first test order issues no invoice and doesn't touch the stock.
Step 5: fill in the Bling data
The ERP data card takes the numbers of records from Bling itself. Leave blank what you don't use: Vipter finds the Cancelado status and the payment methods on its own.
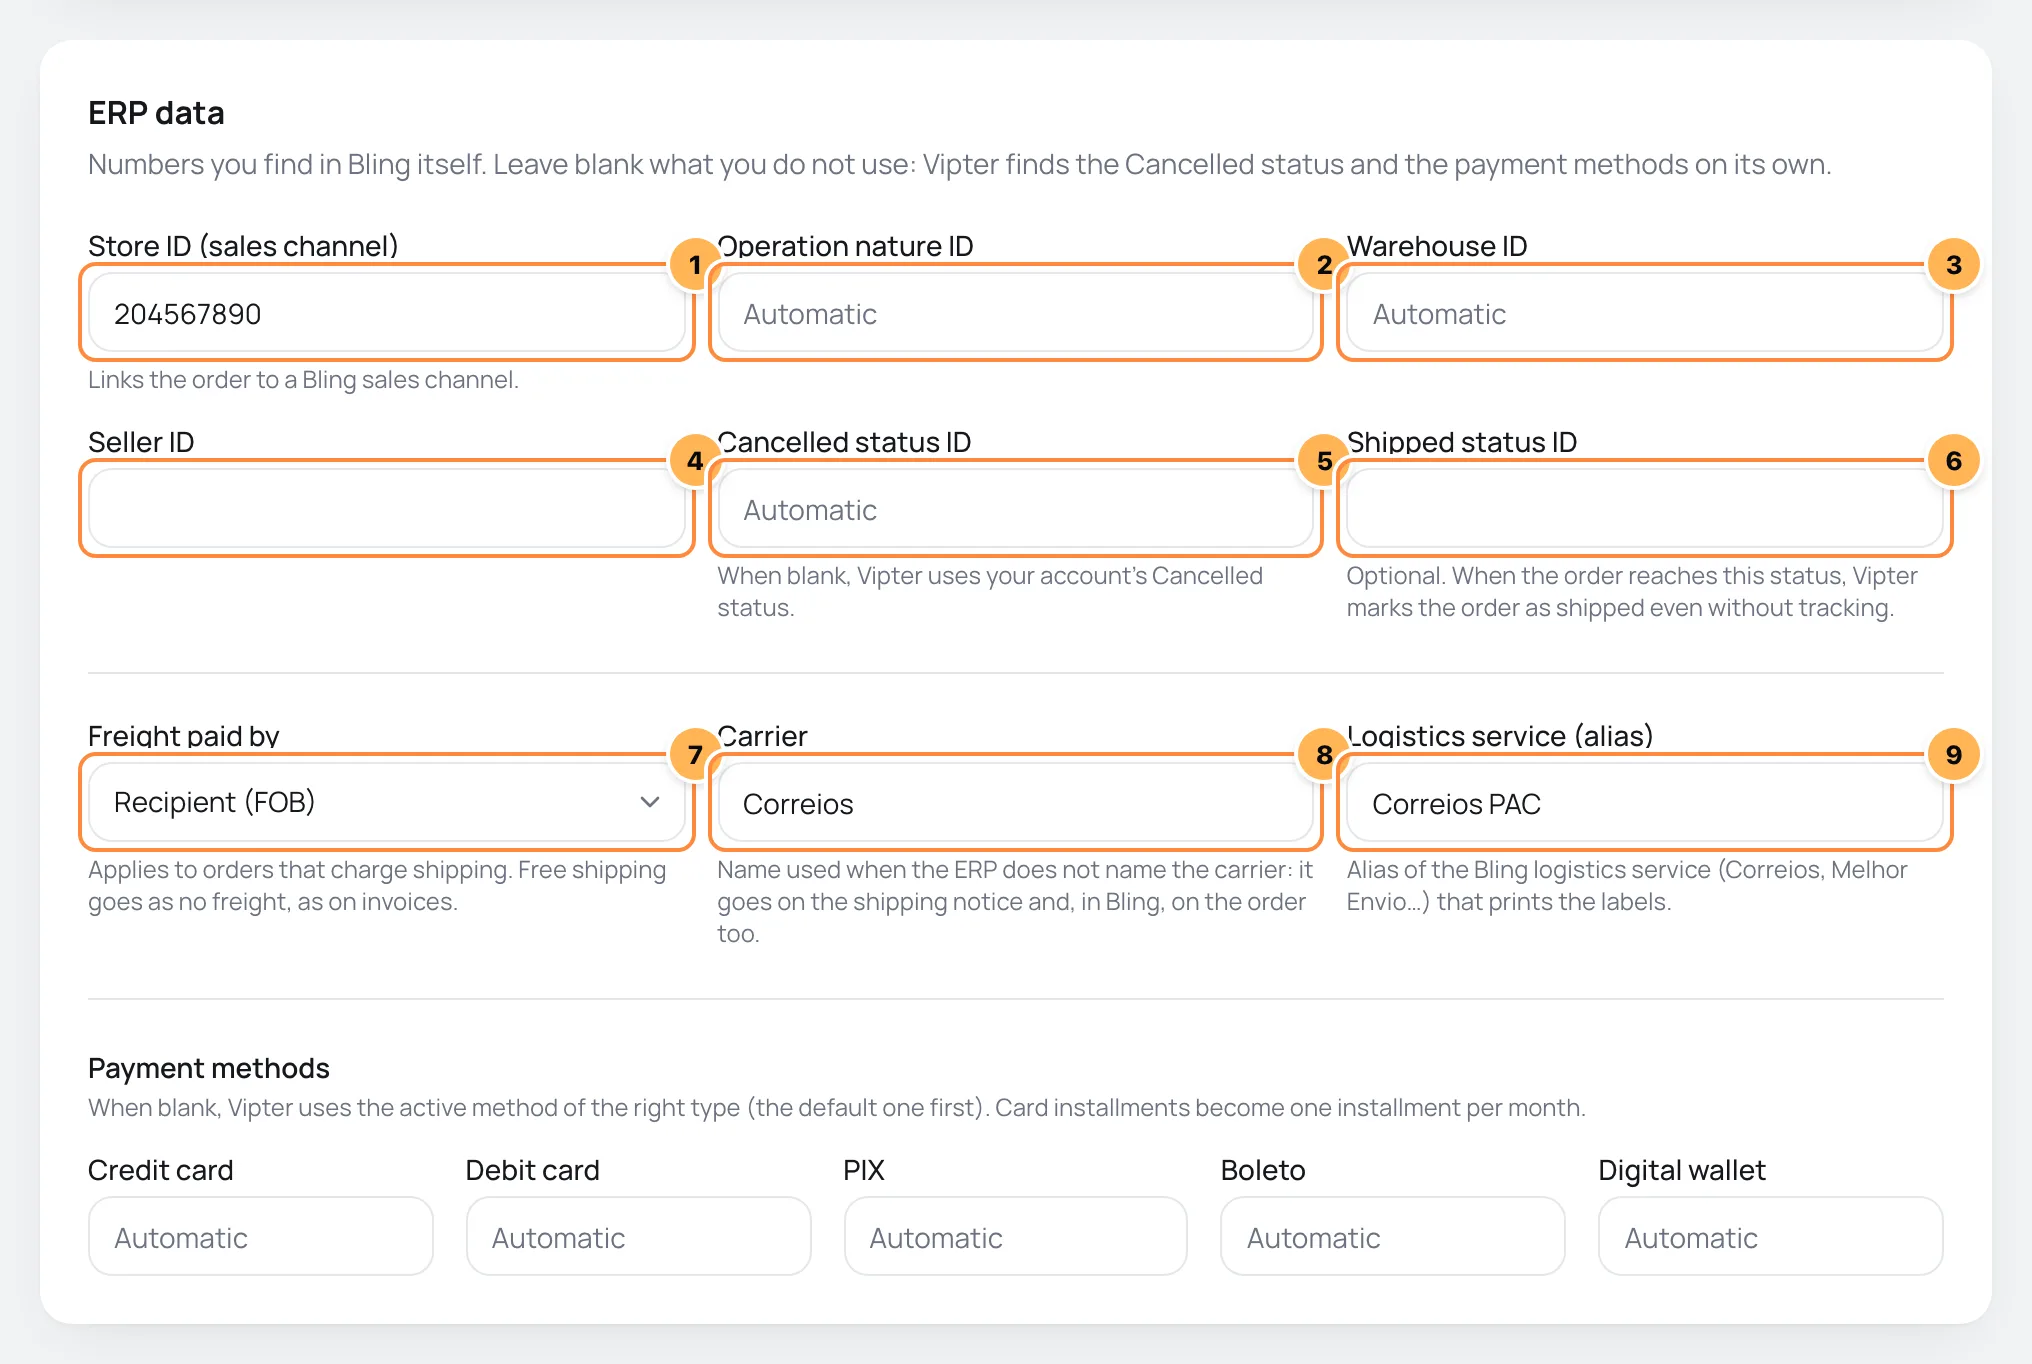
| # | Field | What to paste |
|---|---|---|
| 1 | Store ID (sales channel) | The ID of the Bling store (sales channel) that receives the orders. Blank, the order has no store. |
| 2 | Operation nature ID | The ID of the operation nature of each item, used on the NF-e. Blank, Bling uses its own settings. |
| 3 | Warehouse ID | The ID of the warehouse the stock comes out of. Blank, Bling uses its default warehouse. |
| 4 | Seller ID | The ID of the Bling seller recorded on the order. Optional. |
| 5 | Cancelled status ID | The ID of the status used on a refund. Blank, Vipter uses your account's Cancelado status. |
| 6 | Shipped status ID | Optional. When the sales order enters this status, Vipter marks the order as shipped, even without a tracking code. |
| 7 | Freight paid by | Who hires the freight when the order charges shipping: Recipient (FOB), the default, Sender (CIF) or own transport. Free shipping always goes as no freight. |
| 8 | Carrier | The carrier name that goes on the sales order and on the shipping notice, when Bling does not report another one. |
| 9 | Logistics service (alias) | The alias of the Bling logistics service, such as Correios or Melhor Envio, that generates the labels. Blank, the order goes without a service. |
Below, under Payment methods, there is one field per Vipter payment method: Credit card, Debit card, PIX, Boleto and Digital wallet. Blank, Vipter uses the active payment method of the right type, the default one first. Without any method, Bling applies its own payment terms and the order goes without installments.
All IDs take numbers only. Click Save.
Step 6: set the product codes
The Products card lists the Vipter products, the ones that ship first. Vipter finds each product in Bling by its code (SKU). When blank, the code is the product's Vipter ID.
- Next to each product, type the code it has in Bling. Leave blank the products whose code in Bling is already the Vipter ID.
- Click Save codes.
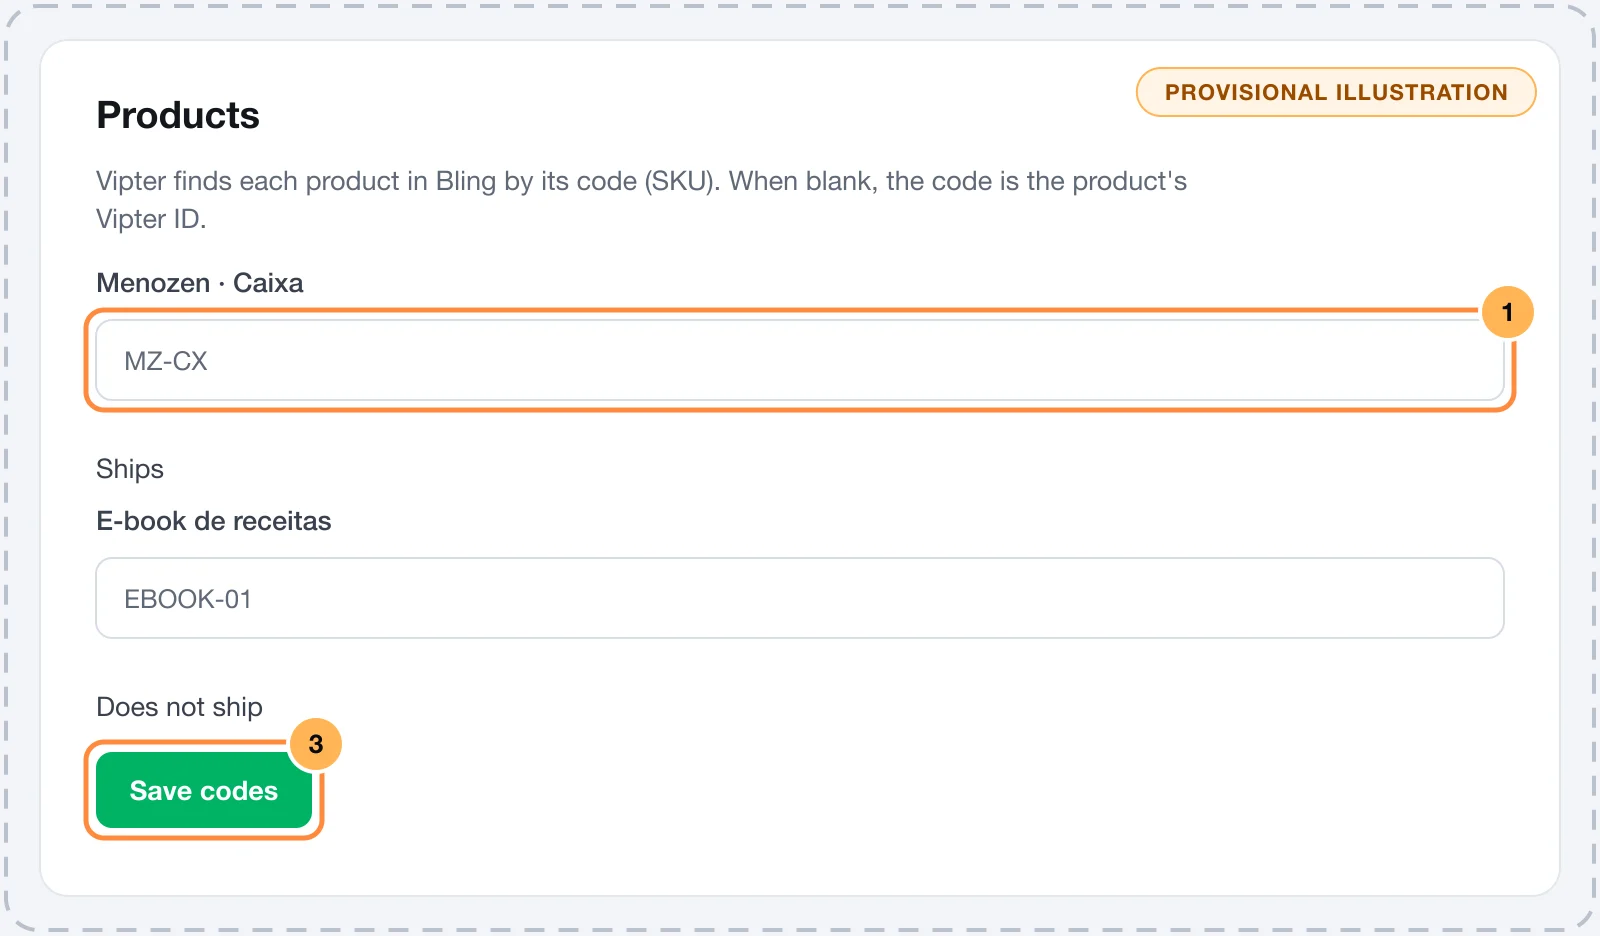
After each product's first sale, its line shows linked to ID 16123456789 in the ERP.
Step 7: test
- Click Test connection. Connection works shows up, with the company name and CNPJ.
- Make a test purchase of a product that ships, or open a paid order and click Send to Bling in the ERP card.
- See the order under Orders sent, at the end of the integration page.
It worked if
The order line shows In the ERP and Order #1042 in the ERP, and the order shows up in Pedidos de venda (sales orders) in Bling, with the Vipter order ID in the store number.
The test order is a real sales order in Bling. After checking, cancel it in Bling. With everything right, turn on the NF-e and the stock, if you will use them, and save.
Turn on, turn off and remove
- Integration active: off, nothing goes to Bling, retries stop and notifications are ignored. Orders paid in that period don't go later on their own: turn it back on and send each one from the order card.
- Remove integration: Remove the Bling integration? The connection and the history of sent orders are deleted. Orders already in the ERP stay there.
Common problems
-
The connection was not completed: the ERP did not accept the authorization code
The dashboard shows The connection did not finish: … with the reason. This reason means the Client ID or the Client Secret is wrong: copy both again from the Informações do app tab, save and click Connect to Bling.
-
After authorizing, Bling took you to another address
The app's Link de redirecionamento is different from the Redirect URL. Paste the Vipter URL into the app, save it in Bling and connect again.
-
The connection was not completed: the authorization link expired
The link is valid for 20 minutes. Click Connect to Bling again and authorize right after.
-
Enter your app's Client ID and Client Secret and save.
The app's Client ID or Client Secret is missing. Fill in both and save before connecting.
-
The card shows Expired
The Bling authorization expired. Click Reconnect and authorize again. Orders that fail in the meantime are resent later. This happens when the app was deleted or had its Client Secret changed in Bling, or when the access was revoked. Orders that use up their retries in the meantime need Resend.
-
No product with this code in the ERP. Set the code under Products or turn on product creation
Bling has no active product with the code shown in the error. Register the product in Bling or set the right code in step 6. Then click Resend.
-
The order became Failed with a message from Bling
Bling refused some data, and the message says which, such as a store or nature ID that does not exist in your account. Fix the field in step 5, save and click Resend.
-
429 errors, for the call limit
Bling accepts up to 3 calls per second per account. Vipter waits its turn between calls and tries again when Bling asks it to wait. If another system uses the same account heavily, an order may fail like this: retries solve it on their own.
-
The refund became Cancellation failed
Bling refused the status change. Check the Cancelled status ID, or leave it blank to use the Cancelado status, save and click Resend.
-
No notification received yet. Without them, Vipter checks the ERP every few hours.
Check that the URL is in the app's Webhooks tab, with Pedido de venda and Nota fiscal turned on. Bling disables a webhook that fails for days in a row: in that case, turn it on again there. If you changed the Client Secret, update it in Vipter.
What to do next
- Understand the sales order, the NF-e, refunds and retries in how the ERP integration works.
- See the ERP card on an order page in Order detail.
How the ERP integration works
Send each paid order to Bling or ERP Olist as a sales order, with optional NF-e and stock, and get the invoice and the tracking back. Learn what goes, when it goes and what to do when an order fails.
Connect ERP Olist (Tiny)
Send each paid order to ERP Olist as a sales order, with optional NF-e and stock, and get the invoice and the tracking back, with an app created in your account.