Connect Discord
Put the buyer in your Discord server with the purchase role when the sale is approved and take the role away on refund or at the end of the subscription, with your store's own application.
With Discord connected, every approved sale creates a personal link. The buyer opens the link, signs in with their Discord account and lands in your server with the purchase role. If they were already in the server, they just get the role. On refund, chargeback or at the end of the subscription, the bot takes the role away and, if you want, removes the person from the server.
Before you start, read how paid communities work.
Before you start
- A Discord server where you can manage the server, to add the bot.
- The roles each product will grant, already created in the server.
- The Admin or Owner role in the Vipter project.
- An e-mail provider connected, so the link also arrives by e-mail. See E-mails to buyers.
Step 1: create the application and the bot on Discord
- Open the Discord Developer Portal, at
discord.com/developers/applications, and click New Application. The application name shows to the buyer on the authorization screen: use the store name. - In General Information, copy the Application ID.
- In OAuth2, copy the Client Secret. If it does not show, generate a new one.
- In Bot, generate the bot token and copy it.
- In Discord, open User SettingsAdvanced and turn on Developer Mode. Then right-click your server and choose Copy Server ID.
Keep the four values for step 2.
Keep the token and the secret safe
With the bot token and the Client Secret, someone can act in your server on behalf of the application. Paste both only into Vipter. Once saved, they are not shown again: each field only shows its last characters.
Step 2: connect in Vipter
- In the Vipter dashboard, open GeneralIntegrationsCommunitiesDiscord.
- In Connection, fill in the fields:
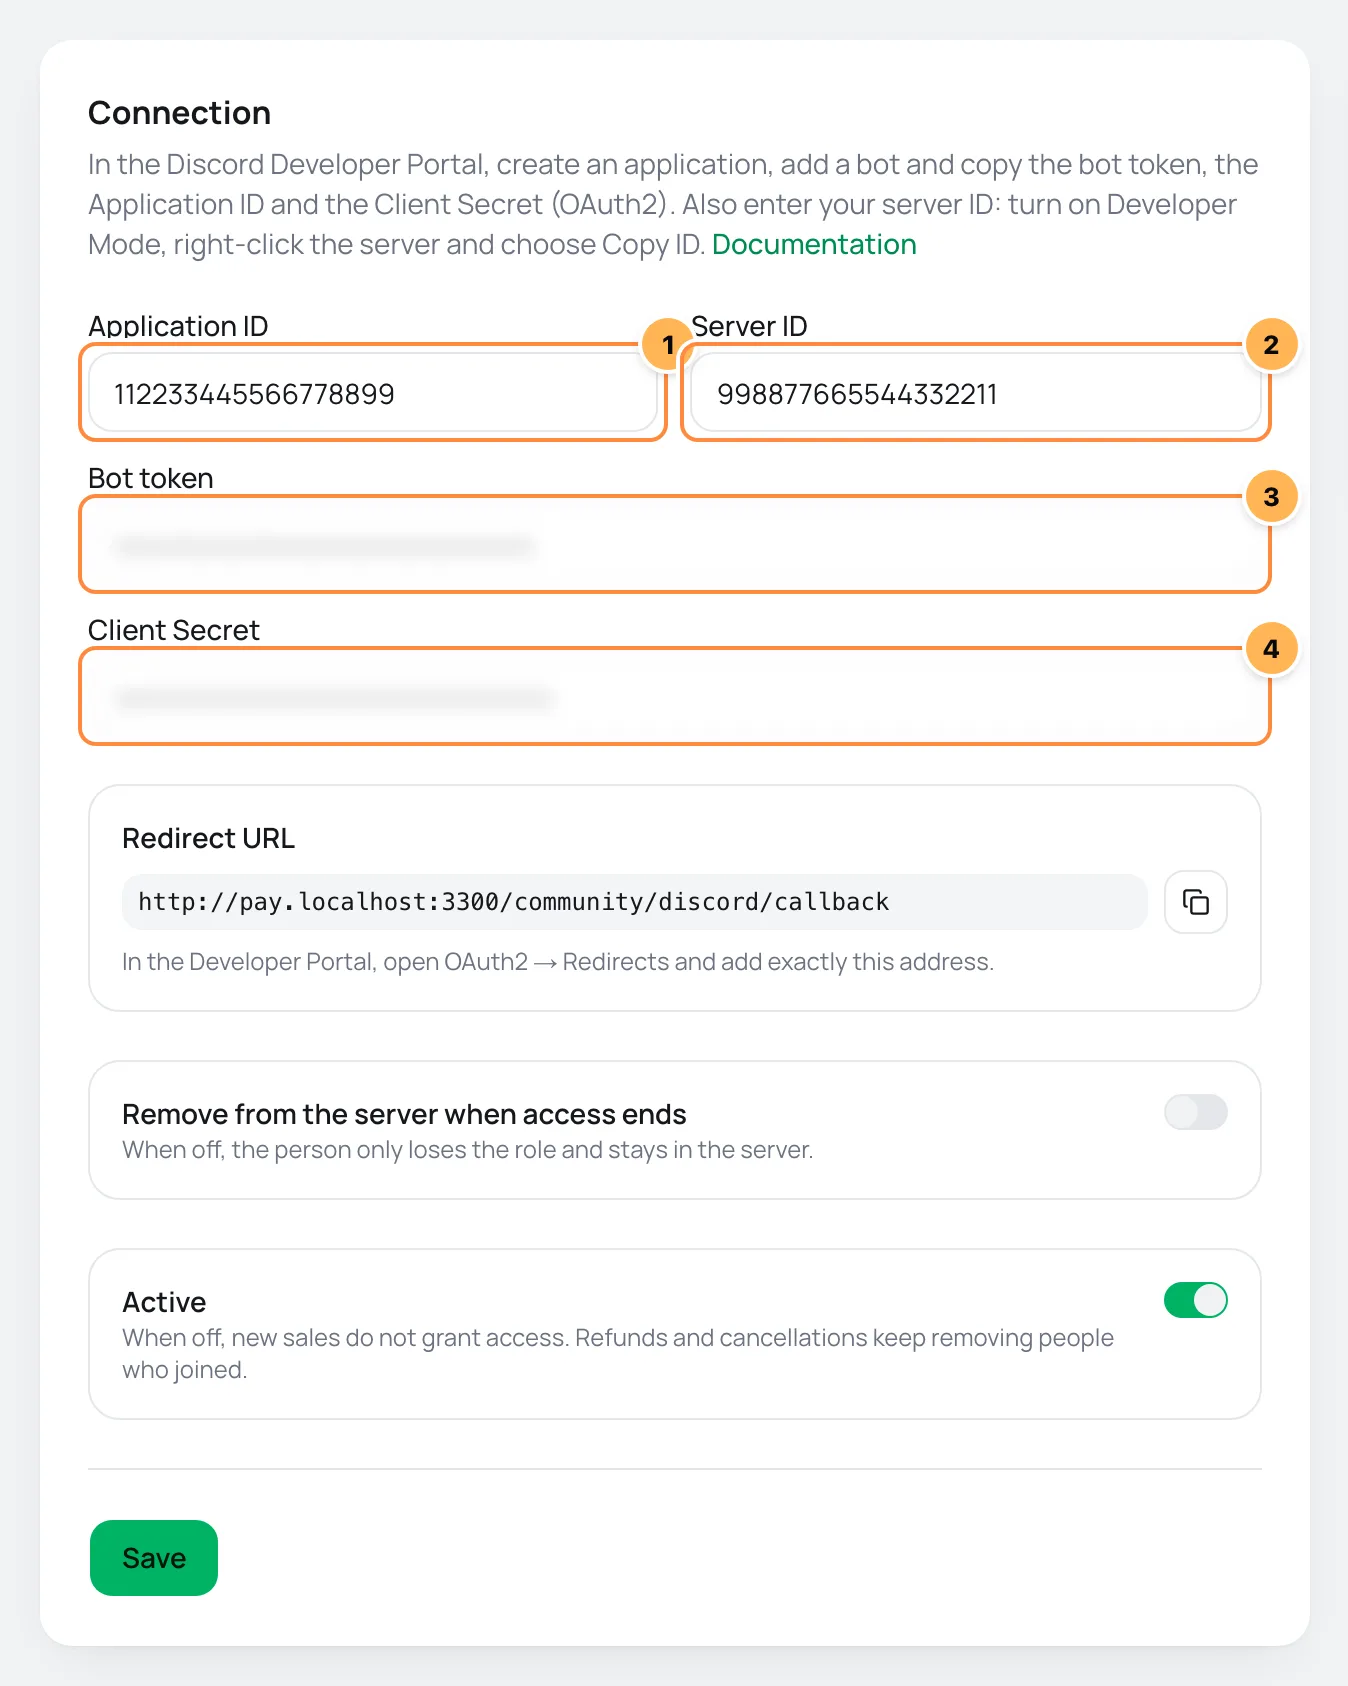
| # | Field | What to paste |
|---|---|---|
| 1 | Application ID | The Application ID from step 1. |
| 2 | Server ID | The server ID you copied with Developer Mode. |
| 3 | Bot token | The bot token. When editing later, leave it blank to keep the saved token. |
| 4 | Client Secret | The application Client Secret. When editing later, leave it blank to keep the saved value. |
- Copy the Redirect URL shown right below. In the Developer Portal, open OAuth2Redirects, add exactly that address and save.
- Turn on Remove from the server when access ends if you also want to remove the person from the server, besides the role. When off, the person only loses the role and stays in the server.
- Leave Active on and click Save.
Vipter checks the bot token, whether the Client Secret matches the Application ID and whether the bot is in the server. Since the bot has not been added yet, the connection is saved with the warning The bot is not in the server. Use the Add the bot to the server button.
Step 3: add the bot to the server
- After saving, click Add the bot to the server. Opens Discord with the permissions it needs: create invite, kick members and manage roles. Then, under Roles, drag the bot role above the roles it will hand out.
- In Discord, confirm the server and authorize.
- Go back to Vipter and click Test connection.
It worked if
The card shows the server name and Bot in the server and ready.
Step 4: put the bot's role above the store's roles
Discord only lets a bot grant roles that are below its own role.
- In the server, open Server SettingsRoles.
- Drag the bot's role, which has the application's name, above every role it will grant.
Step 5: link each offer to a role
- In Server SettingsRoles, right-click the role and choose Copy Role ID. Developer Mode must be on.
- In Vipter, in Access rules, fill in:
| # | Field | What to paste |
|---|---|---|
| 1 | Offer | The offer that grants the role. A sale of another offer of the same product also grants it. |
| 2 | Role ID | The role ID, a number with 17 to 20 digits. |
| 3 | Display name (optional) | A name to help you recognize the rule. Blank, the role name is used. |
- Click Add rule.
The bot checks that the role exists, that it has the manage roles and create invite permissions, and that its role is above. With removal from the server on, it also checks the kick members permission. If something is missing, the rule is not saved and the dashboard says what to fix.
Step 6: test
- Click Test connection. Vipter checks the bot, the server and every rule again.
- Make a test purchase of an offer with a rule and follow the link on the thank-you page, as a buyer. See Test your store.
It worked if
After signing in with Discord, the page says you are already in the server with your role, and the purchase shows in Accesses as Active.
How the buyer joins
- The buyer opens the personal link, on the thank-you page, in the e-mail or in the portal, and taps "Join with Discord".
- Discord shows your application's authorization screen, which asks to see the account and to join servers.
- After authorizing, the buyer joins the server with the purchase role and returns to the link page, which confirms it.
If they leave the server while the access is valid, they just open the link again and join. The buyer's walkthrough is in Join the community you bought.
When access ends
The bot takes away the rule's roles. With Remove from the server when access ends on, it also removes the person from the server. If Discord refuses, Vipter tries again, as explained in Follow the accesses.
Common problems
-
The token was not accepted. Check that you copied the whole token.
Generate another token on the Bot page of the Developer Portal and save. Generating a new token invalidates the previous one.
-
The Client Secret does not match the Application ID.
Check that the Application ID and the Client Secret belong to the same application.
-
The bot is not in the server. Use the Add the bot to the server button.
Do step 3.
-
Use the numeric ID (17 to 20 digits).
Copy the ID again with Developer Mode on. It is a number, without letters.
-
The role is above the bot role. In Server Settings → Roles, drag the bot role above it.
Do step 4.
-
The bot needs the Manage Roles permission.
Use the Add the bot to the server link again or give the permission to the bot's role in the server settings.
-
The bot needs the Create Invite permission to add buyers to the server.
Give the create invite permission to the bot's role.
-
The bot needs the Kick Members permission, because removal from the server is on.
Give the kick members permission to the bot's role or turn off removal from the server.
-
This role is managed by an integration and cannot be assigned.
Roles of other bots and integrations cannot be granted. Create a role of your own for the product.
-
Discord shows a redirect error to the buyer
The Redirect URL is not in OAuth2Redirects, or it was pasted differently. Copy it again from the dashboard and save it in the Developer Portal.
What to do next
- Understand what happens on each sale in How paid communities work.
- Edit the Community access e-mail in Transactional e-mails.
Connect Telegram
Grant entry to a private Telegram group or channel when the sale is approved and remove the person on refund or at the end of the subscription, with your store's own bot.
Invoices: how they work
Learn when Vipter issues and cancels NF-e and NFS-e through Notazz, eNotas or PlugNotas, which fiscal defaults to set up and how to follow each order's invoices.